Showing posts with label Web Part. Show all posts

Monday, June 3, 2013

TIP: How to Change DVWP Column Titles

Introduction

There are a couple of ways in which you can change the title of a Data View Web Part column in SharePoint 2010.  You can simply select and delete the column title and then enter your own.  You can also take the more elegant approach and edit the XSL that generates the column title.  The latter approach will be shown here.  It employs SharePoint Designer 2010.

Procedure
  1. Using SharePoint Designer 2010, open the page containing the DVWP.
  2. In Code View, search for the following string:
    <xsl:call-template name="YourFieldTemplate"...
    
  3. Within this group, look for the following line:
    <xsl:with-param name="fieldtitle" select="fieldtitlename" />
    
    to
    <xsl:with-param... select="YourCustomFieldName" />
    
Summary

Happy Coding!

TIP: How to Change a DVWP field to Configurable QueryString Hyperlink

Introduction

If you're building dynamic pages employing query-strings methods, you may want to employ the Data View Web Part (DVWP) to generate a list of query string hyperlinks in order to build master-detail pages and other custom dashboards.  The problem is, the DVWP doesn't present fields as hyperlinks OOTB and the hyperlink options are limited.  Additionally, the DVWP doesn't identify individual fields in the XML markup that you can modify.  However, using SharePoint Designer 2010, you can make Designer expose the XML to the fields you want to modify as hyperlinks. The following procedure shows you how.

This procedure assumes that you already have an ASPX page that you want to modify and that you have already dropped on DVWP onto this page and connected it to a list.

Procedure

1) In the DVWP, select the field that you want to turn into a query string hyperlink. 

Selecting the field causes a Tasks link to appear next to the field: Common xsl:value-of Tasks.  Alternatively, you can right-click the selected field, which opens a popup menu.

2) From the Tasks menu, choose Show Link to Item.  This changes the field into a hyperlink that points to a form. 

Don't worry about the extra XML: you can remove it.  More importantly, this action causes SharePoint Designer to modify the underlying XMLso that the appropriate XMLfield is exposed so that you can edit it.

3) Review the code and look for the fieldname associated with the field you selected.  You should find something like:
$thisNode/ @ FieldName
(NOTE: there are no spaces before and after the "@".  These spaces were added to prevent this HTML editor from automatically configuring this as an email address.)
Remove the XML that points to a new form.  This line is now ready for you to modify as needed in order to implement it as a query string.

Summary

In this posting, you have explored how to use SharePoint Designer 2010 to expose the XML associated with a specific DVWP field so that you can modify this field XML as a hyperlink.

Further Reading

Sunday, June 2, 2013

Using the Chart Web Part: Tips and Procedures

Introduction

This posting consolidates notes on using the Chart web part.  It includes notes for both 2010 and 2013.  In most cases, notes written for 2010 can be applied to 2013.

Deploying the Chart Web Part

The Chart web part is immediately available in the Enterprise version of SharePoint 2010 [1,3].  However, it is also available in the Standard version if you know how.  To make it available in SharePoint 2010 Standard, you will need to specifically add the web part to the site collection from the Web Parts list [2].  To do this, go:

[yoursharepointsite]/_layouts/NewDwp.aspx

This takes you to the undocumented page, Web Part Gallery.  Scroll down until you find the Chart web part.  Select its checkbox, and then click the Populate Gallery button at the top of the page.  Now go back to your draft page, and again work through the process of adding a web part to a page [3].

Add Axis Interlacing (Bands)

Configure an Alternating Bands (Banded) Background

1) Go to Advanced Properties
2) Select Chart Areas
3) From the Axis menu, select the desired axis
4) Scroll down until you find the Appearance group of settings, and then set Interlaced = TRUE
5) Also in this group, set the InterlaceColor = [desired color]

Angle Axis Labels

1) Go to Advanced Properties
2) Select Chart Areas
3) From the Axis menu, select the desired axis
4) Scroll down until you find the Labels group, and then set Angle = [desired angle]

Hide the Data & Appearance Advanced Properties toolbar

1) Open the page in SharePoint Designer
2) Locate the Chart View Web part in Code View
3) Search for ShowToolbar, and set it to False.

Cannot remove second chart area
  1. Re-assign any series currently assigned to the second chart area back to the first.
  2. Remove any titles assigned to the second chart area.
  3. For both chart areas, for the Alignment settings, set the AlignWithChartArea back to NotSet.
  4. Not ensuring these settings changes will cause any attempt to delete the second chart area to fail.

References
  1. SharePoint Config Blog: SharePoint 2010 Web Parts by License Type
  2. Al's Tech Tips: SharePoint 2010 Shortcuts and General Aids
  3. SharePoint 2010’s Chart Web Part
  4. Microsoft Office: Introduction to the Chart Web Part
  5. SharePoint Solutions: The New Chart Web Part in SharePoint 2010

Search not Indexing Webpart Content

Problem

You have a SharePoint 2010 farm.  You use unique permission settings in some sites for some pages and web parts.  You create new pages and content, using Dataview, Content, and other web parts.  You run a SharePoint 2010 Search crawl of the new content. You check the crawl and discover that the pages are being crawled, but discover that the new content is not being indexed. You investigate this further and find that all new content on all pages is not being crawled.

Solution

The problem likely involves the site settings Search and Offline Availability.  The setting can be found here:
Site Actions > Site Settings > Site Admin > Search and offline availability
By default, the Indexing ASPX Page Content setting is set to Do not index Web Parts if this site contains fine-grained permissions. OOTB, this settings causes no problems.  However, once you begin to implement unique permissions for some sites, such as for example, hiding content on some pages from some user groups, this setting becomes problematic.  Once unique permissions are implemented, the NOINDEX property is set for web parts.

The solution is simple: set the Search and offline availability setting to Always index all Web Parts on this site.  Then re-run the crawl.

References

Sunday, May 5, 2013

SharePoint 2010 SPSecurityTrimmedControl Permissions Enumeration

Introduction

When working with the SPSecurityTrimmedControl, it can be tricky knowing what combination of permissions to employ in order to accomplish the desired security trimming.  The Enumeration List below can help you make that determination easily.  This listing shows the combination of permissions to use to enable Visitors, Contributors, Designers, and/or Owners (full control) to view the items trimmed by this control.

Enumeration List
 
Group Permissions Name Description V C D O
List ManageLists Create and delete lists, add or remove columns in a list, and add or remove public views of a list.       X
List CancelCheckout Discard or check in a document which is checked out to another user.     X X
List AddListItems Add items to lists, add documents to document libraries, and add Web discussion comments.   X X X
List EditListItems Edit items in lists, edit documents in document libraries, edit Web discussion comments in documents, and customize Web Part Pages in document libraries.   X X X
List DeleteListItems Delete items from a list, documents from a document library, and Web discussion comments in documents.   X X X
List ViewListItems View items in lists, documents in document libraries, and view Web discussion comments. X X X X
List ApproveItems Approve a minor version of a list item or document.     X X
List OpenItems View the source of documents with server-side file handlers. X X X X
List ViewVersions View past versions of a list item or document. X X X X
List DeleteVersions Delete past versions of a list item or document.   X X X
List CreateAlerts Create e-mail alerts. X X X X
List ViewFormPages View forms, views, and application pages, and enumerate lists. X X   X
Site ManagePermissions Create and change permission levels on the Web site and assign permissions to users and groups.       X
Site ViewUsageData View reports on Web site usage.       X
Site ManageWeb Grant the ability to perform all administration tasks for the Web site as well as manage content. Activate, deactivate, or edit properties of Web site scoped Features through the object model or through the user interface (UI). When granted on the root Web site of a site collection, activate, deactivate, or edit properties of site collection scoped Features through the object model. To browse to the Site Collection Features page and activate or deactivate site collection scoped Features through the UI, you must be a site collection administrator.       X
Site ManageSubWeb Create subsites such as team sites, Meeting Workspace sites, and Document Workspace sites.       X
Site AddAndCustomizePages Add, change, or delete HTML pages or Web Part Pages, and edit the Web site using a SharePoint Foundation–compatible editor.     X X
Site ApplyThemeAndBorder Apply a theme or borders to the entire Web site.     X X
Site ApplyStyleSheets Apply a style sheet (.css file) to the Web site.     X X
Site CreateGroups Create a group of users that can be used anywhere within the site collection.       X
Site BrowseDirectories Enumerate files and folders in a Web site using Microsoft Office SharePoint Designer 2007 and WebDAV interfaces   X X X
Site CreateSSCSite Create a Web site using Self-Service Site Creation.        
Site ViewPages View pages in a Web site. X X X X
Site EnumeratePermissions Enumerate permissions on the Web site, list, folder, document, or list item.       X
Site BrowseUserInfo View information about users of the Web site. X X X X
Site ManageAlerts Manage alerts for all users of the Web site.       X
Site UseRemoteAPIs Use SOAP, WebDAV, or Microsoft Office SharePoint Designer 2007 interfaces to access the Web site. X X X X
Site UseClientIntegration Use features that launch client applications; otherwise, users must work on documents locally and upload changes. X X X X
Site Open Allow users to open a Web site, list, or folder to access items inside that container. X X X X
Site EditMyUserInfo Allows a user to change his or her user information, such as adding a picture.   X X X
Site ManagePersonalViews Create, change, and delete personal views of lists.   X X X
Site AddDelPrivateWebParts Add or remove personal Web Parts on a Web Part Page.   X X X
Site UpdatePersonalWebParts Update Web Parts to display personalized information.   X X X

References

Sunday, September 2, 2012

TIP: Hiding DataView Web Part Checkboxes

Introduction

Its frequently the case that when you insert a Listview or Dataview web part onto a SharePoint 2010 page, you don't want the "item checkboxes" to appear.  The reason being that they can take up valuable space on the page and they can sometimes skew the appearance and placement of items in the list.  Removing this checkbox is easily accomplished, and there is plenty of discussion providing details for removing them by adding the "TabularView" parameter to the  <View > sub node of the <XmlDefinition> node and setting this parameter to "FALSE" [1, 2, & 3] like so:
<View Name=... TabularView="FALSE"...
However, there really is no need to do any code modification.  All you really have to do is to make a settings change to the list's application page, and then re-insert the Dataview web part; or make the settings change before you even insert the DataView web part, and then you won't have to fiddle with the web part again.

Discussion

By default, a view of a list, on the list's application page, provides checkboxes (shown at leftmost column) enabling multiple list rows to be selected.  By default, the tabular view is enabled.  This causes checkboxes to be displayed in the list. This allows, for example, for multiple list rows to be deleted simultaneously.  When you insert a DataView web part into a page, and then connect it to a list, that web part is configured per the list's default view. 

You can see this by looking at the <View> subnode of the dataview's <XmlDefinition> node.  This subnode incorporates all of the configuration parameters of the list's view.  Note the Name parameter: this is the object name of the view.  Listed here as subnodes of the <View> node, will be all of the fields displayed by the view.

Once you insert a DataView web part, SharePoint Designer takes a snapshot of the current view's properties, and then builds the web part code and inserts it into the ASPX page.  This is a static snapshot, not a dynamic one.  Once SharePoint Designer 2010 inserts the parameters for the web part, that's it: it doesn't do anything more.  The XSL for that web part is frozen.  Therefore, if you later make a change to the view that the web part connects to, such as changing the Tabular View parameter, in the view's Settings page, that change will not be reflected in the DataView web part.  To reflect that change in the web part, you will either need to adjust the parameter manually, by editing the code, or by re-inserting the web part.

Summary

This TIP showed you how to remove the checkboxes displayed next to items listed in a ListView or DataView web part.  Specifically, it discussed why the checkboxes appear and how to remove them either in code or in the list's view settings.  Happy Coding!

References

  1. XsltListViewWebPart – remove checkboxes
  2. Hide the item checkboxes and the select all checkbox in list view webparts
  3. Remove checkbox next to list items XSLT List view webpart Sharepoint 2010

Tuesday, March 27, 2012

SharePoint 2010 Health Analyzer: Missing server side dependencies

Problem

You find the following entry (in whole or in part) in the SharePoint 2010 Central Administration Review problems and solutions All Reports listing:

TitleMissing server side dependencies.
Severity1 - Error
CategoryConfiguration
Explanation[MissingWebPart] WebPart class [baf5274e-a800-8dc3-96d0-0003d9405663] is referenced [22] times in the database [CentralAdminContentDatabase], but is not installed on the current farm. Please install any feature/solution which contains this web part. One or more web parts are referenced in the database [CentralAdminContentDatabase], but are not installed on the current farm. Please install any feature or solution which contains these web parts.
[MissingWebPart] WebPart class [9eba9c17-3b89-a2e7-a3cf-0ee3d7c2adb1] (class [Microsoft.Office.Server.Search.WebControls.SearchTopologyView] from assembly [Microsoft.Office.Server.Search, Version=14.0.0.0, Culture=neutral, PublicKeyToken=71e9bce111e9429c]) is referenced [1] times in the database [CentralAdminContentDatabase], but is not installed on the current farm. Please install any feature/solution which contains this web part. One or more web parts are referenced in the database [CentralAdminContentDatabase], but are not installed on the current farm. Please install any feature or solution which contains these web parts.
[MissingWebPart] WebPart class [b36f9dfe-325a-1b44-e6bb-645dcf79c770] (class [Microsoft.Office.Server.Search.WebControls.FarmSystemStatus] from assembly [Microsoft.Office.Server.Search, Version=14.0.0.0, Culture=neutral, PublicKeyToken=71e9bce111e9429c]) is referenced [1] times in the database [CentralAdminContentDatabase], but is not installed on the current farm. Please install any feature/solution which contains this web part. One or more web parts are referenced in the database [CentralAdminContentDatabase], but are not installed on the current farm. Please install any feature or solution which contains these web parts.
[MissingWebPart] WebPart class [9f56656f-6aa3-0d55-a812-711bf65864ea] is referenced [107] times in the database [CentralAdminContentDatabase], but is not installed on the current farm. Please install any feature/solution which contains this web part. One or more web parts are referenced in the database [CentralAdminContentDatabase], but are not installed on the current farm. Please install any feature or solution which contains these web parts.
[MissingWebPart] WebPart class [926a1a3e-d1ff-f58f-8b3a-854974660703] (class [Microsoft.Office.Server.Search.WebControls.ContentSourcesStatus] from assembly [Microsoft.Office.Server.Search, Version=14.0.0.0, Culture=neutral, PublicKeyToken=71e9bce111e9429c]) is referenced [1] times in the database [CentralAdminContentDatabase], but is not installed on the current farm. Please install any feature/solution which contains this web part. One or more web parts are referenced in the database [CentralAdminContentDatabase], but are not installed on the current farm. Please install any feature or solution which contains these web parts.
[MissingWebPart] WebPart class [de8c8afc-7c6e-e9fc-91c2-aa4a291c3623] (class [Microsoft.Office.Server.Search.WebControls.SearchApplicationSystemStatus] from assembly [Microsoft.Office.Server.Search, Version=14.0.0.0, Culture=neutral, PublicKeyToken=71e9bce111e9429c]) is referenced [1] times in the database [CentralAdminContentDatabase], but is not installed on the current farm. Please install any feature/solution which contains this web part. One or more web parts are referenced in the database [CentralAdminContentDatabase], but are not installed on the current farm. Please install any feature or solution which contains these web parts.
[MissingWebPart] WebPart class [5cc5df3a-29a8-a713-5898-e52e2dce72a8] (class [Microsoft.Office.Server.Search.WebControls.SearchApplicationShortcutsList] from assembly [Microsoft.Office.Server.Search, Version=14.0.0.0, Culture=neutral, PublicKeyToken=71e9bce111e9429c]) is referenced [1] times in the database [CentralAdminContentDatabase], but is not installed on the current farm. Please install any feature/solution which contains this web part. One or more web parts are referenced in the database [CentralAdminContentDatabase], but are not installed on the current farm. Please install any feature or solution which contains these web parts.
[MissingWebPart] WebPart class [874f5460-71f9-fecc-e894-e7e858d9713e] is referenced [65] times in the database [CentralAdminContentDatabase], but is not installed on the current farm. Please install any feature/solution which contains this web part. One or more web parts are referenced in the database [CentralAdminContentDatabase], but are not installed on the current farm. Please install any feature or solution which contains these web parts.
[MissingWebPart] WebPart class [ff79cbb5-48cf-96ee-3f74-f22cc1b00fbd] (class [Microsoft.Office.Server.Search.WebControls.FarmSearchApplicationList] from assembly [Microsoft.Office.Server.Search, Version=14.0.0.0, Culture=neutral, PublicKeyToken=71e9bce111e9429c]) is referenced [1] times in the database [CentralAdminContentDatabase], but is not installed on the current farm. Please install any feature/solution which contains this web part. One or more web parts are referenced in the database [CentralAdminContentDatabase], but are not installed on the current farm. Please install any feature or solution which contains these web parts.
RemedyFor more information about this rule, see "http://go.microsoft.com/fwlink/?LinkID=142689".
Failing Servers 
Failing ServicesSPTimerService (SPTimerV4)
Rule SettingsView
 
Additionally, in the Windows Server Application log, you may find related error events.

Solution
  1. Launch Central Administration.
  2. Navigate to: General Application Settings > Search > Farm Search Administration. 
  3. Refresh the page.
  4. Navigate to: General Application Settings > Farm Search Administration > Search Administration.
  5. Refresh the page.
  6. Navigate to: Monitoring > Health Analyzer > Review problems and solutions.
  7. Click on the error, Missing server side dependencies.
  8. Click the Re-analyze Now button.
  9. Click Close.
  10. Wait a minute or two.
  11. Click the error link again.
References
  1. Missing Server Side Dependencies - 8d6034c4-a416-e535-281a-6b714894e1aa
  2. MSDN Blogs: SharePoint 2010: Missing Server Side Dependencies
  3. Microsoft TechNet: Web Part Error on a clean SP2010 install in Document Center
  4. Microsoft SharePoint Products
  5. SharePoint 2010: Missing Server Side Dependencies
  6. [MissingWebPart] WebPart class [baf5274e-a800-8dc3-96d0-0003d9405663] is referenced [25] times in the database
  7. Health Analyzer showing “missing server side dependency” after performing In-Place upgrade
  8. [MissingWebPart] WebPart class [8d6034c4-a416-e535-281a-6b714894e1aa] is referenced [6] times
Notes
  • See the references above for additional technical detail on this error.
  • UPDATE (10/11/12): I've added some additional references you may find useful on this error.  Note that it's not limited to just the pages discussed above but may occur on other pages and involve other web parts.  The error does not appear to indicate actual loss of functionality that I have been able to tell and thus I recommend disabling the rule for now, as I do for my customer.
  • UPDATE (3/4/14): I have found that just navigating to the page isn't always sufficient to resolve this error.  Instead, I found that refreshing the page once or twice after navigating to it ensured that the error was resolved.
  • UPDATE (3/17/14): This error re-appeared. Performed same procedure to resolve. Unclear why the circumstances generating this error should manifest themselves again.

Sunday, March 27, 2011

SharePoint 2007: How to Integrate Virtual Earth with Lists

Introduction

In this procedure, you'll explore step-by-step how to integrate the Microsoft Virtual Earth map control with a contact list in SharePoint Server 2007 Enterprise in order to present a map to the user of a particular contact clicked on in the Contact list.  Much of the information has already been presented [1] and updated [2].  This procedure enhances these discussions by providing step-by-step directions along with screen captures involved with successfully implementing this control.  Refer to the Virtual Earth SDK links for additional detail on map control functionality.  Tools that you'll need for this procedure include SharePoint Designer 2007 and designer access to the SharePoint instance you want to work with.  You'll also be working with the data view web part.  This procedure is divided into three phases: 1) building the web part, 2) adding the XSL, and 3) associating the XSL with the data view.  Good luck!

Procedure

Phase 1: Build the Data View Web Part

To being this procedure, I have created a small contact list of McDonalds locations in the Arlington Virginia area.  The addresses of these locations are real. However, the contact names, titles, and email addresses are entirely fictional.


Open SharePoint Designer 2007, and then connect to the website you want to work with.


In the Folder List pane, open up Lists > Contacts and then select DispForm.aspx.  This is the display form for the Contacts list.


Double-click this object to expose its designer and code-behind pages.  This page currently contains the list view web part.  You'll place the data view web part below this one.


In the Data Source Library task pane, at right, drag the Contacts list and drop it below the list for web part on the Designer page. After a few moments, you'll see a new list appear displaying the first few lines of the Contacts list.


A Common Data View Tasks menu also appears, listing the various tasks you can do with the currently selected web part.  On this menu, click Filter.


On this dialog, select Field Name ID, Comparison Equals, and then select Value Create New Parameter.  Another dialog appears.


 Change Param1 to ContactID, and then select Parameter Source Query String.  For the Query String Variable, enter ID; and for its Default Value, enter 1.  Click OK.


Note that the Value is now ContactID.  Click OK again.


Phase 2: Add the XSL.

Download the file available here:
LiveMaps.xsl
In SharePoint Designer, from the File menu, point to Import and then select File.  Navigate to the file you just downloaded, and then click OK.  Move this file into the Contacts folder, given that this XSL will only be used in association with the Contacts list.  For additional details on the Virtual Earth mapping functions used in this XSL, consult references [3], [4], and [5] below.

Phase 3: Associate the XSL with the Data View Web Part

Right-click anywhere on the data view web part.


From the context menu, select Web Part Properties.


Open up the Miscellaneous group.


Click in the XSL Link box in order to put the cursor there.  Then click on the button that appear to the right of this text box after you do this.


Navigate to the Contacts list, and then select the XSL object you recently place there.  Then click OK.


Note that the Designer page has changed.  Now click the Save button in the SharePoint Designer toolbar.  You'll be presented with some warnings regarding making changes to this page.  Click OK through these.  Next in your SharePoint collection navigate to the Contacts list and then click on any name listed.


You'll see the usual display form.  But then if you scroll down a bit you'll see the map.


If you hover your cursor over the pushpin, a popup will appear displaying what information was provided to it, in this case just the last name.  Review [3] to learn how to add additional information to this pushpin, including full name, a photo, address, etc.  Happy computing!

References
  1. How to Integrate Virtual Earth Maps with a SharePoint List
  2. Virtual Earth API 6.2 with SharePoint
  3. MSDN: VEPushpin Constructor
  4. MSDN: VEMap.Find Method
  5. MSDN: VEMap.LoadMap Method
  6. Virtual Earth Maps on SharePoint
  7. Windows SharePoint Services Document: Application Templates for Windows SharePoint Services 3.0 – Under the Hood
Notes
  • none

Saturday, March 26, 2011

SharePoint 2007: Creating a Data View Step-by-Step

Introduction

In this procedure, you'll be shown step-by-step how to build a customized view of live data, referred to as a data view or also the data view web part. In this procedure, you will add a new page to your SharePoint instance that contains a custom data view onto XML data available over the Internet.  You'll do this in three phases: 1) create data connections, 2) build the data view, 3) add the new page and its data view to SharePoint so that it can be viewed by others.  This walkthrough was performed on SharePoint Server 2007 Enterprise hosted on Windows Server 2003 Enterprise Edition.  Good Luck!

Procedure

Phase 1: Create Data Connections

Launch SharePoint Designer.


From the Data View menu select Manage Data Sources


Notice how the right task pane changed.  It now displays the Data Source Library.  Now we need to obtain an XML data source.  News sources come in both RSS and XML formats.  We'll take the XML format.  A list of News source feeds is available at [5]. 


Let's select the BBC News Headlines feed:
http://www.bbc.co.uk/syndication/feeds/news/ukfs_news/front_page/rss091.xmlNow click the link Add an XML file... displayed in the Data Source Library task pane and then past in the XML news feed link:


After you added the data feed it will appear under the XML Files group in the Data Source Library:


You can do this with any XML data feed.  For example NOAA has a number of data feeds [6].  Here are weather data feeds for the State of Maine:


You can also add database connections and connections to other SharePoint libraries.  For the purposes of this procedure we'll focus on XML data feeds.  Now hover the cursor over the data feed item you just added.  If you were following this procedure that would be rss091.  And then clock the down arrow.  This will open a list of task that you can perform.


Select 
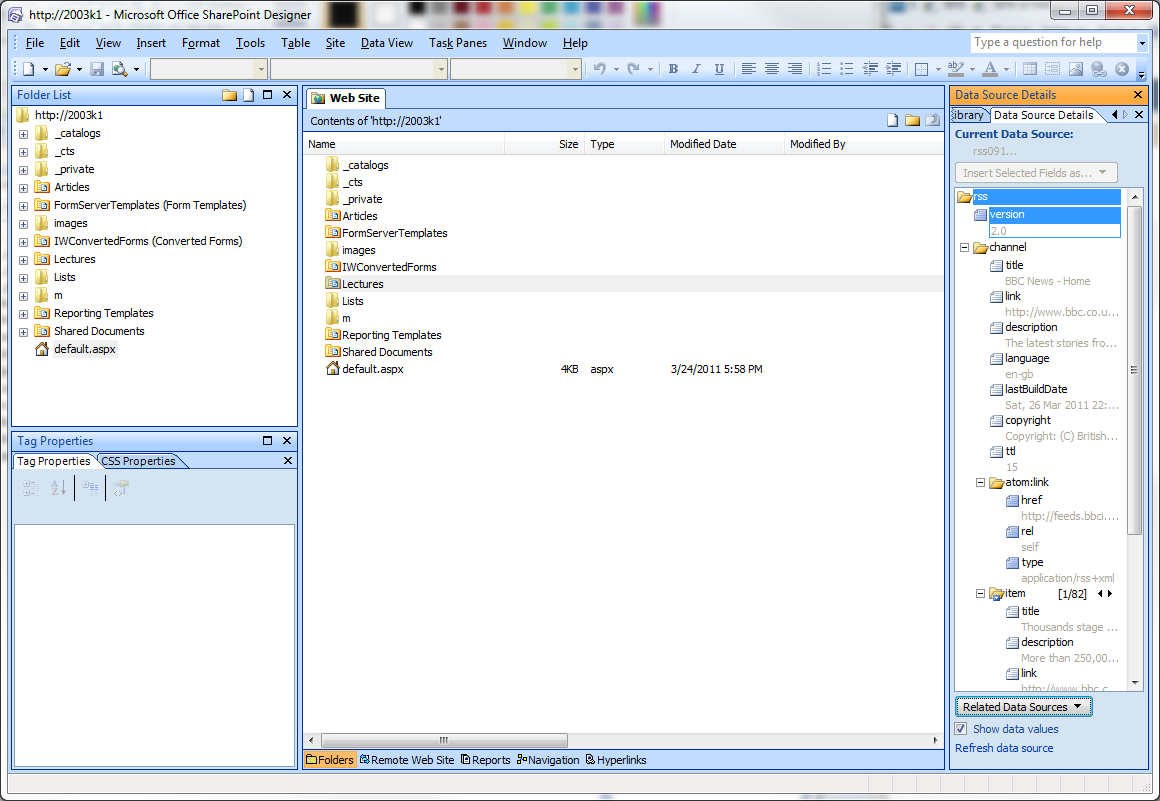
Show Data.  This causes the Data Source Details task pane to appear and display details of the item selected in the Data Source Library task pane.  the data connection item to expand showing you all of the fields available for the data feed.


Note that next to the item field are some numbers and left and right arrows.  These indicate to you just how many items are currently available from this feed.  By clicking the arrows you can actually cycle through the list items and see some of their data in the Data Source Details pane.  It's helpful to study the fields that are display for you'll observe that not all of the fields are repetitive. For this procedure we'll focus on the repeating fields.  Having created a data source you're ready to move on to building a data view.

Phase 2: Building a Data View

From the File menu point to New and then select Create from Master Page...


Click OK at the prompt.


What this does is add a blank page to the SharePoint Designer work space (the center pane) that is based upon the Master Page of the SharePoint site you connected to.


Look carefull in the center pane and you'll see the PlaceHolderMain item.  Click below this item title in the box below it and you'll see a tiny arrow appear to its right.  Click on this and a couple of action items will appear.


Select the Create Custom Content action item and then click the Split tab down below.


You're given a view much like Visual Studio where one pane displays the code page and another pane displays the design view page.  Now from the Insert menu point to SharePoint Controls and the select Web Part Zone.


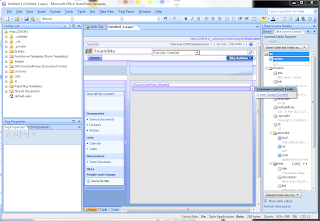
Both panes are updated to display place holders for a web part - what will eventually become a custom data view.


Now, look at the Data Source Details pane to the right, and then select the fields you want displayed. For the purposes of this procedure I selected the repeating title, description, and link fields below the item category.  Once you have these selected, drag and drop them onto the box that states Click to insert a Web Part.  After a few moments, you'll see the first few items of the news feed displayed.


Now let's format this list. As you move your cursor around the design view pane, you see some small arrow buttons appear.  Clicking these brings up action lists.  Move your cursor around the first row of items, specifically over the link itself.  A right arrow button appears.  Click this button.


It would be convenient for the user if the link is formatted as a hyperlink, enabling the user to simply click the link associated with a particular article summary and be immediately taken to that article in toto.  To do this, click the down arrow to the Format as drop down list, and then select hyperlink.


Click Yes.


Click OK.  Observe how the color of the text in the td.ms-vb column has changed.


Now let's explore some additional formatting options.  However your cursor in the row containing the text rss091.  A right arrow button will appear.  Click this arrow.


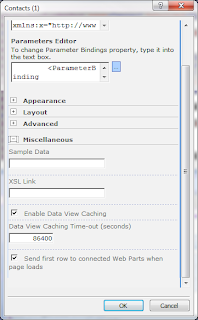
 There are many other formatting options that you can explore here.  For the purposes of this procedure, we'll look at just one more formatting option, the Change Layout... option. Click this link.


In this list box dialog are a number of different formats to choose from.  For the purposes of this procedure, let's choose the second one down from the top, and then click OK.  A warning prompt appears.


Click Yes.  The formatting change is implemented immediately, and you'll be able to see it in the design view pane below.  By completing this step, you have successfully created a data view.  It remains to essentially publish this page to your SharePoint instance.


Phase 3: Adding the page to SharePoint.

From the File menu, click New.


On the New dialog, select the SharePoint Content tab up at top; select Document Libraries, to the left; and then select Document Library in the middle.  Lastly, enter a name for the new document library in the Options group to the right.  When you've done all these things, click OK.  You'll see a new item appear in the SharePoint Designer Folder List pane.


If you refresh your connection to your SharePoint instance, you'll find that a new document library appears there too.


Back in SharePoint Designer, click the 
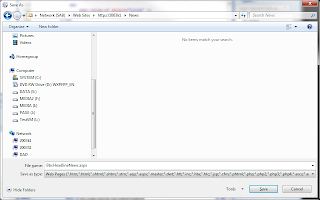
Save button in the Standard toolbar or select Save from the File menu.


Revise the name of the new page.  For this procedure, the name is changed to BbcHeadlineNews.


Double-click the News folder icon that is displayed in the list pane.  This takes you to the News folder for placing this new page.


Back in SharePoint Designer Folder List pane, you'll see a new item appear in the News folder.


In your browser, if you navigate to the News document library, you'll see the new page also displayed.


Clicking the BbcHeadlineNews item takes you to your newly created page listing the first ten items in the BBC Headline News data feed.


This completes this step-by-step procedure in building a data view.  Using just the procedure you've tried out here, you can add many other XML data sources.  Similarly, you can also add data from other kinds of data connections, including databases or even other SharePoint instances.  You can also create more complex views of other list data within an existing SharePoint instance.  There are all kinds of possibilities.  Happy Computing!

References
  1. Microsoft Support/Sharepoint/Sharepoint Designer: Create a Data View
  2. Icbridge: Exploring the Data View Web Part
  3. Microsoft Download Center: Windows SharePoint Services 3.0 Application Templates: All Templates
  4. Microsoft Download Center: SharePoint Designer 2007
  5. Geeklog: RSS, RDF, XML News Feed Resources
  6. NOAA: XML Feeds of Current Weather Conditions
  7. Click2Learn: Simple Data View Web Part
  8. Windows SharePoint Services Document: Application Templates for Windows SharePoint Services 3.0 – Under the Hood
  9. Data View conditional formatting using SharePoint Designer, SharePoint Administration & Development + InfoPath, Daniel
Notes
  •    None