Showing posts with label SQL Server 2008. Show all posts

Tuesday, February 24, 2015

SharePoint: Cannot connect to database master at SQL Server

Problem
You are trying to configure a new SharePoint instance and run the PowerShell command to build the configuration database, New-SPConfigurationDatabase.  The database is installed as a default instance using all defaults.  When you run this command in an elevated SharePoint Management Shell, an error is returned:
New-SPConfigurationDatabase : Cannot connect to database master at SQL server at <yourdb>. The database might not exist, or the current user does not have permission to connect to it.
Creating an inbound Windows Firewall rule on port 1433 does not resolve this issue.
  
Troubleshooting

  1. Verified that the account this command is running under (the SharePoint Setup User Administrator account) has been granted the securityadmin and dbcreator fixed server roles on the backend SQL Server instance.  
  2. Granted it the sysadmin role, repeated command, but same error.  
  3. Ran the command using the actual database server name, but same error.
  4. Checked Windows Firewall on the backend: did not identify anything that appeared to be blocking default port 1433 for inbound connections, but also did not find anything explicitly allowing access on this port.  
  5. Configured an inbound rule to allow any access on port 1433.  The repeated command, but same error.
  6. Created empty Data Link, configured using database alias, and then tested connection: failed.
  7. Tried again using actual database server name and then IP address: both tests failed.
  8. Discussed this issue with a systems administrator, as to whether firewall rules are controlled via GPO and whether creating a rule using the standard process will in fact implement the rule. He informed me that, no, rules created using the standard process are not in fact implemented.  
  9. He showed how to discover what rules are implemented (Windows Firewall > Windows Firewall with Advanced Security on Local Computer > Monitoring > Firewall). Reviewing this list, found that the the rule created previously was not listed.
  10. The systems administrator showed how to update the local GPO using gpedit.msc.
  11. Created new inbound rule on port 1433 using gpedit.  
  12. Checked the list noted above, but did not find new rule.
  13. Discussed with systems administrator who showed how to update local computer with modifications to its GPO: use gpupdate /force in an elevated command shell.
  14. Executed this command.  Was prompted that "Certain Computer policies are enabled that can only run during startup.  OK to restart?"  Chose No.
  15. Checked list: new inbound rule not found.
  16. Restarted server.
  17. Checked list: new inbound rule now listed.
  18. Created empty Data Link, configured using database alias, and then tested connection: success!
  19. Reran command to create new configuration database: success!

Solution

  1. Create inbound rule on the farm backend that allows inbound connections on the port used for database connections.  Create this rule in the local computer GPO using gpo editor gpedit.msc.
  2. Force the backend GPO to update computer settings.
  3. Restart the backend.
References
  • Some knowledge of Windows Server management was helpful here in being able to ask the systems administrator the right questions so as to obtain useful information.
  • This issue applies to all SharePoint versions.
  • Thanks to Thomas Vochten for an excellent tip on how to quickly explore database connection issues.

Thursday, March 6, 2014

SQL Server 2008: View Installed Features

Problem

You need to view the features installed on a SQL Server 2008 R2 instance. 

Discussion

There are at least two ways of going about this: using SQL Server Installation Center (installed and also available on the original installation DVD) and viewing setup files.  I haven't yet researched it, but I believe that you can also view installed features via PowerShell, but you may need to install the PowerShell for SQL Server first and run some configuration before you can do it.

Solution
  1. Use the SQL Server Installation Center:
    1. Go: Start > All Programs > Microsoft SQL Server 2008 R2 > Configuration Tools > SQL Server Installation Center.  The familiar installation dialog appears.
    2. Click Installed SQL Server features discovery report.  The report is generated and presented as a web page.
  2. Use saved setup reports:
    1. Go to: C:\Program Files\Microsoft SQL Server\100\Setup Bootstrap\Log.  Each running of setup or the discovery report generates data that is saved here.
    2. Open the file, Summary.txt.  This file contains the configuration details from the most recent setup or discovery operation.

References

Saturday, February 15, 2014

SQL Server 2008: An exception occurred while enqueueing a message in the target queue

Problem

During routine check of the farm database server event logs, you see the following Application event occuring at the rate of about 77 repetitions per minute:
Log Name:      Application
Source:        MSSQLSERVER
Date:          [date/time]
Event ID:      28005
Task Category: Server
Level:         Error
Keywords:      Classic
User:          N/A
Computer:      [databasename]
Description:
An exception occurred while enqueueing a message in the target queue. 
Error: 15404, State: 19. Could not obtain information about Windows NT 
group/user '[domain\accountname]', error code 0x5.
Event Xml:
<Event xmlns="http://schemas.microsoft.com/win/2004/08/events/event">
  <System>
    <Provider Name="MSSQLSERVER" />
    <EventID Qualifiers="49152">28005</EventID>
    <Level>2</Level>
    <Task>2</Task>
    <Keywords>0x80000000000000</Keywords>
    <TimeCreated SystemTime="[date/time]" />
    <EventRecordID>1127225</EventRecordID>
    <Channel>Application</Channel>
    <Computer>[databasename]</Computer>
    <Security />
  </System>
  <EventData>
    <Data>15404</Data>
    <Data>19</Data>
    <Data>Could not obtain information about 
Windows NT group/user '[domain\accountname]', error code 0x5.</Data>
    <Binary>656D000010000000100000004F00430053002D00
560053002D004E0041005600530051004C00440031000000070000006D00610073007400650072
000000</Binary>
  </EventData>
</Event>
Troubleshooting
  1. Reviewed server Application log to find start of issue:
    • Results: 33,000 repetitions of event completely flooded log through beginning - log was overwriting itself.  Estimated duration of event thus far: (33K total occurrences in log) / (77 occurrences per cycle) / (~ 63 seconds per cycle) > = 7 hours.
  2. Checked farm user content sites:
    • Result: no issues; users able to access content
  3. Checked Central Administration Health Analyzer Reports:
    • Result: no related issues.
  4. Launched SQL Server Configuration Manager and reviewed log on for SQL Server service: local system account.  Changed this to standard domain account per discussion in this reference.
    • Result: no resolution.
  5. Stopped and restarted SQL Server service
    • Result: no resolution.
  6. Restarted the server:
    • Result: no resolution.
  7. Reviewed the DBOs for all farm databases by using this statement:
    SELECT name, suser_sname(owner_sid) FROM sys.databases
    as discussed in this reference.
    • Result: did not find any NULL values as discusses in the reference, thus not helpful
  8. Checked locked status by executing this statement,
    SELECT LOGINPROPERTY('sa','IsLocked')
    according to this reference:
    • Result: not locked, thus not helpful
  9. Tested ability of problematic account to impersonate using this statement,
  10. EXECUTE AS LOGIN = ‘[yourdomain]\me’
    Go
    as discussed in this reference:
    • Results: failed. Tried again on problematic account: succeeded.  Tried on other service accounts: failed.
  11. Checked databases, service accounts and service account roles on database server
    • Results: found three databases created under (and thus owned by) the farm account, which was unusual, as these are usually created by the admin account. Databases involved the securestore and web analytics services. Neither the admin nor the farm account were mapped to these databases (this accounted for an unrelated error involving failed database upgrade - psconfig).
  12. Checked with systems admins regarding patching
    • Results: servers had been patched with latest Windows server CUs the previous day.  Found some older discussion associating eventID 28005 with patching.
  13. Again checked the farm databases against the error details
    • Result: again noted that the account identified in the error, the farm service account, was identified as the DBO for three particular databases; and that these databases were all created recently.  Also noted the owner for a new content database, created recently, also used the farm account.
  14. Changed the DBO for these three databases to my own administrator account using this TSQL statement:
    ALTER AUTHORIZATION ON DATABASE::NewContentDb TO "MyAdministratorAccount";
    • Result: no resolution, but improved my understanding of issue.  28005 error now presented my administrator account in its error message, rather than the farm service account.  This help bound the scope of the issue by demonstrating that I could affect the error outcome, even in a minor way.
  15. Changed the DBO for the new content database to the SA using the same TSQL statement:
    • Result: no resolution.
  16. Changed the DBO for these three databases to the SA.
    • Result: success.  EventID 28005 stopped appearing in the server Application log.
Solution
  1. Changed the DBO for the three particular databases to the SA (using the same TSQL statement shown above).
    • Result: success. 24 hours later, the error message still has not appeared.
Summary

The references pointed the way to the a solution, this being changing the DBO for databases to the SA.  This is not the optimal solution, but it at least resolves the immediate problem.  Note that not all databases had to have their DBO changed.  Only those associated with the domain account presented in the error event.  There remain databases in the farm, after implementing the solution above, for which the owner remains the farm administrator account.  And no error is being generated for them. So, it's unclear what the root cause here is.

One remaining task to be performed is to obtain a domain account for which the 'Allowed to authenticate' security setting has been enabled, as suggested by this reference (scroll to the bottom of the page).  This will require sysadmin assistance and will thus be implemented at a later date.

References
Notes
  • Farm topology: Windows Server 2008 R2, SQL Server 2008 R2 Standard, SharePoint 2010 Server Enterprise.
  • Methodology: the troubleshooting steps were wide ranging in order to more definitively bound the scope of the issue and improve understanding of it.

Friday, January 10, 2014

SharePoint 2010: Farm Database Server memory

Problem

You have installed a new three-tier, SharePoint 2010 farm to virtual machines hosted on Microsoft Hyper-V.  The farm employs SQL Server 2008 R2.  After some time has elapsed, your systems admin informs you that the VM hosting the database server is using 32 GB RAM and this usage continues to climb.  Traffic to the farm is steady and not increasing.

Discussion

SQL Server 2008 R2 can dynamically adjust its buffer pool (cache) size in order to minimize paging.  It will continue to use memory up to that available.  This is normal behavior. 

By default, SQL Server 2008 R2 maximum server memory is set to 2147483647 MB.  If the VM has not been configured for maximum memory, SQL Server will continue to increase its usage of virtual memory to the maximum it can. 

The Maximum Server memory setting configures the buffer pool memory limit.  It does not affect the amount of memory that SQL Server allocates for other processes.

Solution
  1. Launch SQL Server Management Studio.
  2. In Object Explorer, right-click the server name in the tree (top item).
  3. Choose Properties (at bottom of list).  The Server Properties dialog appears.
  4. In the selection pane of the dialog, select Memory.
  5. In the Maximum server memory (in MB) field, enter the maximum memory you want to set.  Set this to less than the actual memory allocated to the VM or physical memory available.  Leave two GB or so for other SQL Server and Windows processes.  See the References for guidance on memory allocation.  You can adjust SQL Server Maximum server memory without restarting the server. 
    After you make this adjustment, server memory usage will drop initially, but then gradually increase again.  This second increase is due to Hyper-V locking the available memory
  6. Click OK.

References

Thursday, October 10, 2013

SharePoint 2010: An error occurred during the Generate Key process

Problem

You are trying to configure a new Secure Store service target application on a SharePoint 2010 farm using Central Administration.  You are logged in as the domain administrator or under an account that has domain administration privileges or is a member of the farm administration group for your SharePoint 2010 instance.  This is a default installation, where all services and service applications were created using the wizard. You are attempting to create a new pass phrase as part of configuring a new secure store service target application.  After entering the new pass phrase, and clicking OK, you see the following error message:
Solution

This issue was resolved by using the farm administration account.  After logging in under this account, and repeating the above, I was able to successfully create a new secure store service pass phrase and configure a new secure store service target application:
Follows are the steps I took to troubleshoot this problem and the references I used to guide this effort.

Troubleshooting Checks
  1. I first checked whether the account I was currently logged in as (domain administrator) was a member of the Farm administrators group:
    When it wasn't, I added it, then again tried to configure a new target application: no success.
  2. Next, I logged in under the farm administration account (in this case Contoso\sp_farm), and then tried to configure a new target application: success. I then logged out from this account and logged back in under the domain administrator account (Contoso\administrator), and navigated to the Secure Store Service application page.  This time, the error message was different:
    This error message confirmed to me that the problem involved permissions.
  3. I wanted to probe this further and checked the Secure Store Service database role of the account I was currently logged in as (domain administrator) against that of the farm administration account:

    I then identified the differences and configured the domain administrator account (Contoso\Administrator) to have the same role as the farm administration account (Contoso\sp_farm):
    I then logged back in under the domain administrator account, and then tried to begin the process of creating a new target application: still no success.   As clean up, I removed this role from the domain administrator account.
  4. I also checked the Secure Store Service database properties:
    Note that the farm administrator account is the owner of the database files.  This further confirmed to me that the problem involved permissions.
  5. Lastly, I reviewed PowerShell commands to see if there was one that added another account to those that can create new target applications, but wasn't able to identify one that seemed to pertain to the problem.
Summary

This posting presented a fix to the problem of trying to create a new target application but experiencing the "An error occurred during the Generate Key process" error message.  Though the problem has been solved, it hasn't been resolved, as the underlying cause is still not fully understood. For example, though the problem seems to involve permissions, adding the appropriate role to an account experiencing this problem does not solve the problem and thus seems insufficient.  Thus, there must be other configuration that must also be done. If someone can point me to the appropriate reference detailing the cause of this problem, I would be grateful.
References

Thursday, October 3, 2013

How to add a named SQL Server 2008 R2 instance

Introduction

This posting walks through the steps necessary for installing a named instance of SQL Server 2008 R2 to an existing default instance.  Total time to completion is approximately 25 minutes.  This procedure was performed on a virtualized Windows Server 2008 R2 SP1, hosting a default instance of SQL Server 2008 R2 SP2.  The development network is hosted on VMware Workstation 7.X and has Internet connectivity.  Take note of step 11, below: this is the critical step for installing a named instance.

Procedure
  1. Load and launch the SQL Server 2008 R2 installation. SQL Server Installation Center dialog appears:
  2. Click New installation or add features to an existing installation.  The first page of the SQL Server 2008 R2 Setup wizard appears:
  3. Click Install. Setup performs a system check: 
  4. Click Next.  The Installation Type page appears:
  5. Select New installation or add shared features, and then click Next.  The Product Key page appears:
  6. Enter the product key or select evaluation, and then click Next.  The License Terms page appears:
  7. Check the I accept the license terms, and then click Next. The Setup Role page appears:
  8. Select All Features With Defaults, and then click Next.  The Feature Selection page appears:
  9. Check/uncheck desired features, and then click Next.  Setup runs installation rules and then presents the results:
  10. Click Next.  The Instance Configuration page appears:
  11. Select Named instance, and then enter the Instance ID (i.e., name) for the new instance.  For this posting, the named instance is called SQL2:
  12. Click Next.  The Disk Space Requirements page appears:
  13. Click Next.  The Server Configuration page appears:
  14. Configure accounts as needed. For this posting, the System account was used:
  15. Click Next.   The Database Engine Configuration page appears:
  16. Click Add Current User.  This will most likely already be added.
  17. Click the FILESTREAM tab and configure this for possible dev exploration in the future:
    1. Check Enable FILESTREAM for Transact-SQL access.
    2. Check Enable FILESTREAM for file I/O streaming access.
  18. Click Next.  The Analysis Services Configuration page appears:
  19. Click Add Current User, to add the current account:
  20. Click Next.  The Reporting Services Configuration page appears:
  21. Select Install, but do not configure the report server, and then click Next. The Error Reporting page appears:
  22. Click Next.  The Installation Configuration Rules page appears:
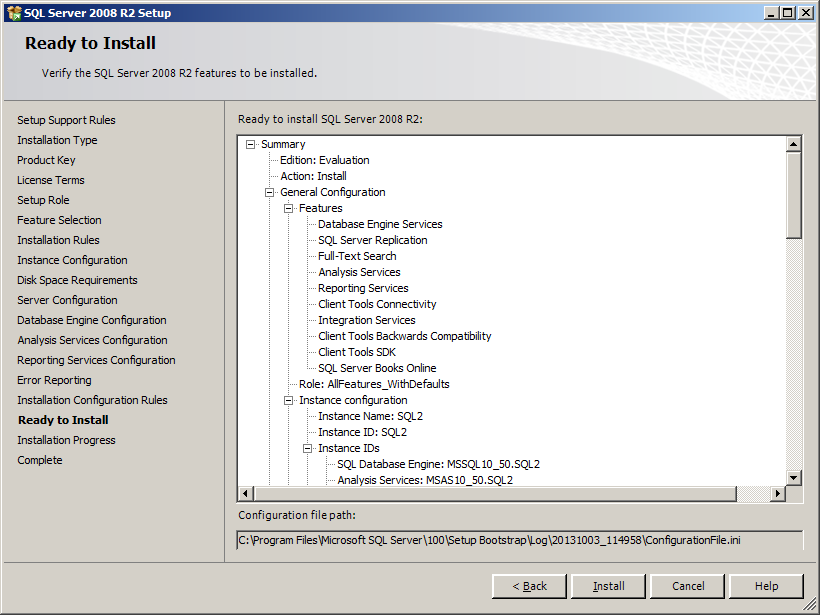
  23. Click Next again.  The Ready to Install page appears:
  24. Click Install.  Installation takes approximately 20 minutes.
  25. Click Close.
  26. This completes installation of a new named instance of SQL Server 2008 R2 to an existing default instance on the same server.
  27. Optional: Verify successful installation and configuration:
    1. Launch SQL Server 2008 R2 Management Studio.
    2. Connect to the new instance.  For this posting, the named instance server name is: SPDEV11\SQL2.
  28. Click Connect.  The Management Studio will appear and is connected to the named instance:
  29. This concludes this procedure.
Summary

This posting presented a step-by-step procedure for installing a named instance of SQL Server 2008 R2 to an existing default instance.  For additional detail on the topics presented here, please consult the references below.

References
Notes
  • This walkthrough was performed in preparation for setting up a new SharePoint Server 2013 instance on the same network as an existing 2010 instance in preparation for migration testing.  The 2013 instance will employ the named instance.

Saturday, September 14, 2013

Build a SharePoint Server 2010 Two-Tier Dev Environment on Windows 2008 R2

Introduction

This posting walks you through the process of building a simple two-tier SharePoint Server 2010 development and testing environment on Windows 2008 R2 and using VMware Workstation 7.X.  It will involve six steps: build servers, configure DC & DNS, join domain, install SQL Server, Install SharePoint Server, Configure SharePoint Server and Configure DNS.  Procedures are also provided for several optional steps: Install SharePoint Designer and Install AdventureWorks Lab Environment.  Aside from VMware Workstation, all other software can be obtained without cost as freeware or trialware.

Step 1: Build Servers
  • Build two Windows Server 2008 R2 SP1 instances.
  • Though the clone template sets RAM at 2 GB, 1.5GB works fine with no noticeable decline in performance.
Step 2: Configure DC and DNS
  • On first server (and in this order!):
    1. Set computer name: spdev11.
    2. Configure network adapter IP address.
    3. Configure DNS to point to ISP DNS.
    4. Add role: Active Directory.
    5. Add role: DNS.
    6. After completion, verify that new forward lookup, pointing to this DNS, was automatically created.
    7. Configure PDC emulator to synchronize time with the Windows time service:
    8. Perform Best Practices scans on the DC and DNS roles to check for any significant issues:
    9. Add domain accounts: sp_admin, sp_web, sp_app.
Step 3: Join Domain
  • On second server:
    1. Set computer name: spdev12.
    2. Configure network adapter IP address.
    3. Configure DNS to point to own DNS.
    4. Join to domain.
Step 4: Install SQL Server 2008 R2
  1. Point VM CD/DVD drive to SQL Server ISO.
  2. Launch installation.
  3. Create shared folder to host: service packs folder.
  4. Install Service Packs 1 & 2.
  5. Add account sp_admin:
    • Add roles: dbcreator, securityadmin.
  6. Add own account as sysadmin.
Step 5: Install SharePoint Server 2010
  1. Create shared folder to host: installation folder.
  2. Verify all prerequisites in PrerequisiteInstallerFiles folder.
  3. Verify PrerequisiteInstaller.Arguments file.
  4. Launch PrerequisiteInstaller.exe.
  5. Launch setup.exe.
  6. After completion of setup, and the appearance of the Product Configuration Wizard, continue to next step.
Step 6: Configure SharePoint Server 2010
  1. Continue the SharePoint Products Configuration Wizard.
  2. Connect to a server farm: Create a new server farm.
  3. Specify Configuration Database Settings.
    1. Database Server: spdev11.
    2. Database name: default.
  4. Specify Database Access Account.
    • Username: contoso\sp_admin.
  5. Specify Farm Security Settings.
    • [configure as desired].
  6. Configure SharePoint Central Administration Web Application.
    1. Specify port number: enabled: 2000.
    2. Configure Security Settings: ntlm.
    3. Service account: sp_app.
  7. When prompted to create a new web application and site collection, choose No.
  8. Check server Application and System logs and resolve common errors:
    1. Error 8193.
    2. Error 7043.
  9. Install SharePoint Server 2010 Service Packs (order is important):
    1. Install Foundation SP1.
    2. Reboot.
    3. Install Server SP1.
    4. Reboot
    5. Run Configuration Wizard.
    6. Install Foundation SP2.
    7. Install Server SP2.
    8. Reboot.
    9. Run Configuration Wizard.
  10. Create a team site.
  11. Register managed account: contoso\sp_web:
  12. Configure default website (team site) web application pool to use sp_web.
  13. Reset IIS:
  14. Check site collection administrators:
    1. On the team site, go: Site Actions > Site Settings > Users and Permissions > Site collection administrators.
    2. Verify that the accounts listed here are domain accounts.
Step 7: Configure DNS
  1. Local (host) DNS:
    1. On your local machine, navigate to C:\Windows\System32\drivers\etc\:
    2. Open the HOSTS file in any text editor.
    3. Add entries for the SharePoint Server's DNS settings:
    4. Test these entries by pinging them from the host:
    5. In Central Administration, add alternate access mappings for these entries:
  2. Domain DNS:
    • Add Host (A) records for these entries.
Optional: Install SharePoint Designer 2010 (32bit)
  1. Install SharePoint Designer 2010.
  2. Install SharePoint Designer 2010 SP1 and SP2.
  3. Test by connecting.
Optional: Install AdventureWorks Lab Environment
  1. Attach the AdventureWorksDW for SQL Server 2008 R2 database from CodePlex.
  2. Download the AdventureWorks 2008R2 Analysis Services Project from CodePlex.
  3. Complete the installation procedure as discussed in Exercise 5 of Building a SharePoint 2010 Virtual Lab.  [See note below]
Optional: Install the Northwind Trader Sample Site Collection
  1. Download the Northwind solution package.
  2. Follow Chris Beckett's directions to install the package.
  3. Add the Northwind Trader employees to Active Directory.
Optional: Add Sample Users to Active Directory
  1. Download a sample user list (CSV) from Brian Dunning, and then place it on the server hosting the DC.
  2. Logon to the server hosting the DC (spdev11 for this posting).
  3. Open a PowerShell window.
  4. Create a CSV file containing all of the sample users to be added.  The column headers can have any name, but they must be appropriately referenced in the script.
  5. Run Todd Klindt's simple PowerShell script for importing new accounts; or try other approaches (some are referenced below).  A sample PowerShell script is provided in the Notes below.  New-ADUser scripts must be run under an account with permissions to modify AD.
Optional: Install Visual Studio Trial Versions
Summary

This posting has presented a step-by-step walkthrough of how to build a virtual SharePoint Server 2010 environment for development and testing.  All of the software elements can be obtained as freeware or trialware, except for VMware Workstation. 

References
Notes
  • Configuring DC and DNS: configure the network adapter first before adding the DC and DNS roles.  This way, the DNS configuration routine will automatically detect the adapter DNS setting, configure a forward lookup for it, and then change this setting to point to itself.  This will save the effort of creating the forward lookup yourself.
  • SharePoint Designer: before installing, assess whether Office 32-bit or 64-bit is installed.  Install that version of Designer consistent with the Office version already installed. Additionally, complex compatibility issues may occur when using the 64-bit version.  See the references for further discussion on this topic.
  • AdventureWorks: thanks to Critical Path Training for making this procedure available.  Note that the AdventureWorks database must first be downloaded and restored before the solution can be installed.
  • Northwind: thanks and gratitude to Chris Beckett for his efforts in migrating this venerable database to the SharePoint Server 2010 platform.  This solution package includes data only: all database tables have been migrated to appropriately named lists.  No pages have been created. His Northwind solution was installable on SharePoint Server 2010 SP1 (fresh - no CUs) without issue.  This sample content is useful in developing and testing dashboard methods.  Visit his blog at SharePointBits. Note: A File Not Found error may be experienced whilst attempting to implement this solution to the root site collection of a new web application.
  • PowerShell New-ADUser Script: here's a sample script for adding new users in bulk to Active Directory (all on one line):
    import-csv c:\temp\100.csv | foreach-object {New-ADUser -SamAccountName $_.SAMAccountName -UserPrincipalName $_.SAMAccountName -GivenName $_.givenName -Initials $_.Initials -Surname $_.Surname -DisplayName $_.DisplayName -Name ($_.givenName + $_.Initials + $_.Surname) -Description $_.Description -Company $_.Company -StreetAddress $_.StreetAddress -City $_.City -State $_.State -PostalCode $_.PostalCode -OfficePhone $_.OfficePhone -Fax $_.Fax -EmailAddress $_.EmailAddress -AccountPassword (ConvertTo-SecureString "P@ssw0rd" -AsPlainText -Force) -ChangePasswordAtLogon $False -PasswordNeverExpires $True -Enabled $True -PassThru -WhatIf} 
    
Troubleshooting
  1. The Local farm is not accessible.  Cmdlets with FeatureDependencyID are not registered.
    1. After setting up the farm using the domain administration account, logged in using regular account provisioned as member of domain admins.  Then attempted to launch SharePoint 2010 Management Shell:
    2. To resolve: launch management shell as Administrator.  Then execute following command: Add-SPShellAdmin [domain\username]
    3. If unsuccessful, logon to the server as domain administrator, then launch the management shell and execute the command.
    4. Note: do not attempt to add the login, roles and permissions manually directly to the SharePoint_Config database, as some have already discussed.  There appear to be other configuration settings affected by this commandlet than just adding logins and configuring roles.
    5. This is what I attempted at first.  Unsuccessful.  I then left the database changes as-is, and then executed the Add-SPShellAdmin, as noted above.  Unsuccessful.  I then removed the changes I had made to the databases, and then re-executed the above commandlet: success.

Saturday, November 3, 2012

SharePoint Foundation Search Refresh Failed

Problem

You have a SharePoint 2010 instance.  You are running the SharePoint Foundation Help Search service.  You check Job History (CA > Monitoring > History > Failed Jobs), and you find a list of SharePoint Foundation Search Refresh failed jobs:

Job Title: SharePoint Foundation Search Refresh
Server: (your SharePoint server)
Web Application:
Content Database:
Status: Failed
Complete: (date/time)
Duration: 0:00:00
Error Message: Logon failure: unknown user name or bad password.

Solution

By default, the SharePoint Foundation Search Refresh job runs hourly.  This job runs under the service account you configured for the Foundation Search service, e.g., sp_fSearch.  This account connects to the SharePoint backend and interacts with several databases.  Make sure that this account has the following permissions for these databases:
  • Server Farm Configuration (SharePoint_Config): dbdatareader
  • SharePoint Admin Content (SharePoint_AdminContent): dbdatareader
  • SharePoint Foundation 2010 Search (WSS_Search_[servername]): db_owner
If you can't recall the names of the databases, go to Step 1 of the Farm Backup page, and you will see a listing of components along with their descriptions, which will guide you to noting the names of the databases listed above.  Once you know the appropriate databases, go into SQL Server Management Studio to configure the accounts appropriately.  After performing this step, you can either perform a manual run of the SharePoint Foundation Search Refresh job, or wait for it to run as scheduled, in order to see the affect of these changes.

References

Saturday, February 26, 2011

Auditing SELECT Statements in SQL Server 2008 Standard using SQL Trace

Background

This procedure walks you through the process of scripting and implementing a very basic stored procedure for auditing SELECT queries against a SQL Server database.  It does not implement any practical structured error trapping which is reserved for a future article.  A copy of the entire script used in this article is available in the Resources section.  You will use SQL Profiler to draft the framework for the script and then you will use SQL Query Editor to finish it up and implement it.  Let's get started.


Procedure
  1. Start SQL Server Management Studio
  2. From the Tools menu select SQL Server Profiler. A Trace Properties dialog will appear.
  3. Enter a name for the trace
  4. Check Save to file.  A file Save As dialog appears.  Navigate to the directory in which you want to store the output from this trace; enter a file name and then click Save.
  5. Check Server processes trace data.  This completes configuration of the General tab.
  6. On the Trace Properties dialog select the Events Selection tab.
  7. On the Events Selection tab uncheck everything.
  8. Check Show all events  and Show all columns.
  9. Scroll down the list of event groups until you come to the TSQL one
  10. Expand this event group to see its members
  11. Enter a check into SQL: StmtStarting.  You may need to uncheck and then recheck it in order to have all of this event's properties also checked.
  12. Scroll across the list of columns until you see the TextData column.  This property will contain the text of a SQL query triggering this event.
  13. On the Events column, select the SQL: StmtStarting event so that it is highlighted (as in the figure above).
  14. Now click Column Filters.  The Edit Filter dialog appears.  The left pane lists all of the properties associated with the event you selected. 
  15. Scroll down this list until you come to the TextData property.
  16. Select the TextData property.  The right pane updates to show you the filters that you can apply.

  17. Open up the Like filter and then enter: %SELECT%
  18. Click OK.  The Edit Filter dialog closes
  19. Click Run.  The Trace Properties dialog closes and a new dialog appears listing events associated with the trace you created.
  20. In Microsoft SQL Server Management Studio select a table from any database, and then view the top 1000 rows (right-click on the table...).  Now go back to the trace list.  Scroll across until you see the TextData property.  All of the events listed here involve the use of SELECT queries.
  21. On the SQL Server Profiler menu choose File > Export > Script Trace Definition > For SQL Server 2005 - 2008 R2.  A Save As dialog appears.
  22. Navigate to where you want to save this script give it a name and then click Save.
  23. Stop the trace and then exit SQL Server Profiler.  You're all done with this tool.  Now go back to SQL Server Management Studio.
  24. From the File menu select Open > File with New Connection... An Open File dialog appears.
    Navigate to where you saved your script (the file ends with .sql) select it.
  25. Click Open.  A new Connect to Database Engine prompt appears.
  26. Enter the appropriate authentication details and then click Connect.  The script appears in a new query tab. Hang in there - you're almost done.  Now let's do a little editing and cleanup.
  27. Remove the filter on SQL Server Profiler statements.  You'll see it right after the one for the SELECT statement.  This filter isn't really needed and serves no useful purpose.  Just delete the whole line.  Now let's build a better filename generator.
  28. Add the following script just after the BEGIN statement.

  29. Update the create trace stored procedure line with the new filename. 

  30. These few lines of script you added create a new trace file every time the trace is started (such as after a shutdown). Now let's turn this into a new stored procedure.
  31. In Object Explorer open up the master database tree then open up Programmability, and then Stored Procedures.
  32. Right click on Stored Procedures and then select New Stored Procedure.  A new Query Editor tab appears.  In this Query Editor is a template for creating a new stored procedure.  This needs a little editing.
  33. Delete the first comment block (it's going to be removed anyway).  You can remove the first SET statement here as our trace procedure won't be performing any SELECT queries; and you can remove the second SET statement as we'll be using standard identifiers (single quote). Then add a few more lines like those shown below.  The reason being that we want this stored procedure to be applied to SQL: StmtStarting events generated by any database, and thus you need to associate it with the master schema.  The next thing to add is a quick check to make sure this procedure hasn't already been created: Fill out the second comment block as appropriate. 
  34. Now copy everything from your trace script and then paste it in between the BEGIN and END statements in the CREATE PROCEDURE template.  You should have something like that illustrated in the figure below.
  35. Remove the comment block just after the BEGIN statement.  This was entered by SQL Profiler and serves no useful purpose.

  36. Click the Parse button, located on the toolbar.  The Results window appears below the Query Editor window.
  37. Double-click the first line that you see in the Results window.  The Query Editor window scrolls down to the location of the error associated with that line.
  38. Remove the go statement just after the finish: statement.  This is what's causing the parse error. Once you remove this go statement, click Parse again.  The parse will complete successfully.
  39. Click the Save button in the toolbar.  The Save As dialog appears.  Enter a name for the trace and then click Save.
  40. Click the Execute button on the Management Studio toolbar.  This creates the stored procedure.
  41. In Object Explorer, right click on any folder and then select Refresh.
  42. In Object Explorer, open up the tree to master/Programmability/Stored Procedures.  The new stored procedure you just created will be listed below the System Stored Procedures.  Good Job!  I bet you didn't think you could get this far.  Now, the last task is to have SQL Server run the stored procedure and configure SQL Server to automatically start this procedure on startup.
  43. Open a new Query Editor window.
  44. Enter the SQL statements shown below.
  45. Click the Execute button.  A new Results window appears below the script presenting the Trace ID of the trace that was started.  In this case the trace has an ID of 2.
  46. Go to the directory in which this trace file was created and you should see it listed there.

  47. Now let's test our script.  If you shutdown and restart your SQL Server instance, a new trace file should be created.
  48. Shutdown and restart SQL Server, and then refresh the directory window where the trace file is being written to.  A second trace file appears.
  49. The next and final test is to see what events are captured by the trace.  To do this simply execute a read against any table. 
  50. Right-click on a table, and then choose Select Top 1000 Rows.  This executes a SELECT query against the selected table.
  51. Double-click on the trace file to start SQL Server Profiler.  In a results window you will see listed all of the events that were captured.  All of these events should involve a SELECT query, as shown in the figure below.
  52. Congratulations!  You have successfully created a script that captures all events involving any reads of any database in your Microsoft SQL Server instance.
  53. A copy of the entire script is available below.
Notes
  • The method discussed here can be applied to any TSQL query that you may want to audit. 
  • I've used SQL Profiler as a tool to build some of the script for me but you can of course script everything out manually in SQL Query Editor.  SQL Profiler is a good tool to use if you're just starting out with scripting traces, since it scripts most of the significant parts for you.  The only thing it doesn't do for you is implement some good structured error trapping, but you can do this yourself using the Try... Catch structure.
References
Resources

USE master
GO
IF OBJECT_ID('dbo.csp_MyAuditTrace') IS NOT NULL
DROP PROC dbo.csp_MyAuditTrace
GO

-- =============================================
-- Author: Al's Tech Tips
-- Create date: 02/26/2011
-- Description: Audits use of SELECT queries
-- against any database
-- =============================================
CREATE PROCEDURE dbo.csp_MyAuditTrace

AS

BEGIN

-- Set the filename for trace data capture
DECLARE @FileName nvarchar(256)
DECLARE @MyDateTime varchar(30), @instanceroot nvarchar(256)
SET @MyDateTime = CONVERT (nvarchar (30) , GETDATE(), 20)
SET @MyDateTime = REPLACE(@MyDateTime, '-','')
SET @MyDateTime = REPLACE(@MyDateTime, ' ','')
SET @MyDateTime = REPLACE(@MyDateTime,':','')

-- Get the instance specific LOG directory
-- Get the instance specific root directory.
SET @instanceroot = ''
EXEC master.dbo.xp_instance_regread N'HKEY_LOCAL_MACHINE',
N'SOFTWARE\Microsoft\MSSQLServer\Setup', N'SQLPath', @instanceroot OUTPUT

IF @instanceroot = '' OR @instanceroot = NULL
BEGIN
-- Exit the procedure
raiserror ('Could not obtain the instance root directory using xp_instance_regread.',
18,127)
return(1)
END

-- Prepare the Trace file.
IF SUBSTRING(@instanceroot, Len(@instanceroot)-1, 1) != '\'
SET @instanceroot = @instanceroot + '\'

SET @FileName = @instanceroot + 'startuptrace_' + @MyDateTime + '.TRC'

-- Create a Queue
declare @rc int
declare @TraceID int
declare @maxfilesize bigint
set @maxfilesize = 5
exec @rc = sp_trace_create @TraceID output, 2, @FileName, @maxfilesize, NULL
if (@rc != 0) goto error

-- Client side File and Table cannot be scripted

-- Set the events
declare @on bit
set @on = 1
exec sp_trace_setevent @TraceID, 40, 7, @on
exec sp_trace_setevent @TraceID, 40, 55, @on
exec sp_trace_setevent @TraceID, 40, 8, @on
exec sp_trace_setevent @TraceID, 40, 64, @on
exec sp_trace_setevent @TraceID, 40, 1, @on
exec sp_trace_setevent @TraceID, 40, 9, @on
exec sp_trace_setevent @TraceID, 40, 41, @on
exec sp_trace_setevent @TraceID, 40, 49, @on
exec sp_trace_setevent @TraceID, 40, 6, @on
exec sp_trace_setevent @TraceID, 40, 10, @on
exec sp_trace_setevent @TraceID, 40, 14, @on
exec sp_trace_setevent @TraceID, 40, 26, @on
exec sp_trace_setevent @TraceID, 40, 30, @on
exec sp_trace_setevent @TraceID, 40, 50, @on
exec sp_trace_setevent @TraceID, 40, 66, @on
exec sp_trace_setevent @TraceID, 40, 3, @on
exec sp_trace_setevent @TraceID, 40, 11, @on
exec sp_trace_setevent @TraceID, 40, 35, @on
exec sp_trace_setevent @TraceID, 40, 51, @on
exec sp_trace_setevent @TraceID, 40, 4, @on
exec sp_trace_setevent @TraceID, 40, 12, @on
exec sp_trace_setevent @TraceID, 40, 60, @on
exec sp_trace_setevent @TraceID, 40, 5, @on
exec sp_trace_setevent @TraceID, 40, 29, @on
exec sp_trace_setevent @TraceID, 40, 61, @on


-- Set the Filters
declare @intfilter int
declare @bigintfilter bigint

exec sp_trace_setfilter @TraceID, 1, 0, 6, N'%SELECT%'

-- Set the trace status to start
exec sp_trace_setstatus @TraceID, 1

-- display trace id for future references
select TraceID=@TraceID
goto finish

error:
select ErrorCode=@rc

finish:


END
GO