Showing posts with label Windows Server 2008. Show all posts

Sunday, October 6, 2013

Error 1060: vmdebug.sys has been blocked from loading due to incompatibility with this system

Problem

Created new virtual instance of Windows Server 2008 R2 on VMware Workstation 7.x.  After installation, checked server System log and discovered this error:

Log Name:       System
Source:             Application Popup
Date:                [Date]
Event ID:         1060
Task Category: None
Level:               Error
Keywords:       Classic
User:                N/A
Computer:        spdev12.contoso.com
Description:
\??\C:\Windows\system32\Drivers\vmdebug.sys has been blocked from loading due to incompatibility with this system. Please contact your software vendor for a compatible version of the driver.
.
.

Resolution
  1. Go: Start > Run > Regedit.
  2. Navigated to: HKEY_LOCAL_MACHINE\SYSTEM\CurrentControlSet\Services\vmdebug:
  3. Modified Start data from 1 to 4:
  4. Rebooted: new instances of error no longer appear in server System log.
  5. Success.
References

Saturday, September 14, 2013

Build a SharePoint Server 2010 Two-Tier Dev Environment on Windows 2008 R2

Introduction

This posting walks you through the process of building a simple two-tier SharePoint Server 2010 development and testing environment on Windows 2008 R2 and using VMware Workstation 7.X.  It will involve six steps: build servers, configure DC & DNS, join domain, install SQL Server, Install SharePoint Server, Configure SharePoint Server and Configure DNS.  Procedures are also provided for several optional steps: Install SharePoint Designer and Install AdventureWorks Lab Environment.  Aside from VMware Workstation, all other software can be obtained without cost as freeware or trialware.

Step 1: Build Servers
  • Build two Windows Server 2008 R2 SP1 instances.
  • Though the clone template sets RAM at 2 GB, 1.5GB works fine with no noticeable decline in performance.
Step 2: Configure DC and DNS
  • On first server (and in this order!):
    1. Set computer name: spdev11.
    2. Configure network adapter IP address.
    3. Configure DNS to point to ISP DNS.
    4. Add role: Active Directory.
    5. Add role: DNS.
    6. After completion, verify that new forward lookup, pointing to this DNS, was automatically created.
    7. Configure PDC emulator to synchronize time with the Windows time service:
    8. Perform Best Practices scans on the DC and DNS roles to check for any significant issues:
    9. Add domain accounts: sp_admin, sp_web, sp_app.
Step 3: Join Domain
  • On second server:
    1. Set computer name: spdev12.
    2. Configure network adapter IP address.
    3. Configure DNS to point to own DNS.
    4. Join to domain.
Step 4: Install SQL Server 2008 R2
  1. Point VM CD/DVD drive to SQL Server ISO.
  2. Launch installation.
  3. Create shared folder to host: service packs folder.
  4. Install Service Packs 1 & 2.
  5. Add account sp_admin:
    • Add roles: dbcreator, securityadmin.
  6. Add own account as sysadmin.
Step 5: Install SharePoint Server 2010
  1. Create shared folder to host: installation folder.
  2. Verify all prerequisites in PrerequisiteInstallerFiles folder.
  3. Verify PrerequisiteInstaller.Arguments file.
  4. Launch PrerequisiteInstaller.exe.
  5. Launch setup.exe.
  6. After completion of setup, and the appearance of the Product Configuration Wizard, continue to next step.
Step 6: Configure SharePoint Server 2010
  1. Continue the SharePoint Products Configuration Wizard.
  2. Connect to a server farm: Create a new server farm.
  3. Specify Configuration Database Settings.
    1. Database Server: spdev11.
    2. Database name: default.
  4. Specify Database Access Account.
    • Username: contoso\sp_admin.
  5. Specify Farm Security Settings.
    • [configure as desired].
  6. Configure SharePoint Central Administration Web Application.
    1. Specify port number: enabled: 2000.
    2. Configure Security Settings: ntlm.
    3. Service account: sp_app.
  7. When prompted to create a new web application and site collection, choose No.
  8. Check server Application and System logs and resolve common errors:
    1. Error 8193.
    2. Error 7043.
  9. Install SharePoint Server 2010 Service Packs (order is important):
    1. Install Foundation SP1.
    2. Reboot.
    3. Install Server SP1.
    4. Reboot
    5. Run Configuration Wizard.
    6. Install Foundation SP2.
    7. Install Server SP2.
    8. Reboot.
    9. Run Configuration Wizard.
  10. Create a team site.
  11. Register managed account: contoso\sp_web:
  12. Configure default website (team site) web application pool to use sp_web.
  13. Reset IIS:
  14. Check site collection administrators:
    1. On the team site, go: Site Actions > Site Settings > Users and Permissions > Site collection administrators.
    2. Verify that the accounts listed here are domain accounts.
Step 7: Configure DNS
  1. Local (host) DNS:
    1. On your local machine, navigate to C:\Windows\System32\drivers\etc\:
    2. Open the HOSTS file in any text editor.
    3. Add entries for the SharePoint Server's DNS settings:
    4. Test these entries by pinging them from the host:
    5. In Central Administration, add alternate access mappings for these entries:
  2. Domain DNS:
    • Add Host (A) records for these entries.
Optional: Install SharePoint Designer 2010 (32bit)
  1. Install SharePoint Designer 2010.
  2. Install SharePoint Designer 2010 SP1 and SP2.
  3. Test by connecting.
Optional: Install AdventureWorks Lab Environment
  1. Attach the AdventureWorksDW for SQL Server 2008 R2 database from CodePlex.
  2. Download the AdventureWorks 2008R2 Analysis Services Project from CodePlex.
  3. Complete the installation procedure as discussed in Exercise 5 of Building a SharePoint 2010 Virtual Lab.  [See note below]
Optional: Install the Northwind Trader Sample Site Collection
  1. Download the Northwind solution package.
  2. Follow Chris Beckett's directions to install the package.
  3. Add the Northwind Trader employees to Active Directory.
Optional: Add Sample Users to Active Directory
  1. Download a sample user list (CSV) from Brian Dunning, and then place it on the server hosting the DC.
  2. Logon to the server hosting the DC (spdev11 for this posting).
  3. Open a PowerShell window.
  4. Create a CSV file containing all of the sample users to be added.  The column headers can have any name, but they must be appropriately referenced in the script.
  5. Run Todd Klindt's simple PowerShell script for importing new accounts; or try other approaches (some are referenced below).  A sample PowerShell script is provided in the Notes below.  New-ADUser scripts must be run under an account with permissions to modify AD.
Optional: Install Visual Studio Trial Versions
Summary

This posting has presented a step-by-step walkthrough of how to build a virtual SharePoint Server 2010 environment for development and testing.  All of the software elements can be obtained as freeware or trialware, except for VMware Workstation. 

References
Notes
  • Configuring DC and DNS: configure the network adapter first before adding the DC and DNS roles.  This way, the DNS configuration routine will automatically detect the adapter DNS setting, configure a forward lookup for it, and then change this setting to point to itself.  This will save the effort of creating the forward lookup yourself.
  • SharePoint Designer: before installing, assess whether Office 32-bit or 64-bit is installed.  Install that version of Designer consistent with the Office version already installed. Additionally, complex compatibility issues may occur when using the 64-bit version.  See the references for further discussion on this topic.
  • AdventureWorks: thanks to Critical Path Training for making this procedure available.  Note that the AdventureWorks database must first be downloaded and restored before the solution can be installed.
  • Northwind: thanks and gratitude to Chris Beckett for his efforts in migrating this venerable database to the SharePoint Server 2010 platform.  This solution package includes data only: all database tables have been migrated to appropriately named lists.  No pages have been created. His Northwind solution was installable on SharePoint Server 2010 SP1 (fresh - no CUs) without issue.  This sample content is useful in developing and testing dashboard methods.  Visit his blog at SharePointBits. Note: A File Not Found error may be experienced whilst attempting to implement this solution to the root site collection of a new web application.
  • PowerShell New-ADUser Script: here's a sample script for adding new users in bulk to Active Directory (all on one line):
    import-csv c:\temp\100.csv | foreach-object {New-ADUser -SamAccountName $_.SAMAccountName -UserPrincipalName $_.SAMAccountName -GivenName $_.givenName -Initials $_.Initials -Surname $_.Surname -DisplayName $_.DisplayName -Name ($_.givenName + $_.Initials + $_.Surname) -Description $_.Description -Company $_.Company -StreetAddress $_.StreetAddress -City $_.City -State $_.State -PostalCode $_.PostalCode -OfficePhone $_.OfficePhone -Fax $_.Fax -EmailAddress $_.EmailAddress -AccountPassword (ConvertTo-SecureString "P@ssw0rd" -AsPlainText -Force) -ChangePasswordAtLogon $False -PasswordNeverExpires $True -Enabled $True -PassThru -WhatIf} 
    
Troubleshooting
  1. The Local farm is not accessible.  Cmdlets with FeatureDependencyID are not registered.
    1. After setting up the farm using the domain administration account, logged in using regular account provisioned as member of domain admins.  Then attempted to launch SharePoint 2010 Management Shell:
    2. To resolve: launch management shell as Administrator.  Then execute following command: Add-SPShellAdmin [domain\username]
    3. If unsuccessful, logon to the server as domain administrator, then launch the management shell and execute the command.
    4. Note: do not attempt to add the login, roles and permissions manually directly to the SharePoint_Config database, as some have already discussed.  There appear to be other configuration settings affected by this commandlet than just adding logins and configuring roles.
    5. This is what I attempted at first.  Unsuccessful.  I then left the database changes as-is, and then executed the Add-SPShellAdmin, as noted above.  Unsuccessful.  I then removed the changes I had made to the databases, and then re-executed the above commandlet: success.

Friday, September 13, 2013

How to build and deploy clone servers on VMware Workstation

Introduction

This posting walks you through the process of building and deploying clones of Windows Server 2008 R2 within the VMware Workstation environment. It involves a five-step process: build, sysprep, snapshot, clone and launch.  Budget about 3h for completion of all steps - most of which will involve the build step.

Step 1: Build
  1. In VMware Workstation, create a new VM.  For my work, 40GB disk is sufficient
    • 1.5GB memory will work fine if total host memory is limited.
  2. Install Windows Server 2008 R2
  3. Install Windows Server 2008 R2 Service Pack 1
  4. Install all remaining updates
  5. Do not add roles or features (these are not supported for sysprep)
  6. Do not configure the network adapter
  7. Do not configure system properties
Step 2: Sysprep
  1. Navigate to C:\Windows\System32\sysprep:
  2. Launch sysprep.
  3. Configure as:
    1. System Cleanup Action: Enter System Out-of-Box Experience (OOBE)
    2. Generalize: Enabled
    3. Shutdown Options: Shutdown
  4. Click OK.
  5. Wait for completion. 

    Shutdown.
Step 3: Snapshot
  1. Right-click build in VMware Workstation sidebar
  2. Choose Take Snapshot
  3. Enter identifying information
  4. Click OK.
Step 4: Clone
  1. Right-click build in VMware Workstation sidebar
  2. Choose Clone...
  3. Click Next
  4. Select An existing snapshot (powered off only)
  5. From dropdown, select snapshot you created
  6. Click Next
  7. Select Create a full clone
  8. Click Next
  9. Enter virtual machine name and location
  10. Click Finish
  11. Wait for completion.
Step 5: Launch
  1. Select a new clone and power up.
  2. On power up, the startup screen will appear different. 

    Seeing this screen is an indication that your clone was successful.  Services and devices will be installed. To retain services and devices in the template, review the references for additional command line arguments.
  3. After bootup, complete the usual installation prompts
  4. This completes this procedure.
Summary

In this posting, you have learned how to build and deploy clones of Windows Server 2008 R2 in VMware Workstation.

References
Notes
  • If after cloning the build and joining it to your domain, you experience weird problems such as disappearing domain accounts or security principal errors, verify that you made the snapshot after sysprep and not before.

Wednesday, March 6, 2013

Configure New URL for Existing SharePoint site

Introduction

This procedure walks you through the steps for configuring a more user-friendly URL for an existing SharePoint 2010 site URL having a port number.  For example, if you have a site that has a URL plus a port number, such as http://spserver01:5456, and you would like your users to be able to enter a simple URL, such as http://support.  Accomplishing this objective is easy and will involve making a few configuration changes on your DNS and SharePoint servers.  The following procedure shows you how.

In this procedure, the SharePoint 2010 server host is spserver01, with IP 192.168.0.61.  A new site collection, http://spserver01:5456 has been created and is called support. This procedure will enable your users to simple enter http://support in their browsers in order to connect to this new site collection.

Procedure

1) Add new DNS Host entry

Start DNS Manager

Double-click the DNS server name to open the domain tree.


Right-click the appropriate domain, and then select New Host (A or AAAA)...


Enter Support for the host and IP address 192.168.0.61.


Click Add Host, and then exit DNS Manager

At this point, you can enter the URL http://Support in a browser and navigate to it.  The site collection that you'll be navigated to, however, will be the default site collection at port 80 of the SharePoint 2010 server.  Try it, and you'll see.  For example, in the figure below, note the URL in the address bar has "support", but the name of the site is that for the default site at port 80.


To be navigated to the desired site collection, you need to inform SharePoint that when it receives requests to http://Support, it needs to respond with the site collection at http://spserver01:5456 and not the site collection at http://spserver01.  This is accomplished by configuring an alternate access mapping for http://spserver01:5456.

2) Configure Alternate Access Mapping

Open Central Administration

Go CA > Application Management > Alternate Access Mappings


From the Alternate Access Mapping Collection (look to the right to see the link, and then click it), look for the desired site collection, in this case, SharePoint - 5456.


Click the link.  Clicking a listed link automatically closes the popup.

Now, back on the Alternate Access Mappings page, click the Edit Public URLs link

In the Intranet field, enter the new URL that you entered previously in DNS manager


Now click OK.  This returns you to the Alternate Access Mappings page, now featuring your new mapping.


That's it.  Your done.  Now test.

3) Test

Open a browser on a machine in the target domain (in this case, alstechtips.com), and then connect to http://support

 Notes
  • Configuring new and simpler URLs can break some web part functionality. 

References

Sunday, March 27, 2011

Adding a Windows Server 2008 to a Small Business Active Directory Domain with Router DHCP Enabled

Problem

You are trying to add a new Windows Server 2008 machine to a relatively new domain created on a network that was originally peer-to-peer and still has a gateway acting as both router and DHCP server, and you experience the following error whenever you attempt to join this server to the new domain:
An attempt to resolve the dns name of a domain controller in the domain being joined has failed...
In this case, your Windows 2008 server is confused.  When it came online, it received its IP configuration information from one DHCP server (a race condition is involved here).  Then, when it attempts to join the domain, it contacts that old DNS address, but finds that it doesn't get the appropriate information.  The best solution is to simply stop DHCP on the gateway, but there may be complex issues for small businesses that require a transition period in which both DHCP servers remain enabled. In any case, the solution is trivial and is discussed here.

Solution

On the Windows Server 2008 machine, go: Local Area Connection > Properties > Internet Protocol Version 4 > Properties.  On the General tab, select the option Use the following DNS server addresses.  For DNS address, enter the IP address of your new domain controller.  Then try to rejoin the domain.

References
  1. Failed to resolve DNS name in domain contrler
  2. an attempt to resolve the dns name of a dc in the domain being joined has failed.Please verify this client is configured to reach a DNS server that can resolve DNS name in the target domain
  3. An Attempt To Resolve The Dns Name Of A Domain Controller In The Domain Being Joined Has Failed
  4. Dns error windows 7 connect to domain
Notes
  • You may find that you didn't have to change the DNS setting at all, but that simply trying to rejoin the domain at a later time is successful.

Monday, March 14, 2011

Step-by-Step Setup of an Active Directory Domain using Windows Server 2008 R2

Introduction

This article walks you through step-by-step building of an active directory domain using (64-bit) Windows Server 2008 R2 Enterprise SP1.  It assumes the existence of a network gateway.  You can perform this exercise remotely, which was the approach taken in this procedure.  Total time for completion of this task is about one hour.  This current walkthrough includes a few steps missed in the similar and excellent walkthrough provided by Read The Effin Blog! (link provided below).  Good Luck!

Procedure

Log onto your target server with an account having administrator privileges.  Then launch Server Manager.  Scroll down until you see the Roles Summary section.


Click Add Roles.  This launches the Add Roles Wizard, the first page of which appears.


Click Next.  This takes you to the Select Server Roles page.  Enter a check into the Active Directory Domain Services role.


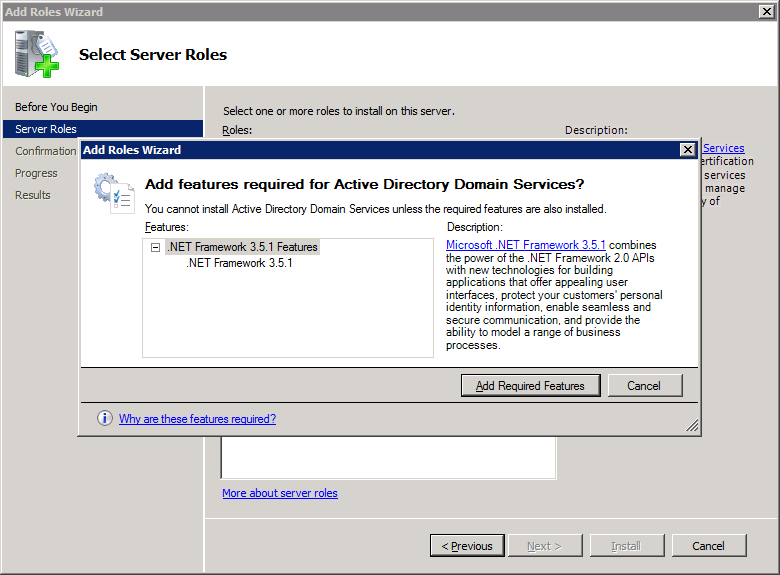
Click Next.  If this is the first time you have configured Active Directory Domain Services on this machine, you will likely be prompted to install the .NET Framework 3.5.1.  You can't install this independently.  It has to be installed as a requirement of a server role.


Click Add Required Features.  The prompt goes away, and you are returned to the Add Server Roles page.


Click Next.  The Active Directory Domain Services page appears.  This is purely an informational page.  Click on any of the displayed links in order to read up on Active Directory topics.


Click Next.  The Confirm Installation Selections page appears.  Again another informational page.


Click Install.  The installation begins, and you'll see a progress meter displayed.  This will take about 5-10 minutes.


On successful installation, you'll see the Installation Results page.


Click Close: A Group Policy Management prompt appears.


Click OK.  The prompt closes, and you are returned to the Server Manager.  This completes the setup of your server as an Active Directory Domain server. Note that now a new item appears in the Roles Summary section: Active Directory Domain Services.  It has an X next to it because you still need to configure Domain Name Services.  That's what you'll do next.

Domain Name Services is not a role that you can add using the Add Roles Wizard. If you run it again, this time selecting the DNS Server option, you'll get a message stating something to this affect:


Instead, go back to Server Manager, scroll down to the Roles Summary section, and then click on the Active Directory Domain Services link.  This takes you to the Active Directory Domain Services section of Server Manager.


Scroll down about half way until you see the Dcpromo.exe link.


Click on this link.  A number of different configuration tasks will start appearing in their own progress meters.  This process will take several minutes.


Once these configuration tasks are completed, the Active Directory Domain Services Installation Wizard appears.


Leave the Use advanced mode installation option unchecked, and then click Next.  The Operating System Compatability page appears.  This page is purely informational.


Read through it, considering and noting your own network architectural needs, and then click Next.  The Choose a Deployment Configuration page appears.


In this step-by-step walkthrough, this is the first domain controller that is being configured.  Thus, the correct option to select is Create a new domain in a new forest.  Click Next.  The Name the Forest Root Domain page appears.  Hang in there, you're almost done.


Guidance on DNS naming conventions are provided in the References section, below.  For this walkthrough, a small private domain is being created that will not be routed; and to ensure that it won't be routed, the first-level domain of local is used, which is not currently registered on the Internet.  Enter any desired namespace for your local domain, and then click Next.  The Set Forest Functional Level page appears.


For this step-by-step walkthrough, the this domain controller will be the only one on the network, and no other domain controllers will be setup.  Thus, the Windows Server 2008 R2 option is chosen.  Select what option meets your needs, and then click Next.  The Additional Domain Controller Options page appears.


The DNS server option is selected by default, and this is what is currently being configured.  Therefore, leave the default option selected, and then click Next. If this is the only domain controller on your network, a warning prompt will appear.


For the purposes of this step-by-step walkthrough, we are currently configuring the only domain controller on this network, and thus the correct choice is Yes.  Click Next.  The Location for Database, Log Files, and SYSVOL page appears.


For the purposes of this step-by-step walkthrough, the default directorys shown work just fine, but revise as desired, and then click Next.  The Directory Services Restore Mode Administrator Password page appears.  Just a few more steps, and you've finished.


 Enter a restore password, and then click Next.  The Summary page appears.


This is the last and final step.  Once you click Next, the installation proceeds, taking a few minutes; and then once it completes, there are no more steps to perform - at least as far as setup goes.  Click Next.  An informational prompt will appear over the Summary page.


Final installation takes a few minutes.  Go ahead and check the Reboot on completion option, while you're waiting.  You'll need to reboot anyway in order to complete the installation.  Might as well as do it now.  Once it has completed, and you checked the Reboot option, your machine will reboot, and then, on coming back online, you will now have a functioning Microsoft Windows Server 2008 R2 domain controller on your network.  Congratulations!  ('Bet you thought you could never do it).

References
Notes
  • This step-by-step walkthrough was performed on a Dell Precision 380, P4, 180GB disk, 2GB RAM.  It's a dinosaur, but its available and has more than enough resources to perform domain controller functions on a small network.