Introduction
This posting walks you through the process of migrating a pre-configured Microsoft Virtual Hard Disk (VHD) system to VMware, using nothing more complex than a text editor. This posting integrates relevant postings on this topic from other authors. Links to all references uses in researching and developing this posting are provided in the References section, below. This posting was developed on VMware Workstation 7.1.3 build-324285, but applies to other VMware products, including ESX and Player.
In this posting, you will migrate the Microsoft Windows Server 2003 R2 Enterprise Edition VHD to VMware Workstation 7.1.3.
Step 1: Prepare VHD
This posting has presented one method for migrating Microsoft VHD systems to VMware Workstation without the need for third party conversion tools. The process merely involves minor changes to the VMware settings file for the VM.
Troubleshooting I: Mouse cursor does not appear within the virtual machine window
This posting walks you through the process of migrating a pre-configured Microsoft Virtual Hard Disk (VHD) system to VMware, using nothing more complex than a text editor. This posting integrates relevant postings on this topic from other authors. Links to all references uses in researching and developing this posting are provided in the References section, below. This posting was developed on VMware Workstation 7.1.3 build-324285, but applies to other VMware products, including ESX and Player.
In this posting, you will migrate the Microsoft Windows Server 2003 R2 Enterprise Edition VHD to VMware Workstation 7.1.3.
Step 1: Prepare VHD
- Download or locate the Source VHD. For this posting, the source VHD filename is Win2k3R2EE.vhd.
- Create a new folder in your VMware VM directory. For this posting, a new folder win2k301 was created.
- Copy the source VHD to your VMware directoryWhile not absolutely necessary, it facilitates file management to keep the VHD source file co-located in the same folder as the target VMware VM folder.


- Launch VMware Workstation.
- From the File menu, point to New and then point to Virtual Machine..

- Click Virtual Machine. The first page of the New Virtual Machine Wizard appears.
- Select the Custom (advanced) option

- Click Next.
- On the Choose the Virtual machine Hardware Compatibility page, select the appropriate virtual machine hardware compatibility from the Hardware dropdown, and then click Next.
- On the Guest Operating System Installation page, select the I will install the operating system later option, and then click Next.
- On the Select a Guest Operating System page, from the Guest operating system group, select Microsoft Windows, and then click Next.
- On the Processor Configuration page, leave all settings default, and then click Next.
- On the memory for the Virtual Machine page, change the memory to 1 GB (1024 MD), and then click Next.
- On the Network Type page, choose the network configuration desired. For this posting, the Use bridged networking option was selected

- Click Next.
- On the Select I/O Controller Types page, leave the default (LSI Logic), and then click Next. The next page is the most important in the VM creation process.
- On the Select a Disk page, select Use an existing virtual disk.

- Click Next. The Select an Existing Disk page appears

- On the Select an Existing Disk page, click Browse, and then navigate to the location of the VHD

- Select the VHD file, and then click Open. The navigation dialog closes, and you are returned to the Select an Existing Disk page

- Back on the Select an Existing Disk page, verify that the path and file name are correct, and then click Next.
- On the Ready to Create Virtual Machine page, click Finish. The VM is created and a new tab appears in VMware

- Verify that the VM folder now has VMSD, VMX and VMXF files


- Exit VMware Workstation. If you are using ESX, remove the new VM (but don't delete the files).
- Navigate to the VM folder created in Step 1. This folder should contain the VHD file along with a VMSD, VMX and VMXF files

- Right-click the VMX file, in this posting named win2k301.vmx, point to Open With, and then choose Notepad. The VMware VM settings file opens in NotePad.
- Edit the scsi0.present setting from TRUE to FALSE.

- Edit the scsi0:0.present setting from TRUE to FALSE.

- Add the following settings:
ide1:1.present = "TRUE"
ide1:1.deviceType = "disk"
ide1:1.fileName = "Win2k3R2EE.vhd"

- Save and close the VMX file.


- Launch VMware Workstation. If you are using ESX, add the VM back.
- Start the VM.
- If you repeatedly experience this blue screen, you may not have correctly edited the VMX settings file. Review this file and try again.

- You'll see the usual Windows settings screen appearand then various Windows Setup dialogs will also appear; and the rest is normal Windows startup


- If, after logging into the Windows VM, you find the cursor missing or stuck in the bottom right corner, see Troubleshooting I below.
- If after trying to shutdown Windows VM, you find that it appears to hang, see Troubleshooting II below.


This posting has presented one method for migrating Microsoft VHD systems to VMware Workstation without the need for third party conversion tools. The process merely involves minor changes to the VMware settings file for the VM.
Troubleshooting I: Mouse cursor does not appear within the virtual machine window
This can occur if the original VHD system had Microsoft Virtual Machine Additions installed. To verify this, perform the following tests:
- Right-click anywhere in the virtual machine window: does a pop-up appear repeatedly in the bottom right corner no matter where you right-click?
- Using your keyboard navigation skills, check the installed software: is Virtual Machine Additions listed?
If either is the case, try the following:
- Re-open the VHD in Virtual PC or Hyper-V, remove the Virtual Machine Additions, and then repeat steps 1-4 above.
- Re-install or update the VMware tools, but leave out the mouse driver, and then reboot.
- Launch Regedit, navigate to
look for the UpperFilters setting, and remove msvmmouf and any spaces from its value, leaving the mouclass value still thereHKEY_LOCAL_MACHINE\SYSTEM\CurrentControlSet\Control\... ...Class\{4D36E96F-E325-11CE-BFC1-08002BE10318}


Troubleshooting II: Shutdown Locks
This occurs after attempting a normal shutdown of the server. The screen changes, the message appears indicating that server is shutting down, the message disappears, and then only a normal desktop is displayed that is unresponsive to keyboard and mouse input. The only way to force the server to shutdown us using VMware shutdown option. There is significant discussion and troubleshooting steps on this issue to be found in the VMware knowledgebase. However, the workaround is simple:
- On the VM server (guest OS), from the Start menu, point to Control Panel, and then point to VMware Tools.

- Click this item. The VMware Tools dialog appears

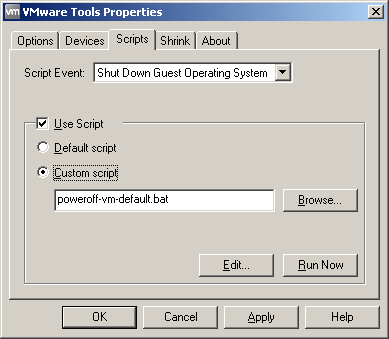
- Select the Scripts tab:
- On the Scripts tab, from the Script Event dropdown, select Shut Down Guest Operating System.
- Enable Use Script.
- Select Custom script

- Click the Edit button.
- In that file, add the following: shutdown /s /t 10 /d P:0:0 /c "VM guest shutdown".
- Save and close the file
- Click OK.
- Test by performing a normal shutdown of the server.


- Salih's Blog: Sharepoint/RTM Demo VHD on Vmware Workstation 7
- My Digital Life: How to Convert and Import VHD to VMDK (VMware)
- SQL Panda: Run Windows 2008R2 VHD under VMware Player
- SuperUser: What is the default administrator password?
- Josh Odom: Sample VMX File
- San Barrow: VMX-file parameters
- Linhost: Create a virtual machine from an ISO with VMWare Player
- Microsoft Windows Server 2003 R2 Enterprise Edition VHD
- VMware mouse problems - mouse stuck in bottom right corner
- Virtual Machine Additions Issue
- Unable to shutdown Windows using the Shutdown Guest option (1004764)
- Windows Server 2003, Enterprise Edition: System requirements
- Use your keyboard to move and resize windows
- Windows Server 2003 Guest OS not shutting down cleanly on Windows 2008 Standard host with VWARE Server 2.0
- Run IT on a Virtual Hard Disk – Test Drive Program
- Hyper-V Server VHD Recovery Tool to Extract Files from VHD, AVHD, VHDX & AVHDX
- Thanks to SQL Panda for guidance on what VMware parameters to modify.
- Thanks to Tim Cerling and Øyvind Hvidsten for guidance and steps on resolving the stuck mouse cursor problem.
- Thanks to AAndrei for presenting a simple workaround for the locked shutdown issue.


