Monday, December 31, 2012

Tip: How to Perform a Manual Java Update

Introduction

Follow these steps to perform a manual Java Update on a Windows machine.  This procedure assumes the use of Windows Vista or 7 and that Java has already been previously installed.

Procedure

Click Start, and then click Control Panel.  The Windows Control Panel appears.


On Control Panel, click Programs.  The Programs and Features panel appears.


On this panel, look for the Java icon, and then click this icon.  The Java Control Panel appears.


On this panel, select the Update tab.


On the Update tab, click the Update Now button.  The first panel of the Java Update wizard appears.


On the Java Update Wizard, click the Install button.  The Welcome panel appears.


On the Welcome panel, click Install.  The McAfee install panel appears.


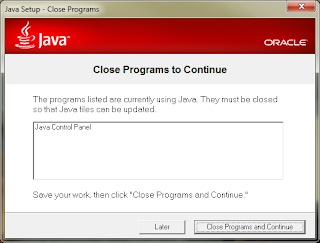
On the McAfee install panel, uncheck the security scan option (unless you really want to do this), and then click Install.  A panel may appear requesting that you close certain open application.

  
Click the Close Programs and Continue button. A status meter panel appears.


Java installation will take about a minute or two.  Once it completes, you will see the Complete panel.


This completes this procedure.  Happy Computing!

References

Saturday, November 3, 2012

No Data In Web Analytics Reports

Problem

You are running an instance of SharePoint 2010.  You are experiencing problems viewing web analytics reports:
  • Partial data is available for one or more report types (e.g., data is available for a certain date range, but not for other date ranges)
  • No data is available for one or more report types

Solution

Perform the following checks:

Check 1: Analytics Services Running
Go: Central Administration > Application Management > Service Applications > Manage Services on Server
Check to make sure that the following two services are running on the SharePoint 2010 Server; if they aren't, start them:
  • Web Analytics Data Processing Service
  • Web Analytics Web Service
Check 2: Usage Data Reporting Configuration
Go: Central Administration > Monitoring > Reporting > Configure usage and health data collection
Make sure that usage data collection has been enabled and appropriately configured.  Best policy: select all options available under Events to log.

Check 3: Job Definition Schedules
Go: Central Administration > Monitoring > Timer Jobs > Review job definitions
Check to make sure that the following job definitions have been appropriately scheduled; if they aren't, schedule them:
  • Microsoft SharePoint Foundation Usage Data Import (5-10 minutes)
  • Microsoft SharePoint Foundation Usage Data Processing  (daily)
  • Microsoft SharePoint Foundation Site Inventory Usage Collection  (daily)
Check 4: Usage Log Folder Permissions
Default: C:\Program Files\Common Files\Microsoft Shared\Web Server Extensions\14\LOGS\
Check to make sure that the folder where usage log files are written to has the appropriate security permissions:
  • WSS_Admin_WPG: everything but Full Control
  • WSS_RESTRICTED_WPG: read and write
  • WSS_WPG: read and write
Check 5: Wait

Yes, wait.  After making any configuration changes, as presented above, it can take a full day or two before you will observe any changes reflected in your web analytics reports.  Take heart: it seems more complicated than it is.  Following the above checks, and you will have resolved 90% of the issues out there.

Notes

  • Not all types of data appear in the web analytics reports available for Central Administration, Web, or Collection scopes (e.g., the Storage Usage report doesn't appear).  For example, Storage Usage reports are available only at the Collection scope.

References

SharePoint Foundation Search Refresh Failed

Problem

You have a SharePoint 2010 instance.  You are running the SharePoint Foundation Help Search service.  You check Job History (CA > Monitoring > History > Failed Jobs), and you find a list of SharePoint Foundation Search Refresh failed jobs:

Job Title: SharePoint Foundation Search Refresh
Server: (your SharePoint server)
Web Application:
Content Database:
Status: Failed
Complete: (date/time)
Duration: 0:00:00
Error Message: Logon failure: unknown user name or bad password.

Solution

By default, the SharePoint Foundation Search Refresh job runs hourly.  This job runs under the service account you configured for the Foundation Search service, e.g., sp_fSearch.  This account connects to the SharePoint backend and interacts with several databases.  Make sure that this account has the following permissions for these databases:
  • Server Farm Configuration (SharePoint_Config): dbdatareader
  • SharePoint Admin Content (SharePoint_AdminContent): dbdatareader
  • SharePoint Foundation 2010 Search (WSS_Search_[servername]): db_owner
If you can't recall the names of the databases, go to Step 1 of the Farm Backup page, and you will see a listing of components along with their descriptions, which will guide you to noting the names of the databases listed above.  Once you know the appropriate databases, go into SQL Server Management Studio to configure the accounts appropriately.  After performing this step, you can either perform a manual run of the SharePoint Foundation Search Refresh job, or wait for it to run as scheduled, in order to see the affect of these changes.

References

SharePoint 2010 Timer service failed to start

Problem

You recently installed SharePoint 2010.  You start up the SharePoint host server, after a multi-day shutdown.  Connecting to Central Administration, you experience a HTTP Error 503. The service is unavailable error displayed in your browser.  You then try connecting to one of your user sites on this same SharePoint server and experience the same error.  Checking host server logs, you notice a number of error and warning events, including:
  • Event 8193: Volume Shadow Copy Service error: Unexpected error calling routine RegOpenKeyExW(-2147483646,SYSTEM\CurrentControlSet\Services\VSS\Diag,...).  hr = 0x80070005, Access is denied.
  • Event 8230: Volume Shadow Copy Service error: Failed resolving account [account] with status 1376. Check connection to domain controller and VssAccessControl registry key.
  • Event 10: Event filter with query "SELECT * FROM __InstanceModificationEvent WITHIN 60 WHERE TargetInstance ISA "Win32_Processor" AND TargetInstance.LoadPercentage > 99" could not be reactivated in namespace "//./root/CIMV2" because of error 0x80041003. Events cannot be delivered through this filter until the problem is corrected.
  • Event 7000: The Claims to Windows Token Service service failed to start due to the following error: The service did not respond to the start or control request in a timely fashion.
  • Event 1202: This computer is now hosting the specified directory instance, but Active Directory Web Services could not service it. Active Directory Web Services will retry this operation periodically.
And there are more instances of such errors.  You continue to scoll down, and then you see the following events:
  • Event 7000: The SharePoint 2010 Timer service failed to start due to the following error: The service did not start due to a logon failure.
  • Event 7038: The SPTimerV4 service was unable to log on as ALSTECHTIPS\sp_farm with the currently configured password due to the following error:  Logon failure: the specified account password has expired.

Solution

The problem involves password expirations, as noted in Event 7038.  This was a new SharePoint 2010 instance, installed within the past few months.  Installation involved a number of domain service accounts being created and configured for use with the new instsance.  The service account option Password never expires was not enabled.  Enable this option for all SharePoint 2010 service accounts:


Then restart the server.

References

Sunday, October 21, 2012

TIP: Remove domain from username in SharePoint 2010

Introduction


Sometimes, in SharePoint 2010, the user will see his or her name displayed as [domain name]\username, rather than the [Full Name] saved in Active Directory. Such as:


This can become problematic when configuring views to conserve limited width, as the addition of the domain in the username display may add considerably to the column width needed:


One way to address this is to configure user profile synchronization, and this is the best way as it automates resolution of this issue.  See the References for links to helpful articles on how to implement this approach.  However, this approach may not always be desirable or even feasible in some environments.  A much simpler spot approach is to use PowerShell.

Using PowerShell commandlets, you can resolve this for one user or a bunch of users at one time.  Let's get started.

Procedure

1) Open the SharePoint 2010 Management Shell as Administrator.

2) Enter the command in the format:

Set-SPUser -Identity '[domain name]\[username]' -DisplayName '[full name]' -Web [url]


3) After the command completes, a new command prompt is display (no messages).

4) To verify whether the command worked, just refresh your page:


and


5) To update the display name for all users, you need to first get the SPUser object associated with your website, and then port the results into the Set-SPUser commandlet, like so:

Get-SPUser –Web [url] | Set-SPUser –SyncFromAD


6) Running this command will generate a number of errors appearing in the command shell.  These result from the command attempting to synchronize ALL accounts, including such accounts as System, Local Service, etc, which obviously won't work. 


Ignore these errors: it worked on the others.

Summary

In this Tip, you were shown how to easily and quickly resolve a user identity appearing in the form "[domain name]\username" rather than "[Full Name]".  You were also shown how to do this for all users of a website.

References


TIP: Set Unique Item Permissions for a SharePoint 2010 List

Introduction

SharePoint 2010 allows you to set permissions not only for a list, but also for individual rows within that list.  This can be useful, for example, when building mashups and dashboards and needing to appropriately secure the source list data feeding into the mashup or dashboard so that users see only that data in the mashup they are supposed to see.  These unique permissions follow this row where ever it may appear.  For example, if you develop a custom page and use the Dataview web part to present data from a list having unique row permissions, users connecting to this page will only see those list rows displayed in the dataview that they are supposed to see.  Let's get started.

Procedure

1) Go to the target list.

2) Go to the list item for which you want to set unique row permissions.

3) Open the list item's action menu


4) Select Manage Permissions from this menu.  This takes you to the Permissions page for that row.

5) Look for the Stop Inheriting Permissions button in the ribbon.


6) Click this button.  A prompt will appear.


7) Click Yes.  The prompt closes and you are returned to the Permissions page.  Note that now you can select users and security groups and your function buttons in the ribbon have changed.  You can now change the row permissions uniquely from the parent list.


Summary

In this Tip, you were shown how to set unique permissions for a row - permissions different from the parent list.  Setting unique row permissions can be useful in those cases where you need to ensure that users see only that data they are suppose to see. These unique permissions follow the row item where ever it may appear, even when you custom develop pages and webparts to display list data.

Notes

  • If you add users and groups to a row item permissions that were not originally included in the parent list permissions, these will be added to the parent list.

References

Monday, September 3, 2012

Installing a Headless PostgreSQL Server, Step-by-Step

Introduction

It isn't necessary to install PostgreSQL with its GUI frontend.  It runs just fine without it and consumes a smaller footprint.  If you're comfortable using the command line interface, installing headless is the way to go.  In some environments, it may even be necessary.  This step-by-step procedure shows you how.  This step-by-step installs an older version of PostgreSQL, 8.4.8-1, but is applicable to all.  It will install the postgres8_4-x86_64 package group, which contains three packages:
  • postgresql-libs-8.4.8-1PGDG.rhel5.x86_64.rpm
  • postgresql-8.4.8-1PGDG.rhel5.x86_64.rpm
  • postgresql-server-8.4.8-1PGDG.rhel5.x86_64.rpm
and it will create the following subdirectories:
  • /var/log/pgsql
  • /var/lib/pgsql
  • /usr/share/pgsql
  • /usr/lib64/pgsql
  • /etc/sysconfig/pgsq
This procedure was tested on a headless CentOS 5.5 enterprise server. Total installation time is about one hour.  This procedure concludes by providing steps for changing the database server password and adding new users.  Good luck!

Procedure

1) Open a terminal on the target server.

2) Log into the root account.

3) Install the PostgreSQL server package and its dependencies using YUM.  Be sure to disable gpg signature checking, in order to avoid annoying warnings:

[root]# yum install postgresql-server --nogpgcheck

4) Initialize the database.  Note that database initialization on RHEL (and thus also CentOS) will be somewhat different than other Linux flavors:

[root]# service postgresql initdb –D /var/lib/pgsql/data

Or, you may need to initialize the database using this approach:

[root]# /etc/init.d/postgresql start

5) Now, start the service:

[root]# /etc/rc.d/init.d/postgresql start

6) The default location on RHEL (and thus also CentOS) systems is /var/lib/pgsql.  However, applications such as bash will expect the location to be /usr/local/pgsql.  This can be fixed via soft symlink:

[root]# ln –s /var/lib/pgsql   /usr/local/pgsql

7) Check to make sure that the postgres account owns the pgsql directory and subdirectories:

[root]# ls –l /var/lib

If not, you will need to change ownership.  When changing ownership, do so recursively.

8) Test the account by logging into it and then performing stop and start commands:

[root]# su – postgres
-bash-3.2$ pg_ctl –stop
-bash-3.2$ pg_ctrl start

9) Stop the PostgreSQL instance so that you can edit configuration settings files:

[root]# service postgresql stop

10) Save a copy of the original configuration file:

[root]# cp /var/lib/pgsql/data/postgresql.conf   /var/lib/pgsql/data/postgresql.conf.ORIGINAL

11) Update the PostgreSQL configuration file to enable it to listen in on the server IP address at the default port:

[root]# vi /var/lib/pgsql/data/postgresql.conf

Uncomment the line “listen_addresses” and set it equal to ‘*’

Uncomment the “port” and leave it set to the default port (5432)

12) Save a copy of the original security access file:

[root]# cp /var/lib/pgsql/data/pg_hba.conf   /var/lib/pgsql/data/pg_hba.conf.ORIGINAL

13) Update the PostgreSQL security access file to enable client access to this PostgreSQL instance from within the subnet:

[root]# vi /var/lib/pgsql/data/pg_hba.conf

Add this line:

host all all 192.168.0.0/24  md5

Additionally, if you want to be able to use a GUI to interact with this postgresql instance over a VPN, you’ll need to identify the IP address that is received by the PostgreSQL instance and add this to the list of hosts allowed to connect.  For example, if your VPN IP address was “10.58.150.8”, then to allow only your “10.0.0.0” IP address to be able to connect you would add the following:

host all all 10.58.150.8/32  md5

14) Startup the postgressql service:

[root]# service postgresql start

15) This completes this PostgreSQL installation procedure.

Troubleshooting the Installation

If you encounter the following error, while trying to perform a YUM install…

Loaded plugins: fastestmirror, rhnplugin
Determining fastest mirrors
Could not retrieve mirrorlist
http://mirrorlist.centos.org/?release=5&arch=x86_64&repo=os error was
[Errno 4] IOError: <urlopen error (-3, 'Temporary failure in name resolution')>
Error: Cannot find a valid baseurl for repo: base"


this likely indicates that YUM on this server was attempting to check an external list using an external repository that your environment is not using.  The solution involves deleting all files in your external repository on the target machine.  For example, your external repository might be:  /etc/yum.repos.d/. 

Delete all the files in this repository and then try again.

Changing the Database Server Password

1) Open a terminal on the target server

2) Login to root

# sudo su - root

3) Super into the postgres account

[root] # su - postgres

4) Open a postgresql shell to the PostgreSQL service database

[root] # psql -d template1 -U postgres

5) Alter the postgres account’s password

[root] # ALTER USER postgres WITH PASSWORD 'postgres_password';

The password change take effect immediately.

6) This concludes this procedure.

Creating a New User

1) Open a terminal

2) Login to root

3) Login to the postgres account

[root] # su - postgres

4) Create new database user for Jive SBS, assigning the password immediately, then responding to the prompts as shown:

-bash-3.2$ createuser -P sbs
Enter password for new role:
Enter it again:
Shall the new role be a superuser? (y/n) n
Shall the new role be allowed to create databases? (y/n) n
Shall the new role be allowed to create more new roles? (y/n) n


The new user is available immediately.

5) This concludes this procedure

Summary

This step-by-step procedure walked you through the installation of a headless PostgreSQL database server onto a CentOS enterprise server.  For additional installation tips and details, consult the references below.  Happy Coding!

References

Sunday, September 2, 2012

TIP: Hiding DataView Web Part Checkboxes

Introduction

Its frequently the case that when you insert a Listview or Dataview web part onto a SharePoint 2010 page, you don't want the "item checkboxes" to appear.  The reason being that they can take up valuable space on the page and they can sometimes skew the appearance and placement of items in the list.  Removing this checkbox is easily accomplished, and there is plenty of discussion providing details for removing them by adding the "TabularView" parameter to the  <View > sub node of the <XmlDefinition> node and setting this parameter to "FALSE" [1, 2, & 3] like so:
<View Name=... TabularView="FALSE"...
However, there really is no need to do any code modification.  All you really have to do is to make a settings change to the list's application page, and then re-insert the Dataview web part; or make the settings change before you even insert the DataView web part, and then you won't have to fiddle with the web part again.

Discussion

By default, a view of a list, on the list's application page, provides checkboxes (shown at leftmost column) enabling multiple list rows to be selected.  By default, the tabular view is enabled.  This causes checkboxes to be displayed in the list. This allows, for example, for multiple list rows to be deleted simultaneously.  When you insert a DataView web part into a page, and then connect it to a list, that web part is configured per the list's default view. 

You can see this by looking at the <View> subnode of the dataview's <XmlDefinition> node.  This subnode incorporates all of the configuration parameters of the list's view.  Note the Name parameter: this is the object name of the view.  Listed here as subnodes of the <View> node, will be all of the fields displayed by the view.

Once you insert a DataView web part, SharePoint Designer takes a snapshot of the current view's properties, and then builds the web part code and inserts it into the ASPX page.  This is a static snapshot, not a dynamic one.  Once SharePoint Designer 2010 inserts the parameters for the web part, that's it: it doesn't do anything more.  The XSL for that web part is frozen.  Therefore, if you later make a change to the view that the web part connects to, such as changing the Tabular View parameter, in the view's Settings page, that change will not be reflected in the DataView web part.  To reflect that change in the web part, you will either need to adjust the parameter manually, by editing the code, or by re-inserting the web part.

Summary

This TIP showed you how to remove the checkboxes displayed next to items listed in a ListView or DataView web part.  Specifically, it discussed why the checkboxes appear and how to remove them either in code or in the list's view settings.  Happy Coding!

References

  1. XsltListViewWebPart – remove checkboxes
  2. Hide the item checkboxes and the select all checkbox in list view webparts
  3. Remove checkbox next to list items XSLT List view webpart Sharepoint 2010

Wednesday, August 1, 2012

Installing Zimbra Email Server Step-by-Step

Introduction

This step-by-step walkthrough shows you how to install and configure the open source VMware Zimbra email server.  It's part of the VMware Zimbra Collaboration Server suite of applications. Total installation time is about one hour.  This procedure assumes that you have an LDAP server installed and it assumes installation to CentOS servers.

Prerequisites

There are a number of prerequisites associated with Zimbra.  Some are required and some are suggested.  The following are required:
  • NPTL
  • sudo-1.7.2p1-10
  • libidn-0.6.5-1.1
  • gmp-4.1.4-10
  • /usr/lib64/libstdc++.so.6
These will likely already have been installed as a part of the default CentOS server.  Still, it’s a good idea to check to make sure, before launching the Zimbra installation script. The next two prerequisites are suggested:
  • perl-5.8.8
  • sysstat
Of these, the perl-5.8.8 should already have been installed as a part of the default CentOS installation.  The sysstat item will not have been installed.  Check to make sure.  If not, install it:
[root]# yum install sysstat
Also, if you happened to have attempted previous Zimbra installs on the target machine, there may be artifacts left on the machine.  Don’t worry about these.  The Zimbra install checks default locations for previous Zimbra installation artifacts and removes these if they exist.

Installation

Login as root onto the target server.

Copy the Zimbra Collaboration Server (ZCS) installation file to the target server.  A good location to copy this file to is: /opt/local/src.  The file will be in a format similar to:
zcs-6.0.13_GA_2918.RHEL5_64.20110513152056.tgz
Unpack this file:
[root]# tar xzvf zcs-6.0.13_GA_2918.RHEL5_64.20110513152056.tgz
Change into the installation directory:
[root]# cd zcs-6.0.13_GA_2918.RHEL5_64.20110513152056
Execute the installation script, using the platform override option:
[root]# ./install.sh –platform-override
Accept defaults for all packages

At the warning regarding platforms, enter Yes.

At the warning about the system being modified, enter Yes.

After entering Y, you may experience a domain name warning; and you may be asked to change to domain name.  Be sure to check with your systems administrator to obtain the appropriate domain name for your specific environment.

At the Main Menu, enter 3 for Zimbra store. 

At the Store configuration menu, enter 4.

Follow the prompts to create the Admin password.

Accept all other defaults, and continue with the installation.

At the prompt to save the configuration to a file, enter Yes, and then note the path to this file.

At completion of installation, take note of the name and path to the setup log in case you need to review in order to troubleshoot emerging issues.

This completes Zimbra installation.  For additional details on Zimbra installation, consult the Zimbra Quick Start or Zimbra Administrator manuals.

NOTE: by default, Zimbra will be installed to the /opt/Zimbra directory.  This location is hard-coded in the Zimbra installation routine and cannot be changed via installation parameters.

Configure Authentication

Open a browser, and then connect to the target Zimbra machine apache web server: [Your_Zimbra_Server_Name]:7071/zimbraAdmin.

Logon to the Zimbra admin console.  The default administrative username and password are: admin/admin.

In the Zimbra Admin console, under the Configuration group, expand the Domains tree and select the domain you wish to configure authentication for.  A new tab will appear.

If you domain is not listed, you will need to create it.

To create a new domain, click the @New button on the Manage Domains tab.  This will launch a wizard that will walk you through the rest of this process.  After you complete this process, a new item will appear under the Domains tree.


On the new tab for the domain, click Configure Authentication.

On the first page of the Authentication Configuration Wizard, configure the parameters as shown below (you will need to obtain these parameters from your LDAP administrator):
LDAP Server Name: [Your_LDAP_Server_URL]
Port: 389
Use SSL: NO (unchecked)
LDAP Filter: (uid=%u)
LDAP Search Base: OU=[Your OU name],OU=[Your group name],DC=[Your domain name],DC=[Your domain type - e.g., com, local, gov, etc]
Bind DN: cn=[common name],ou=[OU name],ou=[User group name],dc=[Your base domain name],dc=[Your domain type - e.g., com, local, gov, etc]
Bind password: [request from LDAP administrator]
Confirm bind password: [request from LDAP administrator]
Click Next.

On the second page of the Authentication Configuration Wizard, configure the parameters as shown below:
Bind DN: cn=[common name],ou=[Your OU name],ou=[Another OU name],dc=[your domain name],dc=[your ase domain name]
Bind password: [request from administrator]
Confirm bind password: [request from administrator]
Click Next.

On the third page of the Authentication Configuration Wizard, enter the user name and password of a known account in the target LDAP directory.

Click Test.  On successful test, you will a green “Authentication test successful” message.

Click Next.

Click Finish. 

You're done!

Add Users

Zimbra does not automatically interrogate LDAP for users.  Each user must be added manually to Zimbra.  This is by design, as there may be users in the LDAP directory for whom it would not be appropriate to have email accounts.  Therefore, after configuring and verifying Zimbra LDAP authentication, create new email accounts for each user in the domain as desired.  This can be accomplished using the Zimbra Admin console.

Summary

In this step-by-step walkthrough, you've installed and configured the open-source Zimbra email server and connected it to your LDAP server for authentication.  For additional detail, consult VMware's Zimbra wiki.

Happy computing!

References
Tip: Quickly Import List and Library Templates into SharePoint

Introduction

Importing a list or library in Microsoft SharePoint 2010 is different than in SharePoint 2007.  For one thing, you won't find the usual Manage list template gallery in the Site Administration page:


Instead, you'll see a different link, List templates:


Clicking the List templates link takes you to a page listing any custom templates you may have, but does not seem to provide any means of loading them.


If you search online, you may find one or more articles that state that the only way to now upload templates to SharePoint 2010 is using PowerShell [1].  However, there is a very simple way of uploading custom lists and libraries to a SharePoint 2010 collection that doesn't require scripting or anything complicated.  The following procedure shows you how.

Procedure

On any page of your site collection, go:

Site Actions > Site Settings > Galleries > List templates

This takes you to the All Templates listing, as shown above.  On this page, click the Documents tab to view the Documents ribbon.


Then, on the Documents tab, click Upload Document on the Documents ribbon.  Navigate to your list or library template, and then upload.  That's it.

You can also accomplish the same thing by selecting the Library ribbon, and then clicking the Open in Explorer button.

Summary

This tip showed you how to quickly upload custom list and library templates into a SharePoint 2010.  Use this method to migrate lists and libraries and their content from one SharePoint 2010 site to another.

Happy computing!

References

Wednesday, April 25, 2012

Event ID: 7362: The super user account utilized by the cache is not configured

Problem

You encounter the following error appears in the Windows Application event log:
Log Name:      Application
Source:        Microsoft-SharePoint Products-Web Content Management
Date:          <date>
Event ID:      7362
Task Category: Publishing Cache
Level:         Warning
Keywords:     
User:          <username>
Computer:      <server>
Description:
Object Cache: The super user account utilized by the cache is not configured. This can increase the number of cache misses, which causes the page requests to consume unneccesary system resources.
 To configure the account use the following command 'stsadm -o setproperty -propertyname portalsuperuseraccount -propertyvalue account -url webappurl'. The account should be any account that has Full Control access to the SharePoint databases but is not an application pool account.
 Additional Data:
 Current default super user account: [MachineName]\system
SharePoint 2010 is hosted on this machine.

Solution

On new installations, the SharePoint super user account is configured to run under the machine's local System account.  However, this causes complications and thus the warning.  This should be addressed during setup, but isn't included in the setup wizard.  Anyway, resolving it is simple.  There are two ways: using STSADM or using Powershell.  We'll go through both here.

Step 1: Create Super User and Super Reader Domain Accounts

Create super user and super reader domain accounts

Example: DOMAIN\sp_superuser, DOMAIN\sp_superreader

Step 2: Configure Accounts in SharePoint Central Administration

Go to SharePoint CA: Central Admin -> Manage Web Application -> User Policy

Add DOMAIN\sp_superuser – Full Control

Add DOMAIN\sp_superreader – Full Read

Check to make sure these accounts have similar access to the SharePoint databases.  Next, use one of the following steps: A or B.

Step 3A: Using STSADM

Open a command prompt

Execute:
stsadm -o setproperty -propertyname portalsuperuseraccount -propertyvalue DOMAIN\[sp_superuser] -url [WEBAPPURL]
And
stsadm -o setproperty -propertyname portalsuperreaderaccount -propertyvalue DOMAIN\[sp_superreader] -url [WEBAPPURL]

Step 3B: Using SharePoint Management Shell

Open a shell

Execute the following commands:

$wcm = Get-SPWebApplication -Identity http://[webappurl/]
$wcm.Properties["portalsuperuseraccount"] = “DOMAIN\sp_superuser”
$wcm.Properties["portalsuperreaderaccount"] = “DOMAIN\sp_superreader”
$wcm.Update()

Close the shell

Step 4: Reset IIS

Reset IIS either from the GUI or executing "IISReset" at the command prompt.

Step 5: Test

Opena command prompt

Execute the following:
stsadm -o getproperty -propertyname portalsuperuseraccount -url [WEBAPPURL]
Output should read:

<PropertyExist=”Yes” Value=”DOMAIN\sp_superuser” />
Similarly for the super reader account.  The references below provide good background.
Happy Computing!

References

Event ID 7043: Could not load type 'Microsoft.SharePoint.Portal.WebControls.TaxonomyPicker'

Problem

Reviewing the Windows Application event log, you come across the following:
Log Name:      Application
Source:        Microsoft-sharePoint Products-Sharepoint Foundation
Date:          [date]
Event IO:      7043
Task category: Web Controls
Level:         Error
Keywords:
User:          [SharePoint service account]
Computer:      [SharePoint host]
Description:   Load control template file /_controltemplates/Taxonomypicker.ascx failed: could not load type 'Microsoft.sharepoint.portal.webControls.Taxonomypicker' from assembly...
The machine on which this event occurred is the host for a newly installed SharePoint 2010 instance.

Solution
  1. Temporary solution:
    1. Open a folder and browse to: C:\Program Files\Common Files\Microsoft Shared\Web Server Extensions\14\TEMPLATE\CONTROLTEMPLATES\.
    2. Open the file TaxonomyPicker.ascx in a text editor.
    3. Search for the string: &#44;
    4. Replace it with just a comma and a space:
    5. Save the file.
    6. Reset IIS.
    7. Perform these steps on each farm server (except the database).
  2. Permanent solution
    1. Delete this file from the controls folder (see above).
Notes
  • The problem involves a control template that remains in the control template folder but that has been removed from the code base.  I other words, this is a release error by Microsoft.  A temporary solution is to fix a minor typo in this control, as discussed in KB2481844.  However, the error will re-appear after a system restart, even though the typo no longer exists.  The permanent solution is to remove the control completely. 
  • Renaming the control simply leads to the new problem of a (renamed) control being loaded for which no code exists in the code base.
References

Sunday, April 22, 2012

SharePoint 2010: Cannot open backup device 'F:\[foldername]'. Operating system error 5(Access is denied.).

Problem

Your SharePoint 2010 system employs a SQL Server 2008 server hosted on a different machine. SharePoint 2010 SP1 may or may not have been installed. Both SharePoint 2010 and SQL Server are hosted on Windows Server 2008 platforms.  The MSSQLSERVER service is run under the NETWORK or other domain account.

You attempt to perform a backup from within SharePoint 2010 Central Administration to a network share.  After the backup operation completes, on the status page, you see one of the following errors:
Error: Object SharePoint_Config failed in event OnBackup. For more information, see the error log located in the backup directory.
SqlException: Cannot open backup device '[filename and path]'. Operating system error 3(The system cannot find the path specified.).
BACKUP DATABASE is terminating abnormally.

Error: Object [objectName] failed in event OnBackup. For more information, see the error log located in the backup directory. SqlException: Cannot open backup device Operating system error 5(Access is denied.) BACKUP DATABASE is terminating abnormally.
Solution

The problem most likely involves a permissions issue and is trivial to implement. 

The account running the MSSQLSERVER service is the one that actually processes the backup.  The destination folder for the backup must be configured to specifically allow this account access.  Setting access to Everyone is insufficient.  The MSSQLSERVER service account must specifically be granted Full Control access to both the physical folder and its shared representation.  If you have configured your MSSQLSERVER service to run under the NETWORK or other domain account, simply assign Full Control permissions specifically to these accounts.
NOTE: grant permissions to the NETWORK account.  Not the NETWORK SERVICE account.
If you have configured your MSSQLSERVER service to run under the System account, which is local, you will need to change the account to a domain account in order to resolve this issue.

Happy Computing!

References

Sunday, April 15, 2012

An error (920) occurred during the action Save As.

Problem

You are trying to save a Visio 2007 worksheet as a graphic. During this process, you experience the following error:


Resolution

This problem is often caused by objects outside of the worksheet that Visio is unable to adequately fit into the viewing area for rendering into an image.  These objects can be located so far off the worksheet that it is difficult to immediately view them; and the scroll bar won't give any indication that these objects are there (it only tracks the current worksheet.  However, there is a simple way to remove these unwanted objects lying outside the worksheet.

Zoom out from the worksheet a bit, and then press CTRL + A.  This selects all of the objects on the current tab.  Note that a dashed green line surrounds the worksheet, but that it appears to extend outside of the current zoom view.


This indicates that the current selection has captured objects lying outside of the current worksheet.  Now, zoom outward until you can see the entire selection area.  In the image below, the zoom level is such that the actual worksheet is miniscule; and now the other objects can be seen.


Delete these other objects.  Then press CTRL + A again to ensure that no more objects lay outside of the worksheet.  Once the dashed green selection line only surrounds the current worksheet, you can safely save the current worksheet as an image without encountering further Visio 920 errors.

Happy computing!

References

Wednesday, March 28, 2012

Windows could not set the offline locale information error during install

Problem

You are performing a clean installation of Windows 7 (any version) and experience the following error at some point during the installation:
Windows could not set the offline locale information. Error code 0x80FF0000
You then attempt to repeat the installation, but experience the same error, though it may occur at somewhat different points during the installation process.  You were able to re-partition and even format the target drive during the installation process without issue.  Other possible experiences you may have had with this machine prior to this error include:
  • Suddenly displayed a blue screen, without warning. On restart, BIOS would load fine, but then became stuck during Windows loading.
  • Suddenly loaded extremely slowly or even remained stuck in the Windows loading phase of the boot process.
You would like to recover the system, but in the least costly manner possible.

Discussion

All of these issues point to a possible problem with the hard disk and likely involves the failure of one or more sectors on the disk.  While the hard disk is likely the culprit, and it may degrade further, it is still possible to recover the use of your machine without the purchase of any new software or hardware.  This article shows you how.

You will need your system recovery disk.

The primary method for accomplishing this is to isolate the problem.  Most of the hard drive is likely still functional.  You just need to configure the hard drive in such a way that the operating system will neither be installed to nor operate using those sectors.  You accomplish this through appropriate partitioning.

Rather than trying to re-install your system to the drive configured as a single partition, you will instead create multiple partitions on the hard drive with the intent of capturing those bad sectors within one of those partitions and using the other partition as your system partition.

The Windows 7 installation enables you to create and delete partitions during the installation process.  You don't know where the bad sectors may lie, whether they are towards the outer rim of the disk or inner portions, so you'll need to progressively work your way inwards with partitions of varying sizes, until you create a partition set that isolates the problem and allows you to perform the installation without issue.

Take, for example, a 3-year old (just out of warranty) laptop having a 450 GB hard disk. Try creating two partitions, each 225 GB.  Format the partitions.  Now, install the system to the first partition.  If the installation proceeds without issue, you have successfully isolated the sector failure to the second partition.  If it doesn't, try to repeat the installation attempt to the second partition.  If this succeeds, you've successfully isolated the issue to the first partition.  Otherwise, you may have found the issue midway on the disk.

Continue this process, trying different partition sizes, until you can get the installation to proceed without issue.  Once the system is installed, you can perform a disk check using Windows tools in order to recover the bad partition. 
NOTE: Given the fact that this hard disk has likely evidenced sector failure once, it is even more likely to do so again in the future.  Thus, the recovery procedure discussed here is a temporary measure.
Summary

This article has discussed one method for possibly recoverying from Error code 0x80FF0000, if experienced during clean installation.  It provides a least-cost method of recovery, enabling you to regain the use of the system, if temporarily, without the purchase of new software or hardware.

References

Tuesday, March 27, 2012

SharePoint 2010 Health Analyzer: Missing server side dependencies

Problem

You find the following entry (in whole or in part) in the SharePoint 2010 Central Administration Review problems and solutions All Reports listing:

TitleMissing server side dependencies.
Severity1 - Error
CategoryConfiguration
Explanation[MissingWebPart] WebPart class [baf5274e-a800-8dc3-96d0-0003d9405663] is referenced [22] times in the database [CentralAdminContentDatabase], but is not installed on the current farm. Please install any feature/solution which contains this web part. One or more web parts are referenced in the database [CentralAdminContentDatabase], but are not installed on the current farm. Please install any feature or solution which contains these web parts.
[MissingWebPart] WebPart class [9eba9c17-3b89-a2e7-a3cf-0ee3d7c2adb1] (class [Microsoft.Office.Server.Search.WebControls.SearchTopologyView] from assembly [Microsoft.Office.Server.Search, Version=14.0.0.0, Culture=neutral, PublicKeyToken=71e9bce111e9429c]) is referenced [1] times in the database [CentralAdminContentDatabase], but is not installed on the current farm. Please install any feature/solution which contains this web part. One or more web parts are referenced in the database [CentralAdminContentDatabase], but are not installed on the current farm. Please install any feature or solution which contains these web parts.
[MissingWebPart] WebPart class [b36f9dfe-325a-1b44-e6bb-645dcf79c770] (class [Microsoft.Office.Server.Search.WebControls.FarmSystemStatus] from assembly [Microsoft.Office.Server.Search, Version=14.0.0.0, Culture=neutral, PublicKeyToken=71e9bce111e9429c]) is referenced [1] times in the database [CentralAdminContentDatabase], but is not installed on the current farm. Please install any feature/solution which contains this web part. One or more web parts are referenced in the database [CentralAdminContentDatabase], but are not installed on the current farm. Please install any feature or solution which contains these web parts.
[MissingWebPart] WebPart class [9f56656f-6aa3-0d55-a812-711bf65864ea] is referenced [107] times in the database [CentralAdminContentDatabase], but is not installed on the current farm. Please install any feature/solution which contains this web part. One or more web parts are referenced in the database [CentralAdminContentDatabase], but are not installed on the current farm. Please install any feature or solution which contains these web parts.
[MissingWebPart] WebPart class [926a1a3e-d1ff-f58f-8b3a-854974660703] (class [Microsoft.Office.Server.Search.WebControls.ContentSourcesStatus] from assembly [Microsoft.Office.Server.Search, Version=14.0.0.0, Culture=neutral, PublicKeyToken=71e9bce111e9429c]) is referenced [1] times in the database [CentralAdminContentDatabase], but is not installed on the current farm. Please install any feature/solution which contains this web part. One or more web parts are referenced in the database [CentralAdminContentDatabase], but are not installed on the current farm. Please install any feature or solution which contains these web parts.
[MissingWebPart] WebPart class [de8c8afc-7c6e-e9fc-91c2-aa4a291c3623] (class [Microsoft.Office.Server.Search.WebControls.SearchApplicationSystemStatus] from assembly [Microsoft.Office.Server.Search, Version=14.0.0.0, Culture=neutral, PublicKeyToken=71e9bce111e9429c]) is referenced [1] times in the database [CentralAdminContentDatabase], but is not installed on the current farm. Please install any feature/solution which contains this web part. One or more web parts are referenced in the database [CentralAdminContentDatabase], but are not installed on the current farm. Please install any feature or solution which contains these web parts.
[MissingWebPart] WebPart class [5cc5df3a-29a8-a713-5898-e52e2dce72a8] (class [Microsoft.Office.Server.Search.WebControls.SearchApplicationShortcutsList] from assembly [Microsoft.Office.Server.Search, Version=14.0.0.0, Culture=neutral, PublicKeyToken=71e9bce111e9429c]) is referenced [1] times in the database [CentralAdminContentDatabase], but is not installed on the current farm. Please install any feature/solution which contains this web part. One or more web parts are referenced in the database [CentralAdminContentDatabase], but are not installed on the current farm. Please install any feature or solution which contains these web parts.
[MissingWebPart] WebPart class [874f5460-71f9-fecc-e894-e7e858d9713e] is referenced [65] times in the database [CentralAdminContentDatabase], but is not installed on the current farm. Please install any feature/solution which contains this web part. One or more web parts are referenced in the database [CentralAdminContentDatabase], but are not installed on the current farm. Please install any feature or solution which contains these web parts.
[MissingWebPart] WebPart class [ff79cbb5-48cf-96ee-3f74-f22cc1b00fbd] (class [Microsoft.Office.Server.Search.WebControls.FarmSearchApplicationList] from assembly [Microsoft.Office.Server.Search, Version=14.0.0.0, Culture=neutral, PublicKeyToken=71e9bce111e9429c]) is referenced [1] times in the database [CentralAdminContentDatabase], but is not installed on the current farm. Please install any feature/solution which contains this web part. One or more web parts are referenced in the database [CentralAdminContentDatabase], but are not installed on the current farm. Please install any feature or solution which contains these web parts.
RemedyFor more information about this rule, see "http://go.microsoft.com/fwlink/?LinkID=142689".
Failing Servers 
Failing ServicesSPTimerService (SPTimerV4)
Rule SettingsView
 
Additionally, in the Windows Server Application log, you may find related error events.

Solution
  1. Launch Central Administration.
  2. Navigate to: General Application Settings > Search > Farm Search Administration. 
  3. Refresh the page.
  4. Navigate to: General Application Settings > Farm Search Administration > Search Administration.
  5. Refresh the page.
  6. Navigate to: Monitoring > Health Analyzer > Review problems and solutions.
  7. Click on the error, Missing server side dependencies.
  8. Click the Re-analyze Now button.
  9. Click Close.
  10. Wait a minute or two.
  11. Click the error link again.
References
  1. Missing Server Side Dependencies - 8d6034c4-a416-e535-281a-6b714894e1aa
  2. MSDN Blogs: SharePoint 2010: Missing Server Side Dependencies
  3. Microsoft TechNet: Web Part Error on a clean SP2010 install in Document Center
  4. Microsoft SharePoint Products
  5. SharePoint 2010: Missing Server Side Dependencies
  6. [MissingWebPart] WebPart class [baf5274e-a800-8dc3-96d0-0003d9405663] is referenced [25] times in the database
  7. Health Analyzer showing “missing server side dependency” after performing In-Place upgrade
  8. [MissingWebPart] WebPart class [8d6034c4-a416-e535-281a-6b714894e1aa] is referenced [6] times
Notes
  • See the references above for additional technical detail on this error.
  • UPDATE (10/11/12): I've added some additional references you may find useful on this error.  Note that it's not limited to just the pages discussed above but may occur on other pages and involve other web parts.  The error does not appear to indicate actual loss of functionality that I have been able to tell and thus I recommend disabling the rule for now, as I do for my customer.
  • UPDATE (3/4/14): I have found that just navigating to the page isn't always sufficient to resolve this error.  Instead, I found that refreshing the page once or twice after navigating to it ensured that the error was resolved.
  • UPDATE (3/17/14): This error re-appeared. Performed same procedure to resolve. Unclear why the circumstances generating this error should manifest themselves again.

Wednesday, February 1, 2012

soap:ServerServer was unable to process request

Problem

You've created a new website and site collection.  You then successfully connect to the site collection using SharePoint Designer 2010 using the site collection's fully qualified domain name (FQDN).  However, when you then attempt to edit any page (e.g., by clicking the "Edit this page" link), you experience the following prompt:


When you click on the prompt's Details button to learn more about the error, you see the following:


or
soap:ServerServer was unable to process request. ---> Value does not fall within the expected range.
You then try to connect to the site collection (through Designer) using the server name, and this works fine, enabling you to use SharePoint Designer to access site pages and even edit them.  However, when you close out this connection, and then connect using the site's FQDN, you experience the same error whenever trying to edit a page.  Enabling SharePoint Designer 2010 access to your site collection via the collection's FQDN is critical, in that you cannot connect to servernames when accessing the sharepoint instance from outside the corporate intranet.

Discussion

The problem involves SharePoint Alternate Access Mapping (AAM). The site collection is viewable just fine through a browser, because the browser interacts with IIS (or the web server) in order to navigate among the website pages.  However, SharePoint Designer interacts directly with SharePoint itself.  Setting up a new site collection properly updates the web server with the host header information associated with the new site collection, and this is why you can browse just fine to the site.  However, SharePoint does not yet know how to map this FQDN to the appropriate page, and thus this information must be manually configured in SharePoint in order for Designer to connect to the site collection using the host header.

Resolution

Login to Central Administration.

Navigate to: Central Administration > System Settings > Farm Management | Configure alternate access mappings.

On the Alternate Access Mappings page, in the Alternate Access Mapping Collection dropdown (upper right), select the appropriate website. 

Click the Edit Public URLs link.  The Edit Public Zone URLs page appears.

In the Intranet and Internet boxes, enter the FQDN for the site collection.


Then click OK.

If you still have SharePoint Designer connected to the site collection, close that connection, and then connect back to the site collection using its FQDN.  You should now be able to connect to the site collection from SharePoint Designer 2010 using the FQDN to the site collection.

Summary

Setting the AAM is not critical, when using SharePoint Designer from within the corporate intranet, as you can easily connect using the servername of the machine hosting the SharePoint instance.  However, if you want to enable Designer access to your site collection from the Internet, you will need to configure AAMs appropriately.

References

Master Pages link missing in SharePoint Designer 2010

Problem

You created a new site collection.  You then connect Microsoft SharePoint Designer 2010 to the new site collection, in order to edit the site's master page.  However, the Master Pages link does not appear in the Navigation pane of SharePoint Designer 2010.

Discussion

By default, new site collections disable SharePoint Designer 2010 access to the site master and layout pages, though this setting is enabled by default for the hosting website.  This setting can be enabled within the Site Collection Administration pages. 

Note: users having site ownership privileges are able to view the site's Collection Administration pages but will not see the link enabling them to make the appropriate settings change.  Only users who are site collection administrators will be able to see the appropriate line and enable SharePoint Designer 2010 access to the site master and layout pages for the site.

Resolution

Login to the site collection.

From the Site Actions menu (top left), select Site Settings.


On the Site Settings page, scroll down to the Site Collection Administration section, and then look for the SharePoint Designer Settings link.


Click this link.  The Site Collection Administration's SharePoint Designer Settings page appears.


Check the setting, Enable Customizing Master Pages and Page Layouts checkbox, and other settings as desired, and then click OK.

This completes this procedure.

Summary

In this troubleshooting tip, you learned how to enable your site collection for SharePoint Designer 2010 access to the site collection's master and layout pages.  For additional reading and background on this topic, see the links in the References section.

References