Introduction
This procedure walks you through step-by-step exploration of PostgreSQL 9.0.3 running on CentOS Standard Server 5.5 within VMware Workstation 7.1.3. You'll start out by: 1) determining the status of the Postgres service; 2) starting up and shutting down the Postgres service; 3) creating and deleting databases; 4) creating and deleting tables; 5) populating databases; and then 6) running some scripts against the sample database. For each step, you'll first be shown how to do it from the terminal and then shown how to do it using various graphical user interfaces. Note: you'll need root user privileges in order to complete some steps. See
Step-by-Step Installation of PostgreSQL onto Linux Server for a walkthrough on how to setup Postgres on Linux. General sources of information on PostgreSQL can be found in the references [1-3, 16]. This walkthrough employs the sample database SQL scripts available from PostgreSQL Guide [9]. It will take you about three hours to complete this walkthrough, from start to finish. All references used in this walkthrough are listed in the
References section below. Good Luck!
Step 1: Determining the Status of the Postgres Service
There are several methods available for determining the Postgres instance status: a) from the command line using the Linux service command, b) from the command line using the Postgres pg_ctl command, and c) using the pgAdmin graphical user interface (GUI). We'll explore all of these methods here.
Using the Linux service command
Let's start out by exploring the Linux
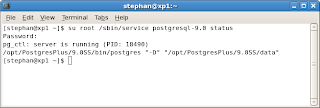
service command [5]. Open a terminal. Run the following command:
su root /sbin/service postgresql-9.0 status
Note that the name of the Postgres service on your machine may be different than the one that I have used here. Note too that you can only run this service with
root privileges.
Using this command is the simplest command-line method for determining Postgres service status.
TIP: to find the name of the Postgres service on your machine, enter the following at the prompt: chkconfig --list. This will present a sorted list of all currently running services [4].
TIP: if you get an error trying to run the service command, you may need to use the find command to locate it. Typically, in CentOS, the service command is located in the sbin directory.
Using the Postgres pg_ctl command
Next let's explore using the Postgres
pg_ctl command [6]. You can't run the Postgres
pg_ctl command as root; and it may return an error if you try to run it under your account:
Thus, to run this command in CentOS, you need to run it
as the user that owns the Postgres process, namely,
postgres. You'll use the Linux
su command [7]. At the prompt,
su into the
postgres account and enter the password when prompted:
Note the "
-" after the
su command. This is important. Using the hyphen, you assume both the identity and environment of the
postgres account, and this will avoid an annoying warning message later. Leaving out the hyphen, you assume only the identity of the
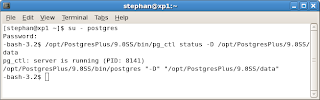
postgres account. Once you're logged in under the postgres service account, enter the following command:
/opt/PostgresPlus/9.0SS/bin/pg_ctl status -D /opt/PostgresPlus/9.0SS/data
There's no space between the hyphen and the "
D". Running this command will return the postgres service status.
TIP: if you got the "could not change directory" error, you probably used the su command without the hyphen.
TIP: if you ever want to know what the pg_ctl command options are just type "--help" after the pg_ctl command. That's two hyphens followed by the word help.
Now let's take a look at checking up on the status of the Postgres service using a GUI.
Using the CentOS Service Configuration tool GUI
From the
System menu, point to
Administration, and then select
Services.
You may be prompted to enter your root password.
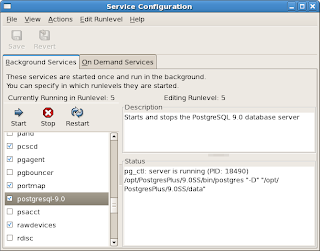
Enter the root password. The
Services Configuration dialog appears. Scroll down to the
postgresql-9.0 service, and then select it. It's status will appear in the
Status pane, at right.
If you're new to Linux and want to learn more about services in Linux, there's an excellent article covering just this topic in Red Hat Magazine written by Len DiMaggio [23]. This completes exploring how to check the status of the Postgres service. Now let's explore how to stop and start it.
Step 2: Starting Up and Shutting Down the Postgres Service
You can use both command line or GUI methods for controlling the Postgres service. Command line options include both Linux and Postgres methods. We'll explore them all here.
Using the Linux service command
Open a terminal, and then run the following command [5]:
# su root /sbin/service postgresql-9.0 status
You'll be prompted for the root password. Note that the name of your
postgres service may be different than the one that I have used here. This checks the status of the service - you want to make sure the service is running before shutting it down.
Now to shut down the service. At the prompt, enter the following command:
# su root /sbin/service postgresql-9.0 stop
You'll be prompted for the root password. Then an orderly shutdown is performed.
Now to restart the service. At the prompt, enter the following command:
# su root /sbin/service postgresql-9.0 start
You'll be prompted for the root password. Then an orderly startup is performed.
Now let's explore stopping and starting Postgres using the Postgres
pg_ctl command.
Using the Postgres pg_ctl command
As noted previously, you can't run the Postgres
pg_ctl command as root; and it may return an error if you try to run it under your account. Therefore, to use this command, you'll need to login as the account that owns the postgress process, in this case
postgres. So do this first and then continue on. Let's start out by verifying that the service is running:
Make sure to type the hyphen after su - otherwise you'll get annoying warnings cropping up. Now let's explore stopping the service. Enter the following at the prompt:
/opt/PostgresPlus/9.0SS/bin/pg_ctl stop -D /opt/PostgresPlus/9.0SS/data
An orderly shutdown ensues.
Let's take a quick look to verify that the postgres service is indeed shutdown. Remember how to check for status? If you don't recall, review Step 1 again.
Good. The service has been stopped. Now let's restart it. Enter the following at the prompt:
/opt/PostgresPlus/9.0SS/bin/pg_ctl start -D /opt/PostgresPlus/9.0SS/data
An orderly startup ensues.
And just to make sure that the service did startup. Let's verify again:
This completes exploring how to stop and start the Postgres service from the command line. Let's now explore how to do this using the convenient GUI.
Using the Service Configuration tool GUI
Launch the
Service Configuration dialog as you did previously (in Step 1).
Scroll down until you see the
postgresql-9.0 service, and then select it. The status of the selected service appears in the
Status pane, at right.
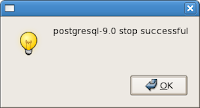
See Len DiMaggio's article to learn more about services in Linux [23]. Anyway, to stop the service, just click the
Stop button. After the service stops, a message will appear:
Click
OK. The message closes, and you can now see the status of the service.
To start the service, click the
Start button. Once the service is started, a message will appear:
Click
OK. The message closes, and you can then see that the service has in fact started.
This completes exploration of stopping and starting the Postgres service. In the next section, you will explore how to create and delete databases.
Step 3: Creating and Deleting Databases
In this step, we'll explore creating and deleting databases from both the command line - actually the
psql command-line interface or shell - and the pgAdmin III GUI.
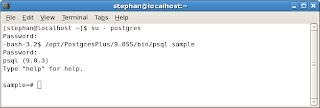
Using the Postgres psql shell
Open a terminal, and then logon as the postgres service account:
Enter the following command to launch the psql interface [12]:
/opt/PostgresPlus/9.0SS/bin/psql
Note how the prompt has now changed to
postgres=#. You are now in the psql shell and able to send SQL commands directly to the database. The default database you are connected to is the
postgres database, which is why it's name appears in the prompt. The database that the shell is currently connected to appears in the psql shell prompt.
To get out of the psql interface enter the following meta command at the
psql prompt:
\q
psql meta commands are always preceded by a "\" character. This takes you back to the postgres service account prompt.
Now that you know how to get into and out of the
psql command-line interface, let's explore a little further by creating a database. You can create databases from the Linux command prompt or from within Postgres command-line interface. We'll just explore commands from the interface here. Launch the psql interface once again, and then enter the following standard SQL command [8]:
CREATE DATABASE sample;
Be sure to add the ";" at the end of this command line. Without it, the
psql command line interface will not execute the line but will wait for additional input.
To check that the database has been created, just enter the meta command "\l" (that's a backwards slash followed by the lower case "L"):
You can also do this from the Linux command prompt, under the postgres account. Exit the interface (enter the meta command "\q") but remain within the
postgress account logon. Enter the following command:
/opt/PostgresPlus/9.0SS/bin/psql -l
where "l" is a lower case "L". This also returns a list of all databases currently hosted by your Postgres instance. Note that the
sample database appears in the list.
Deleting a database is just as easy. Let's explore doing this from the command-line interface. So, get back to the interface, and then enter the following Postgres SQL command [13]:
DROP DATABASE sample;
Be sure to include the ";" at the end of this line. Otherwise, the interface will continue to expect more input and not process the command.
Let's create the database again so that we can explore adding tables to it. As you did before, create the
sample database.
This completes our exploration of adding and deleting databases. In the next step, you'll explore how to add and remove tables from a database.
Step 4: Adding and Removing Tables
Having created a database the next thing to do is create tables within this database. You can build tables line-by-line from the psql command-line interface or you can ingest a file containing SQL script that is then executed during the ingestion process. Let's explore both. First, let's explore creating a single table from the command-line interface, and then dropping it. Then, we'll explore ingesting a file that contains all of the SQL for adding several tables to the
sample database.
Using the Postgres psql shell
To create a table manually, you'll exploit some features of the command-line interface, or shell, that help you organize all the various elements of the SQL needed for creating a table. To do this, keep in mind that the shell does not actually execute your script until it sees the ";" at the end of a line. Let's get started. At the shell prompt, enter the following (below). NOTE: after each line shown, press the ENTER key. When you get to the last line, wait for a bit and don't press the ENTER key.
CREATE TABLE customer
(
customer_id serial,
title char(4),
fname varchar(32),
lname varchar(32) not null,
addressline varchar(64),
town varchar(32),
zipcode char(10) not null,
phone varchar(16),
CONSTRAINT customer_pk PRIMARY KEY(customer_id)
);
Once you do this, you should get something similar to that shown below.
Now press the ENTER key. Now the table will be created.
To verify that the table was created, use the meta command "
\dt" [11, 12, 20]:
Command-line methods for creating tables are useful for limited cases, but not for creating many tables. When you need to create a number of tables at the same time, it's much easier to ingest a prepared SQL script file. Before we go on to ingesting a SQL script file, let's drop the table we just created so that we can start fresh. At the shell prompt, enter the following [21]:
DROP TABLE customer
This will remove the table from the
sample database.
Let's ingest a script for creating tables,
create_tables-bpfinal.sql, available from PostgreSQL Guide [9]. To do this I created a special folder,
/home/share, on my CentOS machine that all users can access [10, 11]. From the postgres service account logon enter the following command:
/opt/PostgresPlus/9.0SS/bin/psql - f /home/share/create_tables-bpfinal.sql sample
This command instructs
psql to ingest the file and run it against the sample database.
To verify that these tables were in fact created, logon to the shell, pointing it to the sample database,
/opt/PostgresPlus/9.0SS/bin/psql sample
and then use the psql meta command "
\dt" like so:
Now let's explore creating tables using the pgAdmin III GUI [14].
Using the Postgres pgAdmin tool GUI
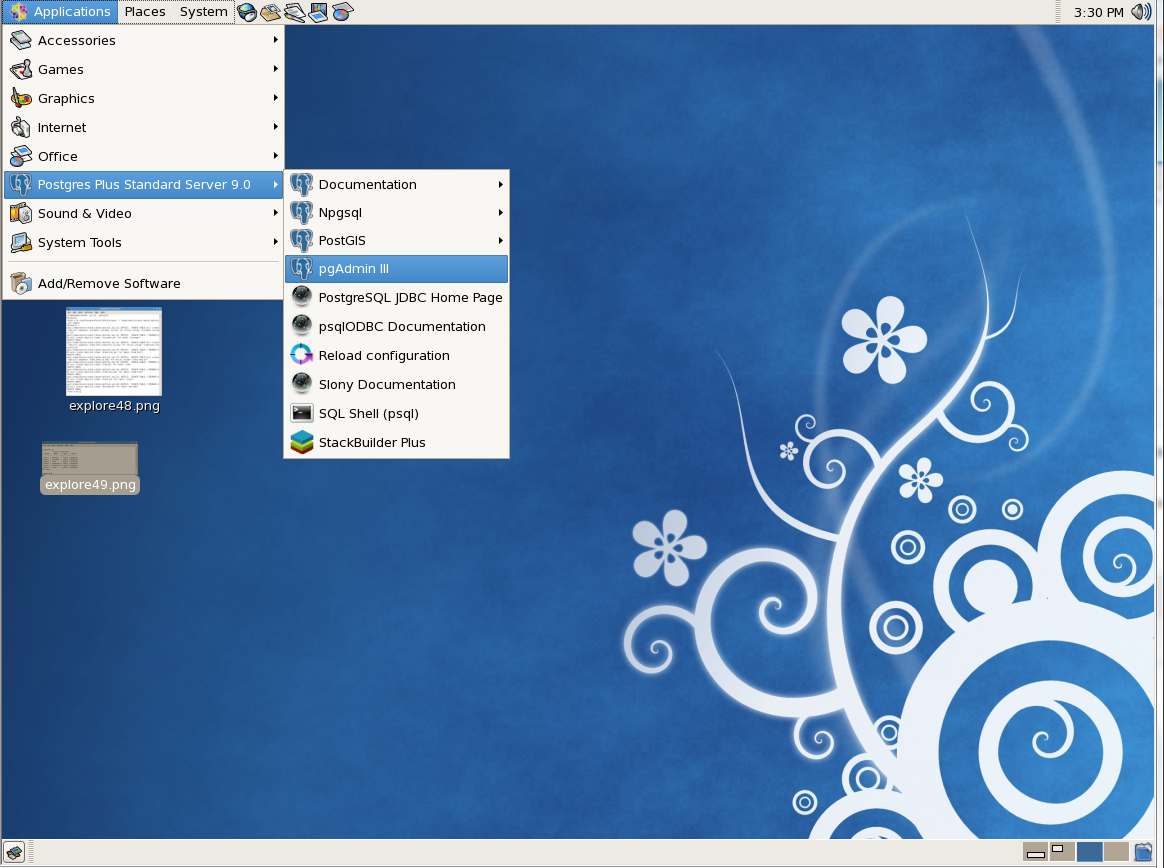
pgAdmin is an open source graphical user interface platform for PostgreSQL administration and development. To start the UI, from the
Applications menu, point to
Postgres Plus Standard Server 9.0 and then select
pgAdmin III.
The pgAdmin interface appears [22].
Right-click on the
Postgres Plus Standard item in the Object Browser, and then select
Connect.
Enter the password for the
postgres service account, and then click
OK.
Note the
sample database item in the Object Browser under
Databases. Select this database, and then expand
Schemas,
public, and then
Tables. Listed here will be all the tables that were created by ingesting the script in Step 4, previously.
We're going to explore creating tables using the pgAdmin UI. But before we can do that, we need to remove the tables that we just created. Removing tables using the UI is very simple. Just right-click on a table, and then select
Delete/Drop.
A prompt appears.
Click
Yes. The table is removed. Repeat this for all of the tables associated with the
sample database.
Now we're ready to recreate these tables using pgAdmin. First, make sure that the
sample database has been selected in Object Browser. On the
Object Browser, select the
sample database. Then, from the Tools menu, select
Query tool.
The pgAdmin
Query dialog appears. Look in the top right. Note that it states:
sample on postgres... This indicates that Query tool is connected to the
sample database, and whatever queries you execute in the query tool will be executed against the
sample database. If you want to open the Query tool connected to a different database, be sure to select that database before launching the Query tool.
Open up the
create_tables-bpfinal.sql file you downloaded previously [9].
Select and copy the contents of this file, and then past it into the
SQL Editor pane of the
Query tool.
On the Query tool toolbar, you'll find a green arrow. Clicking this arrow executes the query.
Click the arrow. The SQL script is executed, and a message will appear in the Query tool
Output pane, below.
The messages indicate that a number of tables have been created. Scroll up and down these messages. If any error messages appear, you'll need to fix the syntax in the file. But you shouldn't need to: the create table file has been tested error-free. Go back to the pgAdmin UI. Open up the
Tables item under the
sample database. Six new tables - the same as before - have again been created.
Good work. You've now removed and created tables using the pgAdmin interface. This completes exploration of creating and removing tables using command-line and GUI methods. Having created the sample database tables again, you're in a good position to populate them, which you'll do in the next step.
Step 4: Populating Database Tables with Data
The next thing to do is to populate the tables with some data. You'll explore populating the tables both using command-line and GUI methods. A script is provided with the sample database available from PostgreSQL Guide,
pop-all-tables.sql, that facilitates this step.
Using the Postgres psql shell
I have place this script in the same shared folder discussed previously. To ingest this script follows much the same process as done previously. First, exit from the
psql interface by entering the "quit" meta command at the shell prompt:
\q
Skip this step if you are no longer in the shell. Then enter the following psql command while logged in under the postgres service account:
/opt/PostgresPlus/9.0SS/bin/psql -f /home/share/pop-all-tables.sql sample
This loads all of the tables with data. You'll see something like that shown below:
Scroll up and down this output to check for errors. There's an apostrophe in the name "
O'Neill" in the customers table that may generate a warning during ingestion. The backslash is a valid extension [15]. You might want to try the ingestion using double apostrophes instead:
''.
Using the Postgres pgAdmin Query tool
Populating the tables using pgAdmin is accomplished along the lines previously used to create the tables: select and copy all of the script in the
pop-all-tables.sql file;
paste it into the
SQL Editor pane of the
Query tool,
and then execute the query. A message will appear in the
Output pane's
Messages tab.
This completes populating the sample database tables with data, using both command-line and GUI methods. In the last and fine step of this walkthrough, you'll explore how to perform queries against the sample database from the command-line and from the pgAdmin
Query tool.
Step 5: Querying Databases
In this last and final step of this walkthrough, you'll explore performing a simple query first from within the psql shell and then from the pgAdmin Query tool.
Using the Postgres psql shell
Open up a psql shell, connecting it to the
sample database:
Enter a simple SELECT query like so:
SELECT * FROM customer;
Remember to enter the ";" at the end before hitting the ENTER key.
Now let's try something a bit more complex. Enter the following SQL, pressing the ENTER key after each line, but not yet using the ";":
SELECT
customer.lname,
customer.fname,
orderinfo.date_placed,
orderinfo.date_shipped,
orderinfo.shipping,
item.description,
item.sell_price
FROM
public.customer,
public.orderinfo,
public.orderline,
public.item
WHERE
customer.customer_id = orderinfo.customer_id AND
orderinfo.orderinfo_id = orderline.orderinfo_id AND
orderline.item_id = item.item_id
When you've entered all of this you should have something like that shown below:
Now enter the "
;" character, and then press the ENTER key. The query is executed and the results are displayed immediately afterwards:
The query that you performed pulled the order descriptions, dates, and sale prices, of all the customers who had placed orders so that you can see customers and their orders in one table. The psql shell is effective for rapidly executing queries against a database. However, you do need to know a bit about SQL in order to use it effectively. Let's take a look now at running he same queries from the pgAdmin Query tool.
From the pgAdmin Query Tool
Launch the pgAdmin tool as in Step 4, and then connect to the database server. Select the sample database, and then launch the Query tool. In the SQL Editor pane, type the following SQL.
Click the
Execute query button. Note that you don't need to type the ";" character this time. Just enter the SQL script, and then execute it. The results of the SQL script are presented in the Output pane's
Data Output panel.
More complex queries can be built using the Query tool's Graphical Query Builder. To get to it, just select the
Graphical Query Builder tab.
The left pane is essentialy an object browser, displaying the objects associated with the sample database; while the right pane will present the graphical display of the query. Let's get started. Open up the
Schemas object in the object browser pane. A single object appears,
public. Double-click the
public object. An expansion sign appears to the left of this object. Open up the
public object. The
sample database tables appear - all six of them. These are the objects that you will work with.
Double-click the customer table object. It appears in the right pane.
Now add the
orderinfo,
orderline, and
item table objects.
Next, link up the tables. Left-click and hold on the
customer_id field in the
customer table and then drop it onto the
customer_id field in the
orderinfo table. Similarly, link up the
orderinfo_id and
item_id fields in the other tables.
Next, enter a check into the
fname,
lname,
date_shipped,
shipping,
description, and
sell_price fields.
To see the SQL script that you have created by using the graphical method, select the SQL Editor tab. You may see a prompt.
Click OK. Now you can see the SQL that was built.
Lastly, click the
Execute query button. The results are displayed in the Data Output panel in the Output pane.
Congratulations! You've completed this walkthrough. Happy computing!
References
- PostgreSQL Open Source Database
- EnterpriseDB
- PostgreSQL Wiki!
- Red Hat Linux 6 Deployment Guide: chkconfig
- Red Hat Linux 6 Deployment Guide: service
- Postgres Manual: pg_ctl
- CentOS Documentation: How to Become Root (su command)
- PostgreSQL 8.1.23 Documentation: Creating a Database
- PostgreSQL Sample Database
- Linux.com: mkdir
- Linux Forums: how do i create a shared folder
- PostgreSQL 8.4.7 Documentation: psql command
- PostgreSQL 8.1.23 Documentation: Destroying a Database
- pgAdmin Administration and Development Platform
- PostgreSQL 9.0.3 Documentation: Lexical Structure
- How to use Postgres
- CentOS-5 Documentation
- PostgreSQL 9.0.3 Documentation: Database File Layout - PGDATA
- PostgreSQL 9.0.3 Documentation: postgres - PGDATA
- Postgres Forums: Re: how to view all database,tables,users
- PostgreSQL 9.0.3 Documentation: DROP TABLE
- pgAdmin 1.4 online documentation: pgAdmin Main Window
- Red Hat Magazine: Understanding your (Red Hat Enterprise Linux) daemons
- A collection of sample databases for PostgreSQL - PgFoundry
Notes
- To find the location of the pg_ctl command on your Linux machine, run the following command on the terminal: find / -name pg_ctl.
- To avoid having to enter the path every time you enter Postgres commands, add the path to the Postgres bin directory to your PATH environment variable, which is located in your /home/[username/.bash_profile. Use gedit to edit this file. For exmple, in my case, I added the following:
- export PATH=$PATH:/opt/PostgresPlus/9.0SS/bin/:/sbin
- When running some Postgres commands, the command expects to find the default data directory in the PGDATA environment variable. If this is unset, you may experience a warning or error and the command may not execute. To set the PGDATA variable, first determine the path to the default data directory (you can find this easily by selecting the service in the CentOS Service Configuration tool) and then adding the following line to your .bash_profile. For example, in my case, I added the following [18-19]:
- export PGDATA=/opt/PostgresPlus/9.0SS/data
- A variety of databases are available for more significant exploration of Postgres capability - see [24].