Showing posts with label CentOS. Show all posts

Monday, September 3, 2012

Installing a Headless PostgreSQL Server, Step-by-Step

Introduction

It isn't necessary to install PostgreSQL with its GUI frontend.  It runs just fine without it and consumes a smaller footprint.  If you're comfortable using the command line interface, installing headless is the way to go.  In some environments, it may even be necessary.  This step-by-step procedure shows you how.  This step-by-step installs an older version of PostgreSQL, 8.4.8-1, but is applicable to all.  It will install the postgres8_4-x86_64 package group, which contains three packages:
  • postgresql-libs-8.4.8-1PGDG.rhel5.x86_64.rpm
  • postgresql-8.4.8-1PGDG.rhel5.x86_64.rpm
  • postgresql-server-8.4.8-1PGDG.rhel5.x86_64.rpm
and it will create the following subdirectories:
  • /var/log/pgsql
  • /var/lib/pgsql
  • /usr/share/pgsql
  • /usr/lib64/pgsql
  • /etc/sysconfig/pgsq
This procedure was tested on a headless CentOS 5.5 enterprise server. Total installation time is about one hour.  This procedure concludes by providing steps for changing the database server password and adding new users.  Good luck!

Procedure

1) Open a terminal on the target server.

2) Log into the root account.

3) Install the PostgreSQL server package and its dependencies using YUM.  Be sure to disable gpg signature checking, in order to avoid annoying warnings:

[root]# yum install postgresql-server --nogpgcheck

4) Initialize the database.  Note that database initialization on RHEL (and thus also CentOS) will be somewhat different than other Linux flavors:

[root]# service postgresql initdb –D /var/lib/pgsql/data

Or, you may need to initialize the database using this approach:

[root]# /etc/init.d/postgresql start

5) Now, start the service:

[root]# /etc/rc.d/init.d/postgresql start

6) The default location on RHEL (and thus also CentOS) systems is /var/lib/pgsql.  However, applications such as bash will expect the location to be /usr/local/pgsql.  This can be fixed via soft symlink:

[root]# ln –s /var/lib/pgsql   /usr/local/pgsql

7) Check to make sure that the postgres account owns the pgsql directory and subdirectories:

[root]# ls –l /var/lib

If not, you will need to change ownership.  When changing ownership, do so recursively.

8) Test the account by logging into it and then performing stop and start commands:

[root]# su – postgres
-bash-3.2$ pg_ctl –stop
-bash-3.2$ pg_ctrl start

9) Stop the PostgreSQL instance so that you can edit configuration settings files:

[root]# service postgresql stop

10) Save a copy of the original configuration file:

[root]# cp /var/lib/pgsql/data/postgresql.conf   /var/lib/pgsql/data/postgresql.conf.ORIGINAL

11) Update the PostgreSQL configuration file to enable it to listen in on the server IP address at the default port:

[root]# vi /var/lib/pgsql/data/postgresql.conf

Uncomment the line “listen_addresses” and set it equal to ‘*’

Uncomment the “port” and leave it set to the default port (5432)

12) Save a copy of the original security access file:

[root]# cp /var/lib/pgsql/data/pg_hba.conf   /var/lib/pgsql/data/pg_hba.conf.ORIGINAL

13) Update the PostgreSQL security access file to enable client access to this PostgreSQL instance from within the subnet:

[root]# vi /var/lib/pgsql/data/pg_hba.conf

Add this line:

host all all 192.168.0.0/24  md5

Additionally, if you want to be able to use a GUI to interact with this postgresql instance over a VPN, you’ll need to identify the IP address that is received by the PostgreSQL instance and add this to the list of hosts allowed to connect.  For example, if your VPN IP address was “10.58.150.8”, then to allow only your “10.0.0.0” IP address to be able to connect you would add the following:

host all all 10.58.150.8/32  md5

14) Startup the postgressql service:

[root]# service postgresql start

15) This completes this PostgreSQL installation procedure.

Troubleshooting the Installation

If you encounter the following error, while trying to perform a YUM install…

Loaded plugins: fastestmirror, rhnplugin
Determining fastest mirrors
Could not retrieve mirrorlist
http://mirrorlist.centos.org/?release=5&arch=x86_64&repo=os error was
[Errno 4] IOError: <urlopen error (-3, 'Temporary failure in name resolution')>
Error: Cannot find a valid baseurl for repo: base"


this likely indicates that YUM on this server was attempting to check an external list using an external repository that your environment is not using.  The solution involves deleting all files in your external repository on the target machine.  For example, your external repository might be:  /etc/yum.repos.d/. 

Delete all the files in this repository and then try again.

Changing the Database Server Password

1) Open a terminal on the target server

2) Login to root

# sudo su - root

3) Super into the postgres account

[root] # su - postgres

4) Open a postgresql shell to the PostgreSQL service database

[root] # psql -d template1 -U postgres

5) Alter the postgres account’s password

[root] # ALTER USER postgres WITH PASSWORD 'postgres_password';

The password change take effect immediately.

6) This concludes this procedure.

Creating a New User

1) Open a terminal

2) Login to root

3) Login to the postgres account

[root] # su - postgres

4) Create new database user for Jive SBS, assigning the password immediately, then responding to the prompts as shown:

-bash-3.2$ createuser -P sbs
Enter password for new role:
Enter it again:
Shall the new role be a superuser? (y/n) n
Shall the new role be allowed to create databases? (y/n) n
Shall the new role be allowed to create more new roles? (y/n) n


The new user is available immediately.

5) This concludes this procedure

Summary

This step-by-step procedure walked you through the installation of a headless PostgreSQL database server onto a CentOS enterprise server.  For additional installation tips and details, consult the references below.  Happy Coding!

References

Wednesday, August 1, 2012

Installing Zimbra Email Server Step-by-Step

Introduction

This step-by-step walkthrough shows you how to install and configure the open source VMware Zimbra email server.  It's part of the VMware Zimbra Collaboration Server suite of applications. Total installation time is about one hour.  This procedure assumes that you have an LDAP server installed and it assumes installation to CentOS servers.

Prerequisites

There are a number of prerequisites associated with Zimbra.  Some are required and some are suggested.  The following are required:
  • NPTL
  • sudo-1.7.2p1-10
  • libidn-0.6.5-1.1
  • gmp-4.1.4-10
  • /usr/lib64/libstdc++.so.6
These will likely already have been installed as a part of the default CentOS server.  Still, it’s a good idea to check to make sure, before launching the Zimbra installation script. The next two prerequisites are suggested:
  • perl-5.8.8
  • sysstat
Of these, the perl-5.8.8 should already have been installed as a part of the default CentOS installation.  The sysstat item will not have been installed.  Check to make sure.  If not, install it:
[root]# yum install sysstat
Also, if you happened to have attempted previous Zimbra installs on the target machine, there may be artifacts left on the machine.  Don’t worry about these.  The Zimbra install checks default locations for previous Zimbra installation artifacts and removes these if they exist.

Installation

Login as root onto the target server.

Copy the Zimbra Collaboration Server (ZCS) installation file to the target server.  A good location to copy this file to is: /opt/local/src.  The file will be in a format similar to:
zcs-6.0.13_GA_2918.RHEL5_64.20110513152056.tgz
Unpack this file:
[root]# tar xzvf zcs-6.0.13_GA_2918.RHEL5_64.20110513152056.tgz
Change into the installation directory:
[root]# cd zcs-6.0.13_GA_2918.RHEL5_64.20110513152056
Execute the installation script, using the platform override option:
[root]# ./install.sh –platform-override
Accept defaults for all packages

At the warning regarding platforms, enter Yes.

At the warning about the system being modified, enter Yes.

After entering Y, you may experience a domain name warning; and you may be asked to change to domain name.  Be sure to check with your systems administrator to obtain the appropriate domain name for your specific environment.

At the Main Menu, enter 3 for Zimbra store. 

At the Store configuration menu, enter 4.

Follow the prompts to create the Admin password.

Accept all other defaults, and continue with the installation.

At the prompt to save the configuration to a file, enter Yes, and then note the path to this file.

At completion of installation, take note of the name and path to the setup log in case you need to review in order to troubleshoot emerging issues.

This completes Zimbra installation.  For additional details on Zimbra installation, consult the Zimbra Quick Start or Zimbra Administrator manuals.

NOTE: by default, Zimbra will be installed to the /opt/Zimbra directory.  This location is hard-coded in the Zimbra installation routine and cannot be changed via installation parameters.

Configure Authentication

Open a browser, and then connect to the target Zimbra machine apache web server: [Your_Zimbra_Server_Name]:7071/zimbraAdmin.

Logon to the Zimbra admin console.  The default administrative username and password are: admin/admin.

In the Zimbra Admin console, under the Configuration group, expand the Domains tree and select the domain you wish to configure authentication for.  A new tab will appear.

If you domain is not listed, you will need to create it.

To create a new domain, click the @New button on the Manage Domains tab.  This will launch a wizard that will walk you through the rest of this process.  After you complete this process, a new item will appear under the Domains tree.


On the new tab for the domain, click Configure Authentication.

On the first page of the Authentication Configuration Wizard, configure the parameters as shown below (you will need to obtain these parameters from your LDAP administrator):
LDAP Server Name: [Your_LDAP_Server_URL]
Port: 389
Use SSL: NO (unchecked)
LDAP Filter: (uid=%u)
LDAP Search Base: OU=[Your OU name],OU=[Your group name],DC=[Your domain name],DC=[Your domain type - e.g., com, local, gov, etc]
Bind DN: cn=[common name],ou=[OU name],ou=[User group name],dc=[Your base domain name],dc=[Your domain type - e.g., com, local, gov, etc]
Bind password: [request from LDAP administrator]
Confirm bind password: [request from LDAP administrator]
Click Next.

On the second page of the Authentication Configuration Wizard, configure the parameters as shown below:
Bind DN: cn=[common name],ou=[Your OU name],ou=[Another OU name],dc=[your domain name],dc=[your ase domain name]
Bind password: [request from administrator]
Confirm bind password: [request from administrator]
Click Next.

On the third page of the Authentication Configuration Wizard, enter the user name and password of a known account in the target LDAP directory.

Click Test.  On successful test, you will a green “Authentication test successful” message.

Click Next.

Click Finish. 

You're done!

Add Users

Zimbra does not automatically interrogate LDAP for users.  Each user must be added manually to Zimbra.  This is by design, as there may be users in the LDAP directory for whom it would not be appropriate to have email accounts.  Therefore, after configuring and verifying Zimbra LDAP authentication, create new email accounts for each user in the domain as desired.  This can be accomplished using the Zimbra Admin console.

Summary

In this step-by-step walkthrough, you've installed and configured the open-source Zimbra email server and connected it to your LDAP server for authentication.  For additional detail, consult VMware's Zimbra wiki.

Happy computing!

References

Tuesday, August 9, 2011

Migrating the Jive SBS Database Step-by-Step

Introduction

This procedure walks you through migration of the Jive SBS 4.5 internal database to a new separate instance of PostgreSQL 8.4.  Use this walkthrough when upgrading from the initial standalone, test Jive SBS instance to a full production instance.  Though this walkthrough focuses on migration of a PostgreSQL database, the method that you will learn here can be applied to any type of Jive SBS database migration.  It will also work for Jive SBS version 4.0.  Performing the migration involves seven steps: 1) Create database dump files, 2) Create databases, 3) Create user, 4) Assign dump file ownership, 5) Import dump files, 6) Update Jive startup file, 7) Restart Jive, and 8) Test.  Only minimal comments and executable statements are presented here.  Note that each step is presented discretely - skip the exits and logouts if continuing from one step to another.  Good Luck!

Procedure

Step 1: Create Database Dump Files

On the Jive SBS machine:

sudo su - root

cd /usr/local/jive/postgres/bin

./pg_dump -U postgres sbs > /pathToYourHomeDirectory/jive_db_sbs.dump

./pg_dump -U postgres sbsanalytics > /pathToYourHomeDirectory/jive_db_sbsanalytics.dump

On the new PostgreSQL machine:

cp /pathToYourHomeDirectory/jive_db_sbs.dump /tmp/jive_db_sbs.dump

cp /pathToYourHomeDirectory/jive_db_sbsanalytics.dump /tmp/jive_db_sbsanalytics.dump

logout

Step 2: Create Databases

On the new PostgreSQL machine:

sudo su - root

su - postgres

createdb -T template0 sbs

createsb -T template0 sbs

exit

logout

Step 3: Create User

On the new PostgreSQL machine:

sudo su - root

su - postgres

psql postgres

CREATE USER sbs WITH PASSWORD 'password';

GRANT ALL PRIVILEGES ON DATABASE sbs TO sbs;

GRANT ALL PRIVILEGES ON DATABASE sbsanalytics TO sbs;

\q

exit

logout

Step 4: Assign Dump File Ownership

On the new PostgreSQL machine:

sudo su - root

chmod 755 /tmp/jive_db_sbs.dump

chown postgres /tmp/jive_db_sbs.dump

chmod 755 /tmp/jive_db_sbsanalytics.dump

chown postgres /tmp/jive_db_sbsanalytics.dump

logout

Step 5: Import Dump Files

On the new PostgreSQL machine:

sudo su - root

su - postgres

psql sbs < /tmp/jive_db_sbs.dump

psql sbsanalytics < /tmp/jive_db_sbsanalytics.dump

exit

logout

Step 6: Update the Jive Startup File

On the Jive SBS machine:

sudo su - root

cd /usr/local/jive/applications/sbs/home

cp ./jive_startup.xml ./jive_startup.xml.ORIGINAL

vi ./jive_startup.xml

Make the following edits:

<serverURL>jdbc:postgresql://[YourPostgresqlDomainName]:5432/sbs</serverURL>

<password>sbsAccountPassword</password>

:x

chmod 600 ./jive_startup.xml

logout

Step 7: Restart the Jive SBS

sudo su - root

service jive-application - restart

Step 8: Test

Open a browser and point it to your Jive SBS instance.

Summary

Congratulations! In this step-by-step walkthrough, you have been shown how to perform a migration of the Jive SBS 4.5 internal backend to a new and separate instance of PostgreSQL 8.4.  The method presented here has been successfully tested on both versions 4.0 and 4.5 of Jive SBS.  The method presented here focuses on PostgreSQL migration but may be applied to any other type of database migration.

Troubleshooting

If you attempt to perform an import of the dump files, but experience a "Permission Denied" error, perform the following checks:
  • Verify that the account being used to perform the import (most likely the "postgres" account) has permission to navigate the directory path to the location of the dump files.
  • Verify that the account used to perform the import (most likely the "postgres" account) has permission to read the dump files.
If, after performing this walkthrough, you test the Jive SBS instance and experience an HTTP Status 404 error, perform the following checks:
  1. Verify that the password stated in the jive_startup.xml file is the same as that used to create the sbs user.
  2. Verify the PostgreSQL server URL and port are correct.
  3. Verify that the sbs user has been granted ALL PRIVILEGES to both the sbs and sbsanalytics databases.
  4. Verify that the PostgreSQL postgresql.conf file has been configured to allow it to listen to connection attempts ("listen_addresses").
  5. Verify that the port stated in the PostgreSQL postgresql.conf file is the same as that indicated in the jive_startup.xml file.
  6. Verify that the PostgreSQL pg_hba.conf file has been configured to allow connections from the Jive SBS IP address.
  7. Check the PostgreSQL log files located here: .../pgsql/data/pg_log/.
  8. Check the Jive SBS logs located here: .../jive/var/logs/.
References
Notes
  • Jive SBS 4.5 uses PostgreSQL 8.1 as its internal database.
  • This walkthrough was performed on headless 64-bit CentOS 5.5 servers.
  • This walkthrough was performed using 64-bit Jive SBS 4.5 and 64-bit PostgreSQL.

Tuesday, August 2, 2011

Installing Openfire and Integrating it with Jive SBS

Introduction

This step-by-step procedure walks you through installation and integration of the Openfire 3.7.0 chat infrastructure server with Jive SBS 4.0. Openfire is an open source application that implements the XMPP server protocol. It supports instant messaging capabilities for Jive SBS. Integrating Openfire with Jive SBS involves three primary steps: 1) configuring the Jive SBS Real-Time Connection; 2) installing Openfire; and 3) configuring Openfire.

Procedure

Step 1: Configuring the Jive SBS Real-Time Connection

Connect to the Jive SBS Admin console, and the go System > Real-Time. The Real-Time Integration page appears.


NOTE: In version 4.5, Real-Time Integration functionality has been packaged as a separate plug-in.  Thus, you won't see the Real-Time Integration page, when going to the Admin console.  To regain this functionality, install the Jive Connects Plugin for Openfire. You will then see the Real-Time tab again.
Click the connection page link. The Real Time – Connection Settings page appears.

Enter the Shared Secret: [enter any word]


Click the Save Shared Secret button. A green message bar will appear. You will then need to restart the Jive SBS instance in order for the new shared secret to take effect.


Logout of the Jive SBS Admin console.

In a terminal on the server hosting the Jive SBS instance, logon as the Jive user:
$ sudo su - jive
Stop the Jive SBS service:
[jive]# ./bin/appstop -v
Start the Jive SBS service:
[jive]# ./bin/appstart -v
Check the Jive SBS service status:
[jive]# service jive-application status
This completes configuration of the Shared Secret key for Openfire integration. You will need this key in order to integrate Openfire and Jive SBS. In the next section, you will install Openfire.

Step 2: Install Openfire

Logon to the target server

Download the RPM for Red Hat Linux and variants from the Openfire website. For this procedure, the downloaded file name is openfire-3.7.0-1.i386.rpm.

Logon to root:
[user]$ sudo su - root
Copy the RPM to /opt or /usr/bin:
[root]# cp /[path to file]/openfire-3.7.0-1.i386.rpm /opt
Unpack the installation file:
[root]# rpm –ivh openfire-3.7.0-1.i386.rpm
Start the service:
[root]# sudo /sbin/service openfire start
Check the service:
[root]# service openfire status
This completes Openfire installation. The next section walks you through Openfire configuration. You’ll need the Shared Secret key in order to complete this section.

Step 3: Configure Openfire

Open a browser, and then connect it to http://[targetservername]:9090. The Welcome to Setup page appears.


Choose English, and then click Continue. The Server Settings page appears.


Accept defaults, and then click Continue. The Database Settings page appears.


Choose the Embedded Database option, and then click Continue. The Profile Settings page appears.


Select the Clearspace Integration option, and then click Continue. The Profile Settings: Clearspace Integration page appears.


Enter the following:
Then click the Test Settings button. A success message should appear. If not, check the settings you entered and try again.


Click Close. You will be returned to the main page.

Click Continue. The Setup Complete page appears.


Click Login to the admin console. The login page appears.

The Server Information page appears. This completes installation and configuration of the Openfire tool.

Step 4: Uninstallation

Stop the running Openfire process

Delete the Openfire scripts in /etc/rc.d/init.d/ and/or /etc/init.d/

Delete the Openfire installation directory

E.g., /usr/local/openfire OR /opt/openfire OR [yourCustomInstallDirectory]

Delete the launch daemon in /Library/LaunchDaemons/org.jivesoftware.openfire.plist

Delete Openfire preferences /Library/PreferencePanes/Openfire.prefpane

Reboot the machine

Step 5: Troubleshooting Openfire Wizard Setup

The Openfire database schema does not appear to be installed.


Once you begin the Openfire configuration wizard, it’s best to complete it right through without navigating backwards to previous pages.  If you should do this, and if you should need to navigate back to the Database Settings page, you may experience a database schema error may be presented on the page, after clicking the Continue button.

To get around this, just open a terminal on the server hosting Openfire, and then restart the Openfire instance.  You can do this by executing one of the following commands:
[root]# /etc/init.d/openfire reload
Then try running the setup wizard again.

Summary

Congratulations!  You have established a chat infrastructure for your environment and integrated it with the Jive SBS collaboration platform.

References
Notes
  • TBD

Monday, August 1, 2011

Installation and Configuration of PostgreSQL to a Headless CentOS Server Step-By-Step

Introduction

This procedure walks you through step-by-step installation and configuration of 64-bit PostgreSQL server 8.4.8 onto a headless 64-bit CentOS 5.5 server.  The procedure involves four basic steps: 1) install PostgreSQL, 2) initialize the database, 3) start the PostgreSQL service, 4) create a symlink, 5) ensure ownership, and 6) ensure external client access.  You will install the server only; you will not install any GUI interfaces (such as pgAdmin).  All references used in this walkthrough are provided in the References section.  Good luck!

Procedure

Step 1: Install PostgreSQL

This step will install the PostgreSQL package group that comes with 64-bit CentOS.  This group includes the following packages:
  • postgresql-libs-8.4.8-1PGDG.rhel5.x86_64.rpm
  • postgresql-8.4.8-1PGDG.rhel5.x86_64.rpm
  • postgresql-server-8.4.8-1PGDG.rhel5.x86_64.rpm
Open a terminal on the target server.  Login to the root account.

Install the PostgreSQL server package and its dependencies using YUM.  Be sure to disable gpg signature checking, in order to avoid annoying warnings:
[root]# yum install postgresql-server --nogpgcheck
Installation of this package group will create the following subdirectories:
  • /var/log/pgsql
  • /var/lib/pgsql
  • /usr/share/pgsql
  • /usr/lib64/pgsql
  • /etc/sysconfig/pgsq
Step 2: Initialize the Database

Note that database initialization on RHEL (and thus also CentOS) will be somewhat different than other Linux flavors.

Execute the following command:
[root]# service postgresql initdb –D /var/lib/pgsql/data
Or, you may need to initialize the database using this approach:
[root]# /etc/init.d/postgresql start
Step 3: Start the Service

Execute the following command:
[root]# /etc/rc.d/init.d/postgresql start
Step 4: Create the Symlink

The default location on RHEL (and thus also CentOS) systems is /var/lib/pgsql.  However, applications such as bash will expect the location to be /usr/local/pgsql.  This can be fixed via soft symlink:
[root]# ln –s /var/lib/pgsql   /usr/local/pgsql
Step 5: Ensure Ownership

Check to make sure that the postgres account owns the pgsql directory and subdirectories:
[root]# ls –l /var/lib
If not, you will need to change ownership.  When changing ownership, do so recursively.  Test the account by logging into it and then performing stop and start commands:
[root]# su – postgres 
-bash-3.2$ pg_ctl –stop 
-bash-3.2$ pg_ctrl start
Step 6: Enable External Client Access

Stop the PostgreSQL instance so that you can edit configuration settings files:
[root]# service postgresql stop
Save a copy of the original configuration file:
[root]# cp /var/lib/pgsql/data/postgresql.conf /var/lib/pgsql/data/postgresql.conf.ORIGINAL
Update the PostgreSQL configuration file to enable it to listen in on the server IP address at the default port:
[root]# vi /var/lib/pgsql/data/postgresql.conf
Uncomment the line “listen_addresses” and set it equal to ‘*’.  Uncomment the “port” and leave it set to the default port (5432). Save a copy of the original security access file:
[root]# cp /var/lib/pgsql/data/pg_hba.conf /var/lib/pgsql/data/pg_hba.conf.ORIGINAL
Update the PostgreSQL security access file to enable client access to this PostgreSQL instance from within the subnet
[root]# vi /var/lib/pgsql/data/pg_hba.conf
Identify the mask appropriate to your network.  For example, if it is 255.255.255.0, you would add this line:
host all all 192.168.0.0/24  md5
Additionally, if you want to be able to use a GUI to interact with this postgresql instance over a VPN, you’ll need to identify the IP address that is received by the PostgreSQL instance and add this to the list of hosts allowed to connect.  For example, if your VPN IP address was 69.143.195.130, then to allow only your IP address to be able to connect you would add the following:
host all all 69.143.195.130/32  md5
Startup the postgressql service back up:
[root]# service postgresql start
This completes this PostgreSQL installation procedure.
Summary
In this step-by-step walkthrough, you installed the 64-bit version of PostgreSQL server 8.4.8 onto a headless 64-bit CentOS server.  Congratulations!
References
  1. PostgreSQL Home Page: http://www.postgresql.org/.
  2. PostgreSQL 8.4.8 Documentation: http://www.postgresql.org/docs/8.4/static/index.html.
Notes
  • TBD

Saturday, May 14, 2011

How to install Sun Java 1.6 onto CentOS 5.5

Discussion

In this step-by-step walkthrough, you will install Sun Java JRE 1.6.0_25 onto CentOS 5.5.  CentOS comes available with openJDK, an open source Java version.  Some applications (such as JIRA) may not be fully compatible with this version and require the standard Sun JRE or JDK to function properly. Sun Java is not available via YUM.  Installing Sun Java on CentOS is simple, but there are some wrinkles that, if not properly addressed, will cause some needless troubleshooting.  These steps are not fully discussed by the Sun Java installation instructions.

Procedure

Download the Linux binary (not the rpm.bin version).

Create a new directory:

mkdir /opt/java

Copy the binary into this new directory

Change the permissions of the binary:

chmod 755 /opt/java/jre-6u25-linux-i586.bin

Launch the binary:

/opt/java/jre-6u25-linux-i586.bin

NOTE: you will not experience a license prompt while this is executing - this is a variation from the Sun Java instructions for this.

Verify that the java directory was created:

ls -l /opt/java

You should see this:

jre1.6.0_25

Change java directory permissions to allow all user access:

chmod 755 /opt/java

Create a new global environment variable for Java with system-wide access:

gedit /etc/profile.d/java.sh

or use

vi /etc/profile.d/java.sh
Add the following lines to this file:

export JRE_HOME=/opt/java/jre1.6.0_25
export PATH=$PATH:$JRE_HOME/bin

export JAVA_HOME=/opt/java/jre1.6.0_25
export JAVA_PATH=$JAVA_HOME

export PATH=$PATH:$JAVA_HOME/bin


Save and exit.

Verify that the new file has been created:

ls -l /etc/profile.d

One of the items listed should be the following:

java.sh

Load this new global environment variable:

source /etc/profile.d/java.sh

Verify that the new environment variables are active:

echo $JAVA_HOME

This should return (for this procedure):

/opt/java/jre1.6.0_25

Repeat this process for the other global environment variables you created.

Or check for all Java environment variables:

env or printenv

Configure alternatives:

alternatives --install /usr/bin/java java /opt/java/jre1.6.0_25/bin/java 2

Now select which Java is default:

alternatives --config java

This returns

  Selection    Command
-----------------------------------------------
+ 1           /usr/lib/jvm/jre-1.6.0-openjdk/bin/java
   2           /usr/lib/jvm/jre-1.4.2-gcj/bin/java
   3           /opt/java/jre1.6.0_25/bin/java

Enter to keep the current selection[+], or type selection number:

Select 3, or which ever number is associated with the version just installed.

Verify configuration:

java -version

This will return:

java version "1.6.0_25"
Java(TM) SE Runtime Environment (build 1.6.0_25-b06)
Java HotSpot(TM) Client VM (build 20.0-b11, mixed mode, sharing)


This completes this procedure on Sun Java installation to CentOS 5.5.

References
Notes
  • None

Tuesday, May 3, 2011

Intalling the Default Apache HTTP Server on CentOS Step-by-Step

Introduction

In this step-by-step walkthrough, you will install and configure the default Apache HTTPD server on CentOS 5.5.  This default web server is available for installation and configuration, after including the Server and Server GUI package groups during a CentOS 5.5 installation.  Total time to completion is approximately 15 minutes.  Good luck!

Procedure

On CentOS, an Apache HTTPD server will likely already have been installed.  A simple check can verify this.  Open a terminal, and then enter the following:
httpd -v
This command will print the version and patch level of the installed httpd server. 


To find out more about this command and its arguments, enter: man httpd.

Though the Apache httpd web server is installed, it has not yet been started nor fully configured.  First, let's check to see what the current boot configuration for the httpd service is.  You'll use the chkconfig utility [1, 2].  At the terminal prompt, enter the following:
chkconfig --list httpd
This returns the httpd service status for each of the various runlevels [3].  Note the configuration for runlevels 2, 3, and 5.  This service needs to be started at boot for runlevels 2, 3, and 5.  Therefore, at the prompt, enter the following:
chkconfig --levels 235 httpd on
Runlevel 3 is multi-user text mode and 5 is multi-user graphic mode.  2 I'm not sure about: it's user-defined, but I'm not aware of the definition in this context.  Maybe a reader can assist.  Anway, after running this command, check the status again using the previous command.  You should see something like the following:


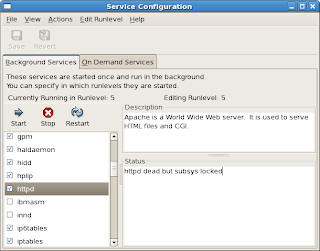
Now let's start the web service.  You'll use the service command.  You can use the graphical Services Configuration tool as well [4], but executing a command is much faster.  First, check it's status.  Enter the following command:
service httpd status
This returns that the service is stopped.


Now enter the following command [5]:
service httpd start
This starts the service.

TIP: to learn more about the service command, enter man service at the prompt.
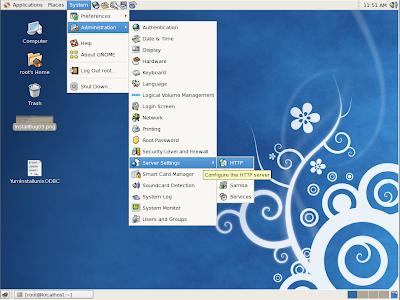
Now to configure the Apache HTTP server service.  This can be done either using commands or using the graphical interface tool.  We'll use the tool here.  On the Gnome panel, go System > Administration > Server Settings > HTTP.


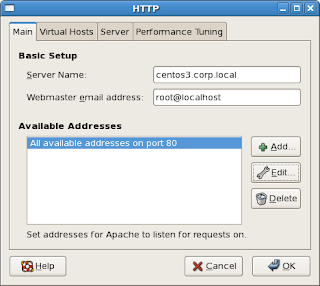
The HTTP tool appears [6].  On this tool, enter the fully qualified domain name.  Select the All available addresses... item listed in the Available Address list.


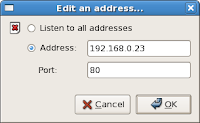
Click Edit.  The Edit an address... tool appears.  Select the Address option, and then enter the server's IP address.


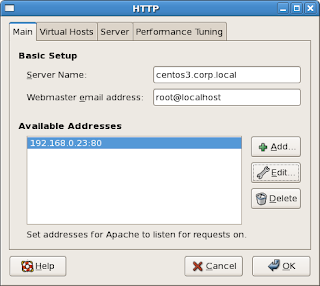
Click OK.  The tool closes, and you are returned to the HTTP tool, with the revised address now listed.


All other settings can be left as default. Additionally, SSL is not addressed in this walkthrough.  Click OK.  A prompt will appear.


Click Yes.  Another prompt will appear.


Click Yes again.  The configuration directive changes you have made are saved to the Apache HTTP Server configuration file, /etc/httpd/conf/httpd.conf.  Now, restart the HTTP service.  Enter the following:
service httpd restart
This restarts the service, causing your configuration changes to be implemented.


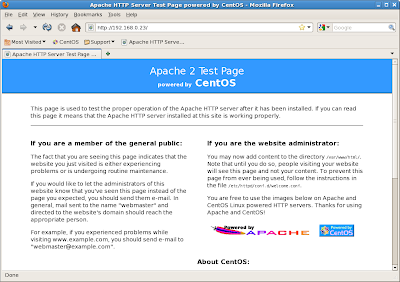
Lastly, launch a web browser and then point it to your server IP:


Congratulations!  This completes this step-by-step walkthrough of installing and configuring the default Apache HTTP server onto CentOS 5.5.  Happy computing!

Troubleshooting

httpd dead but subsys locked

You may see this error after using the Services Configuration tool to restart the HTTP server.


As a check, exit and re-open the Services Configuration tool, and then scroll down and select the httpds service again.  If the status is now httpd (pid 21123) is running, you can ignore the subsystem lock error.

References
  1. Runlevel Utilities - Red Hat Linux Deployment Guide - Section 1.4.2
  2. chkconfig - Red Hat Linux 5 Deployment Guide - Section 16.5
  3. Runlevels - Red Hat Linux 4 Reference Guide - Section 1.4.1
  4. Services Configuration Tool - Red Hat Linux 5 Deployment Guide - Section 17.3
  5. Starting and Stopping httpd - Red Hat Linux 5 Deployment Guide - Section 23.3
  6. Apache HTTP Server Configuration - Red Hat Linux 5 Deployment Guide - Section 23.4
Notes

How to Configure basic Network in CentOS Step-by-Step

Introduction

This step-by-step procedure walks you through basic configuration of an ethernet network device in CentOS 5.5.  Specifically, you will configure the default network interface with a static IP.  A number of tutorials on this subject can be found [1-3].  This step-by-step walkthrough presents a focused, simplified version of network configuration provided in Red Hat Linux 5 Deployment Guide [4].  Total time to completion is approximately 5 minutes.  Good luck!

Procedure

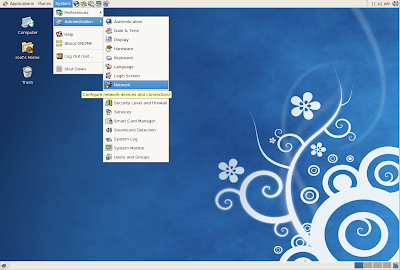
On the Gnome panel, go System >  Administration > Network.


The Network Configuration tool appears. 


Select the Devices tab.  On this tab, select the target ethernet device, and then click the Edit button.  The Ethernet Device dialog appears.  On this dialog, select Statically set IP addresses, and then enter the IP data as appropriate.


Click OK.  The dialog closes, and you are returned to the Network Configuration tool.  On this tool, select the DNS tab.  Enter the fully qualified domain name for this machine.


From the File menu, select Save.  A prompt will appear.


Click OK, and then exit Network Configuration.  From the Gnome panel, go System > Administration > Server Settings > Services.


The Service Configuration tool appears.  Select the Background Services panel.  Scroll down this panel until you see the Network item.  Select this item.


Click the Restart button.  After a few moments, the service will restart and a prompt will appear.


Click OK.  Bring up the Network Configuration tool again.  Select the target ethernet device, and then select the DNS tab.


Enter the appropriate primary and secondary DNS server IP addresses, and a search path if available, and then click Save from the File menu.


Click OK at the prompt, and then exit.  Restart the Network service.  Then launch a browser to test.


This concludes this step-by-step walkthrough of CentOS network configuration.  Happy computing!

References
  1. How to configure network card in Red Hat Enterprise Linux, CentOS, Fedora Core from CLI, Php2s.com, September 2, 2010.
  2. Howto Red hat enterprise Linux 5 configure the network card, Vivek Gite, nixCraft, April 10, 2007.
  3. Linux Network Configuration - Yolinux.com Tutorial
  4. Chapter 16. Network Configuration - Red Hat 5 Documentation
Notes

Friday, April 29, 2011

Install LDAP on CentOS Step-by-Step

Introduction

In this step-by-step walkthrough, you will install and configure the CentOS Directory Server on Centos 5.5 running as a guest OS on VMware Workstation 7.1.  The CentOS Directory Server is the CentoOS distribution of the 389 Directory Server [10], which is an open source LDAP server for Linux.  The Red Hat documentation provides all necessary information on LDAP [5], but can be challenging to quickly and productively review.  A number of online tutorials are also available [3, 4, 6], and the best one that I was able to identify is available at neddix.com [7].  My step-by-step walkthrough retraces the steps presented in the neddix.com tutorial, with some minor modifications, updates, and additional detail and appropriate referencing helpful to those new to LDAP implementation.  Note that it assumes the use of the Gnome interface.  Total time to completion is about 2 hours.  Good luck!

Procedure

Step 1: Configure Networking

On the Gnome panel, select System, and then select Network.


The Network Configuration tool opens. 


On the Network Configuration tool, select the target device, and then click Edit.  The Ethernet Device tool appears.


Configure the usual network items, and then click OK.  The Ethernet Device tool closes, and you are returned to the Network Configuration tool.  On the Network Configuration tool, select the DNS tab.


Enter the Hostname that you want for your network.  For this walkthrough, the hostname is:
centos1.corp.local
Jot down what your hostname and domain name are, as you'll need these data later, when you perform a setup and configuration of CentOS Directory Server.  Don't worry about the DNS entries - anything you enter here will be reset anyway when you reset the Network service.  Then, from the File menu, select Save.


Click OK, and then exit the Network Configuration tool.  On the Gnome panel, point to System, then point to Server Settings, and then select Services.
TIP: if you did not install the Server GUI package, during CentOS install, you will not see the Server Settings submenu.  Instead, the Services menu item will simply be grouped under the System menu.
The Service Configuration tool appears.  Scroll down until you see the network item.  Select this item.


Click the Restart button.  After a few moments, a message will appear.


Click OK.  Now, return to the Network Configuration tool, and then select the DNS tab again.


Enter the appropriate DNS data, and then select Save from the File menu again.  At the prompt, click OK.  And you'll need to restart the Network service again, like you did previously.  Once you've done these things, test your configuration.  First, open a terminal, and then enter:
hostname
which returns the machine's hostname, and then
hostname -f
which returns the machine's fully qualified domain name.  You should see the following:


Now enter the following:
ping -c 1 localhost
followed by
ping -c 1 centos1.corp.local
Either command sends a single ICMP echo request.  You should get something like the following.


Running these commands helps determine whether the machine's DNS settings have been properly configured.
TIP: to get quick help on these and other standard UNIX commands, just enter:
man [command]
This completes network configuration.  In the next very quick step, you'll enable the time service.

Step 2: Enable Network Time Protocol Service

Go to the Services tool, and then scroll down until you see the ntpd service item.  Check this item.


Click the Start button.  After a few moments, the startup process will complete, and the Status panel will be updated.


This completes the network time protocol service startup.  In the next step, you will configure temporary security settings to allow you to install the necessary software.  These will be modified again later.

Step 3: Disable Firewall and SELinux

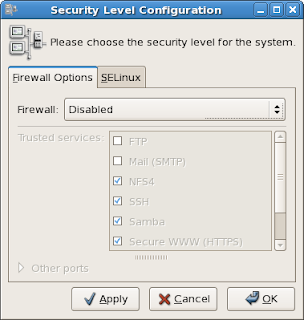
On the Gnome panel, click on System, and then click Security Level and Firewall.  On the Firewall Options tab, make sure that Firewall has been set to Disabled.


And then on the SELinux tab, make sure that the SELinux Setting has been set to Disabled


Then click OK


Click Yes.  This completes security settings configuration.  In the next step, you will create a new account for use by the LDAP service.

Step 4: Create LDAP Service Account

On the Gnome panel, select System, point to Administration, and then select Users and Groups.  The User Manager tool appears.


Click Add User.  The Create New User tool appears.  Enter the appropriate information.


Click OK.  The tool closes, and you are returned to User Manager.  The sysadmin account will now be listed.


This completes setup of the LDAP server service account.  In the next step, you will check on OpenJDK installation and install it if need be.

Step 5: Install OpenJDK

First, let's check to see whether openjdk has already been installed.  You can do this using rpm commands or using the Package Manager GUI tool.  Let's try from the command line first.  At the terminal,  try this:
rpm -qa | grep openjdk
This searches through all of the packages for the search string openjdk.  If this command returns nothing then the package hasn't been installed.  Otherwise, it will return the the package name and version. 
NOTE: if, during your initial CentOS installation, you performed an install of the Server and Server GUI packages, the openjdk package will already have been installed for you, since it comes as part of the Server package group. 
As of this walkthrough, the latest version of openjdk was 1.6.0, but your version may vary. 


Next, let's use the GUI tool to determine whether openjdk has already been installed.

Open the Package Manager tool.  On the Search tab, perform a search on the string JDK.  Scroll down the list of search results and look for the OpenJDK Runtime Environment item.   

If it's not checked, go ahead and check it now for installation.  Once you check it, the Apply button is enabled, and clicking the Apply button launches the installation of all checked packages. 

You can also install it from the command line like this:
yum install java-1.6.0-openjdk
where your version number may vary.  After installing openjdk, do the following check to make sure the libraries have been appropriately installed and configured.  Enter the following:
/usr/sbin/alternatives --config java
This finds all of the java versions available on your machine.  You may find more than one available.  What's important is that a version is available that matches the one you installed and that this is the default version.  CentOS Directory Server requires OpenJDK or Sun JDK.  Make sure that one of these is the default.


This completes JDK installation.  In the next step, you'll check on openssl installation and if it's not installed, install it.

Step 6: Install SSL

As in step 5, there are a couple of ways of determining whether a package has already been installed, either from the command line or using the Package Manager GUI tool.  Let's first do this from the command line.
rpm -qa | grep openssl
This will search through all installed packages for the string openssl.  If it doesn't find anything, it returns nothing.  Otherwise, it returns the full name and version of the package.


To do this using Package Manager, bring up this tool, and then on the Search tab, perform a search on openssl.


In this walkthrough, the openssl package was already installed.  That's because the target CentOS machine was installed along with the Server and Server GUI package groups at the time of CentOS installation.  These groups include the openssl package.  However, if you need to install it, just check the item as seen in Package Manager.  This will enable the Apply button.  Click the Apply button.  This will install openssl.  Alternatively, you can install openssl from the command line like so.
yum install openssl
This will install the latest version of openssl along with all of its dependencies.  This completes installation of openssl.  In the next step, you will perform the installation of CentOS Directory Server itself.
Step 7: Install CentOS Directory Server

To start out, let's make sure that this hasn't been installed already.  Enter the following command:
rpm -qa | grep centos-ds
This will likely return nothing, but it doesn't hurt to check.


Next, let's find out a bit more about this package before installing it.  Enter the following command:
yum info centos-ds
This returns info on the package that is on the yum server.


You can install CentOS Directory Server in two ways: from the command line using yum command or using Package Manager.  If you use Package Manager, open the tool and perform a search on centos-ds.  Check the item described as CentOS Directory, Administration, and Console Suite.


Alternatively, from the command line, enter the following command:
yum install centos-ds
Installation takes a minute or two.  You'll be prompted once for input.


Note the dependencies that were also installed for you automatically.  In particular, note that cyrus-sasl and ldapjdk dependencies were installed.  These no longer need to be installed separately, as discussed elsewhere. 

This completes CentOS Directory Server installation.  It's not yet ready to run, as it still needs to be setup and configured.  But you'll get to that after checking on whether certain support packages have been installed, which is the focus of the next step.

Step 8: Install Support Packages

There are a few support packages required by CentOS Directory Server, as discussed in the CentOS Directory Server Setup HowTo [9].  However, if you are working with a recent installation of CentOS, such as version 5.5, or greater, and you have installed the Server and Server GUI package groups, you may find that you do not need to specifically install these support packages separately.  You may find that they're already installed.  Let's check.  Enter the following four commands in succession, waiting after each one to see its results:
rpm -qa | grep xorg-x11-xauth
rpm -qa | grep bitstream-vera-fonts
rpm -qa | grep dejavu-lgc-fonts
rpm -qa | grep urw-fonts
Executing each of these commands should return something like that shown below.


For this walkthrough, each of these support packages was previously automatically installed.  For your own particular case, if you find one or more of these support packages missing, install them using standard yum commands.  This completes installation of the support packages.  In the next step, you will setup and configure CentOS Directory Server instance and the Admin server.

Step 9: Setup and Configure CentOS Directory Server

Open a terminal, and enter the following command:
setup-ds-admin.pl
You shouldn't need to specifiy the path, as the /etc/sbin directory should already be a part of the machine's PATH.  You'll be prompted along the way. 

Would you like to continue with set up? [yes]:
Do you agree to the license terms? [no]: yes

At this point, dsktune runs and performs a system parameters check.  It may identify a few areas for improving performance.  For example, it may present warnings on memory and file descriptor parameters.  Don't worry about these: you can adjust these later.  Here's hjow to respond to the prompts during setup:

Would you like to continue? [no]: yes 
Choose a setup type [2]: 2
Computer name [CentOS1.corp.local.net]: centos1.corp.local
System User [nobody]: sysadmin
System Group [nobody]: sysadmin
Do you want to register this software with an existing configuration directory server? [no]: hit enter
Configuration directory server administrator ID [admin]: hit enter
Password:
Password (confirm):
Administration Domain [corp.local]: hit enter
Directory server network port [389]: hit enter
Directory server identifier [centos1]: hit enter
Suffix [dc=corp, dc=local]:  hit enter
Directory Manager DN [cn=Directory Manager]: hit enter
Password:
Password (confirm):
Administration port [9830]: hit enter
Are you ready to set up your servers? [yes]: hit enter

This completes setup and configuration of CentOS Directory Server.  In the next step, you'll make somem additional, minor configuration changes.

Step 10: Additional Configuration

Next, let's configure the openldap-client tools. 
gedit /etc/openldap/ldap.conf
This opens the ldap configuration file.  Add the following lines to this file:
BASE dc=corp, dc=local
HOST localhost
PORT 389

You should have something like the following


Next, configure the Directory Server daemon and the Directory Server Admin to startup at boot time.  To do this, enter each of the following commands
chkconfig dirsrv on
chkconfig dirsrv-admin on
After configuring these, do a quick check to make sure these services are running by using the service command:


This completes the additional configuration step.  In the last step, you will launch the Directory Server Administration Console.

Step 11: Start the Directory Server Administration Console

Enter the following command in the terminal:
centos-idm-console
The console login prompt will appear.


Enter the User ID and password that you configured in Step 9, and then enter the URL using the port number that you also configured in Step 9.  Click OK.  The CentOS Management Console appears.


Now that you have a working LDAP server installed and configured and ready, you'll need to start connecting other Linux machines to authenticate from this LDAP server, but that's outside the scope of this walkthrough.

Summary

Congratulations!  You've installed and configured the CentOS LDAP Directory Server.  Happy computing!

References
  1. OpenSSL - OpenSSL Project
  2. OpenLDAP - OpenLDAP Organization
  3. Install Directory Server in CentOS 5.5 - Roger Carhuatocto - Holism and Technology blog
  4. CentOS Directory Server On CentOS 5.2 - HowToForge - Linux Tutorials
  5. Red Hat Directory Server - Red Hat Documentation
  6. Installing 389 Directory Server - LinuxMail.info
  7. How to setup the CentOS Directory Server (389 Directory Server) neddix.com wiki
  8. NTP: The Network Time Protocol
  9. CentOS Directory Server, Basic Install - Centos HowTos
  10. Setting up CentOS Directory Server on CentOS 5.4 Linux - Raining Packets - December 30, 2009
  11. How can I change the TCP/IP tuning parameters? - Red Hat Magazine - 1/25/2007
  12. Linux: tcp keep alive setting - The R71 web dump - 25 November 2009
  13. VNC ( Virtual Network Computing ) - CentOS Documentation
  14. 389 Directory Server - The Fedora Project
  15. Chapter 11. Package Management Tool - Red Hat Documentation
  16. How do I find what dependencies a rpm file has? - nixCraft - January 14, 2006
  17. RPM Commands - CentOS Resources 
  18. Yum Commands - CentOS Resources
  19. Chapter 11. Package Management Tool - Red Hat 5 Documentation
  20. Install and Configure OpenLDAP on CentOS 5 - HowToForge - January 28, 2011
Further Reading
Notes
  • None