Introduction
In this procedure, you'll explore step-by-step how to integrate the Microsoft Virtual Earth map control with a contact list in SharePoint Server 2007 Enterprise in order to present a map to the user of a particular contact clicked on in the Contact list. Much of the information has already been presented [1] and updated [2]. This procedure enhances these discussions by providing step-by-step directions along with screen captures involved with successfully implementing this control. Refer to the Virtual Earth SDK links for additional detail on map control functionality. Tools that you'll need for this procedure include SharePoint Designer 2007 and designer access to the SharePoint instance you want to work with. You'll also be working with the data view web part. This procedure is divided into three phases: 1) building the web part, 2) adding the XSL, and 3) associating the XSL with the data view. Good luck!
Procedure
Phase 1: Build the Data View Web Part
To being this procedure, I have created a small contact list of McDonalds locations in the Arlington Virginia area. The addresses of these locations are real. However, the contact names, titles, and email addresses are entirely fictional.

Open SharePoint Designer 2007, and then connect to the website you want to work with.

In the Folder List pane, open up Lists > Contacts and then select DispForm.aspx. This is the display form for the Contacts list.

Double-click this object to expose its designer and code-behind pages. This page currently contains the list view web part. You'll place the data view web part below this one.

In the Data Source Library task pane, at right, drag the Contacts list and drop it below the list for web part on the Designer page. After a few moments, you'll see a new list appear displaying the first few lines of the Contacts list.

A Common Data View Tasks menu also appears, listing the various tasks you can do with the currently selected web part. On this menu, click Filter.

On this dialog, select Field Name ID, Comparison Equals, and then select Value Create New Parameter. Another dialog appears.

Change Param1 to ContactID, and then select Parameter Source Query String. For the Query String Variable, enter ID; and for its Default Value, enter 1. Click OK.

Note that the Value is now ContactID. Click OK again.

Phase 2: Add the XSL.
Download the file available here:
Phase 3: Associate the XSL with the Data View Web Part
Right-click anywhere on the data view web part.

From the context menu, select Web Part Properties.

Open up the Miscellaneous group.
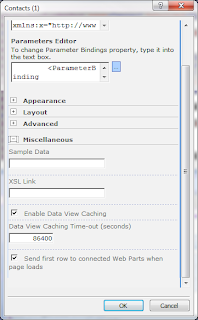
Click in the XSL Link box in order to put the cursor there. Then click on the button that appear to the right of this text box after you do this.

Navigate to the Contacts list, and then select the XSL object you recently place there. Then click OK.

Note that the Designer page has changed. Now click the Save button in the SharePoint Designer toolbar. You'll be presented with some warnings regarding making changes to this page. Click OK through these. Next in your SharePoint collection navigate to the Contacts list and then click on any name listed.

You'll see the usual display form. But then if you scroll down a bit you'll see the map.

If you hover your cursor over the pushpin, a popup will appear displaying what information was provided to it, in this case just the last name. Review [3] to learn how to add additional information to this pushpin, including full name, a photo, address, etc. Happy computing!
References
In this procedure, you'll explore step-by-step how to integrate the Microsoft Virtual Earth map control with a contact list in SharePoint Server 2007 Enterprise in order to present a map to the user of a particular contact clicked on in the Contact list. Much of the information has already been presented [1] and updated [2]. This procedure enhances these discussions by providing step-by-step directions along with screen captures involved with successfully implementing this control. Refer to the Virtual Earth SDK links for additional detail on map control functionality. Tools that you'll need for this procedure include SharePoint Designer 2007 and designer access to the SharePoint instance you want to work with. You'll also be working with the data view web part. This procedure is divided into three phases: 1) building the web part, 2) adding the XSL, and 3) associating the XSL with the data view. Good luck!
Procedure
Phase 1: Build the Data View Web Part
To being this procedure, I have created a small contact list of McDonalds locations in the Arlington Virginia area. The addresses of these locations are real. However, the contact names, titles, and email addresses are entirely fictional.

Open SharePoint Designer 2007, and then connect to the website you want to work with.

In the Folder List pane, open up Lists > Contacts and then select DispForm.aspx. This is the display form for the Contacts list.

Double-click this object to expose its designer and code-behind pages. This page currently contains the list view web part. You'll place the data view web part below this one.

In the Data Source Library task pane, at right, drag the Contacts list and drop it below the list for web part on the Designer page. After a few moments, you'll see a new list appear displaying the first few lines of the Contacts list.

A Common Data View Tasks menu also appears, listing the various tasks you can do with the currently selected web part. On this menu, click Filter.

On this dialog, select Field Name ID, Comparison Equals, and then select Value Create New Parameter. Another dialog appears.

Change Param1 to ContactID, and then select Parameter Source Query String. For the Query String Variable, enter ID; and for its Default Value, enter 1. Click OK.

Note that the Value is now ContactID. Click OK again.

Phase 2: Add the XSL.
Download the file available here:
LiveMaps.xslIn SharePoint Designer, from the File menu, point to Import and then select File. Navigate to the file you just downloaded, and then click OK. Move this file into the Contacts folder, given that this XSL will only be used in association with the Contacts list. For additional details on the Virtual Earth mapping functions used in this XSL, consult references [3], [4], and [5] below.
Phase 3: Associate the XSL with the Data View Web Part
Right-click anywhere on the data view web part.

From the context menu, select Web Part Properties.

Open up the Miscellaneous group.
Click in the XSL Link box in order to put the cursor there. Then click on the button that appear to the right of this text box after you do this.

Navigate to the Contacts list, and then select the XSL object you recently place there. Then click OK.

Note that the Designer page has changed. Now click the Save button in the SharePoint Designer toolbar. You'll be presented with some warnings regarding making changes to this page. Click OK through these. Next in your SharePoint collection navigate to the Contacts list and then click on any name listed.

You'll see the usual display form. But then if you scroll down a bit you'll see the map.

If you hover your cursor over the pushpin, a popup will appear displaying what information was provided to it, in this case just the last name. Review [3] to learn how to add additional information to this pushpin, including full name, a photo, address, etc. Happy computing!
References
- How to Integrate Virtual Earth Maps with a SharePoint List
- Virtual Earth API 6.2 with SharePoint
- MSDN: VEPushpin Constructor
- MSDN: VEMap.Find Method
- MSDN: VEMap.LoadMap Method
- Virtual Earth Maps on SharePoint
- Windows SharePoint Services Document: Application Templates for Windows SharePoint Services 3.0 – Under the Hood
- none
No comments:
Post a Comment