Introduction
This procedure walks you through step-by-step installation of PostgreSQL 9.0.3 Standard Server onto Red Hat Enterprise Linux Server 5.4 running within VMware Player 3.1.3. It will focus on installing the binary (BIN) version of PostgreSQL available from the EnterpriseDB website. Links to all of the websites and key topics presented in this procedure are provided in the References section, below. Total time to completion is approximately 15 minutes. Good Luck!
Procedure
Login to Linux as root. This is necessary, as you'll need this level of permissions in order to be able to execute some of the commands later in this procedure. Incidentally if you want to know what version of Linux you are currently running just enter in one of the following:
Double-click the file. After a few moments, the PostgreSQL flash will appear. This flash will then disappear, and the first page of the PostgreSQL installation wizard appears. Note that instead of the wizard page, you may see an error prompt instead:

If so, you have a Linux distribution that has Security-Enhanced Linux (SELinux) installed and has SELinux Current Enforcing Mode set to Enforcing. No problem. This is easy to resolve. From the System menu, choose Administration/SELinux Management. The SELinux Administration dialog appears.

Select the Status item in the left navigation pane (this is usually selected by default, but just to make sure). Now, change the Current Enforcing Mode to Permissive, and then exit SELinux.
Double-click the binary again. Or, if you want to use a terminal, run the following command within the same directory containing the binary:

Don't start interacting with this wizard just yet. Give it a few more moments. The reason being that you may also see an information prompt appear as well:

If you should see this information prompt, don't continue with installing PostgreSQL, as you may experience some problems later. Instead, cancel out of the PostgreSQL installation. You'll come back to it later, once you've finished installing unixODBC.

Move this folder into a directory that is easy to get to. I moved mine into the Filesystem directory.

Open a terminal, and then navigate to the unixODBC* directory.

Run the following command:

It will take a few moments. Once this configuration is completed, the next command you need to run is the following:

It will take quite a few more moments. Once this compilation is completed, the next command you need to run is the following:
Once this completes, you should see something like that shown in the figure below. When you get to that point, you're done with the unixODBC installation, and you can return to installing PostgreSQL.

Close the terminal. You won't be needing this any more. Go to where the PostgreSQL binary file is. Probably on your desktop, if you performed a default download. Double-click the binary file. After a few moments, the PostgreSQL flash will appear. This flash will then disappear, and the first page of the PostgreSQL installation wizard appears. NOTE: it may take a minute or two after the flash closes before you see the first page of the installation wizard.
Click Next. The Installation Directory page appears.

Enter a program files directory or accept the default, and then click Next. The Data Directory page appears.

Unselect any components you don't want installed, and then click Next. The Value Added Services page appears.

Select the options as desired, and then click Next. The Registered User? page appears.
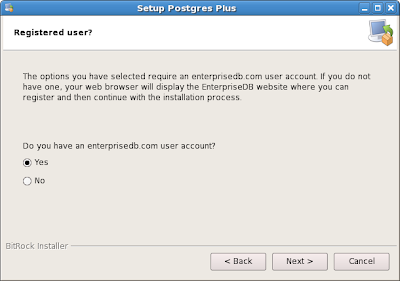
Select the option that applies, and then click Next. Note that in order to download PostgreSQL from the EnterpriseDB website, you had to register. So it won't hurt anything at this point to select Yes. After clicking Next, and selecting the Yes option, the User Authentication page appears (otherwise, skip over this step and proceed to the next step).

Enter the email and password you originally entered at the EnterpriseDB website, and then click Next. The Data Directory page appears.

Enter a data directory path or accept the default, and then click Next. The Password page appears.

Enter the Postgres password, and then click Next. The Port page appears.

Enter a port and choose a locale, or leave the defaults, and then click Next.

Click Next. The Installing page appears, displaying a progress meter.

You'll also see installation meters for the various Postgres subcomponents.

After the installation is completed, the Completing the Postgres Plus Setup Wizard page appears.

For this procedure, we won't explore the various additional applications you can install, as this procedure is focused on PostgreSQL installation. Therefore, uncheck the Launch Stack Builder Plus at exit? option, and then click Finish. The wizard closes, and you are returned to the Linux desktop. The next few steps walk you through performing some simple steps that will help verify successful installation and operation of PostgreSQL to your Linux server.
On the Linux desktop, go to the Applications menu, and then select Postgres Plus Standard Server 9.0 > pgAdmin III.

The pgAdmin III front end for PostgreSQL appears.

This is the graphical user interface (GUI) that you can use to interact with PostgreSQL. When you first launch this GUI, it is not connected to your PostgreSQL instance just yet. You need to manually perform this. Double-click on Postgres Plus Standard. The Connect to Server prompt appears.

Enter the PostgreSQL password you created previously, during the installation phase, and then click OK. The GUI connects to the running instance, and you'll see that two databases are indicated.

Congratulations! This completes the procedure. You've successfully installed PostgreSQL to your Red Hat Linux Server 5 instance; and you verified this installation and its operation. The references below provide additional information and links to download locations.
References
This procedure walks you through step-by-step installation of PostgreSQL 9.0.3 Standard Server onto Red Hat Enterprise Linux Server 5.4 running within VMware Player 3.1.3. It will focus on installing the binary (BIN) version of PostgreSQL available from the EnterpriseDB website. Links to all of the websites and key topics presented in this procedure are provided in the References section, below. Total time to completion is approximately 15 minutes. Good Luck!
Procedure
Login to Linux as root. This is necessary, as you'll need this level of permissions in order to be able to execute some of the commands later in this procedure. Incidentally if you want to know what version of Linux you are currently running just enter in one of the following:
$ cat /etc/releaseDownload the binary file from the EnterpriseDB site. Registration is required but you can download the file for free. By default, the binary file will be downloaded to your Linux desktop.
$ cat /etc/redhat-release
$ cat /etc/*release
Double-click the file. After a few moments, the PostgreSQL flash will appear. This flash will then disappear, and the first page of the PostgreSQL installation wizard appears. Note that instead of the wizard page, you may see an error prompt instead:

If so, you have a Linux distribution that has Security-Enhanced Linux (SELinux) installed and has SELinux Current Enforcing Mode set to Enforcing. No problem. This is easy to resolve. From the System menu, choose Administration/SELinux Management. The SELinux Administration dialog appears.

Select the Status item in the left navigation pane (this is usually selected by default, but just to make sure). Now, change the Current Enforcing Mode to Permissive, and then exit SELinux.
Double-click the binary again. Or, if you want to use a terminal, run the following command within the same directory containing the binary:
./postgresplus-9.0.2-1-linux.binNote that you need to run the version that you actually downloaded, which may have a different file name than the one shown above. After a few moments, the PostgreSQL flash will appear. This flash will then disappear, and the first page of the PostgreSQL installation wizard will appear.

Don't start interacting with this wizard just yet. Give it a few more moments. The reason being that you may also see an information prompt appear as well:

If you should see this information prompt, don't continue with installing PostgreSQL, as you may experience some problems later. Instead, cancel out of the PostgreSQL installation. You'll come back to it later, once you've finished installing unixODBC.
TIP: If you have yum installed, just enter the following at the prompt: yum install unixODBC. This will download and install the unixODBC package from RHEL. Note: the same works for CentOS too.Now, navigate to the unixODBC website (link provided in the References section below) and download the TAR file. By default, this file will be downloaded to your Linux desktop. Double-click on this file. A new window will appear, listing the folder contained within the compressed file.

Move this folder into a directory that is easy to get to. I moved mine into the Filesystem directory.

Open a terminal, and then navigate to the unixODBC* directory.

Run the following command:
./configureYou'll see some traffic appear in the terminal as the configuration proceeds.

It will take a few moments. Once this configuration is completed, the next command you need to run is the following:
makeYou'll see alot of traffic appear in the terminal as the compilation proceeds.

It will take quite a few more moments. Once this compilation is completed, the next command you need to run is the following:
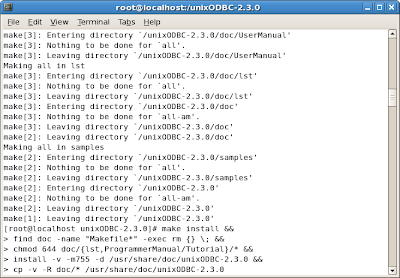
make install &&Remember that you need to be logged in as root in order to conveniently run this command. Some more traffic will appear in the terminal. Once this completes, run the following commands exactly as written, pressing ENTER after each one:
$ make install &&You should see something like that shown in the figure below, as you enter the fourth line:
> find doc -name "Makefile*" -exec rm {} \; &&
> chmod 644 doc/{lst,ProgrammerManual/Tutorial}/* &&
> install -v -m755 -d /usr/share/doc/unixODBC-2.3.0 &&
> cp -v -R doc/* /usr/share/doc/unixODBC-2.3.0
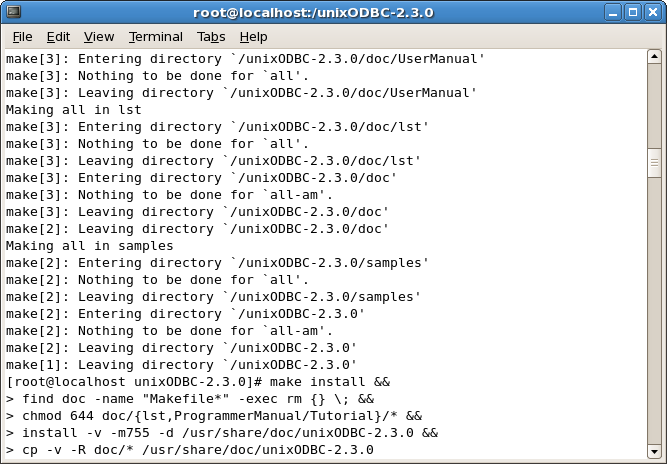
Once this completes, you should see something like that shown in the figure below. When you get to that point, you're done with the unixODBC installation, and you can return to installing PostgreSQL.

Close the terminal. You won't be needing this any more. Go to where the PostgreSQL binary file is. Probably on your desktop, if you performed a default download. Double-click the binary file. After a few moments, the PostgreSQL flash will appear. This flash will then disappear, and the first page of the PostgreSQL installation wizard appears. NOTE: it may take a minute or two after the flash closes before you see the first page of the installation wizard.
Click Next. The Installation Directory page appears.

Enter a program files directory or accept the default, and then click Next. The Data Directory page appears.

Unselect any components you don't want installed, and then click Next. The Value Added Services page appears.

Select the options as desired, and then click Next. The Registered User? page appears.

Select the option that applies, and then click Next. Note that in order to download PostgreSQL from the EnterpriseDB website, you had to register. So it won't hurt anything at this point to select Yes. After clicking Next, and selecting the Yes option, the User Authentication page appears (otherwise, skip over this step and proceed to the next step).

Enter the email and password you originally entered at the EnterpriseDB website, and then click Next. The Data Directory page appears.

Enter a data directory path or accept the default, and then click Next. The Password page appears.

Enter the Postgres password, and then click Next. The Port page appears.

Enter a port and choose a locale, or leave the defaults, and then click Next.
NOTE: jot down the port number - either the default or the one that you entered, as you will need this later when you configure the firewall.The Ready to Install page appears.

Click Next. The Installing page appears, displaying a progress meter.

You'll also see installation meters for the various Postgres subcomponents.

After the installation is completed, the Completing the Postgres Plus Setup Wizard page appears.

For this procedure, we won't explore the various additional applications you can install, as this procedure is focused on PostgreSQL installation. Therefore, uncheck the Launch Stack Builder Plus at exit? option, and then click Finish. The wizard closes, and you are returned to the Linux desktop. The next few steps walk you through performing some simple steps that will help verify successful installation and operation of PostgreSQL to your Linux server.
On the Linux desktop, go to the Applications menu, and then select Postgres Plus Standard Server 9.0 > pgAdmin III.

The pgAdmin III front end for PostgreSQL appears.

This is the graphical user interface (GUI) that you can use to interact with PostgreSQL. When you first launch this GUI, it is not connected to your PostgreSQL instance just yet. You need to manually perform this. Double-click on Postgres Plus Standard. The Connect to Server prompt appears.

Enter the PostgreSQL password you created previously, during the installation phase, and then click OK. The GUI connects to the running instance, and you'll see that two databases are indicated.

Congratulations! This completes the procedure. You've successfully installed PostgreSQL to your Red Hat Linux Server 5 instance; and you verified this installation and its operation. The references below provide additional information and links to download locations.
References
- EnterpriseDB
- EnterpriseDB Documentation: pg_ctl
- PostgreSQL Global Development Group
- PostgreSQL Wiki!
- unixODBC Project home page
- Linux From Scratch - Installing unixODBC-2.3.0
- Wikipedia: Security-Enhanced Linux (SELinux)
- PostgreSQL Sample Database
- A collection of sample databases for PostgreSQL - PgFoundry
- VMware Player 3.0
- Command to run (execute) bin files in Linux
- Sample Databases for PostgreSQL and More
- http://geonames.usgs.gov/domestic/index.html
- Total security in a PostgreSQL database
- Red Hat Documentation: 46.2.2.2. SELinux Configuration Files
- CentOS / RHEL Linux Install Postgresql Database Server, nixCraft
- To explore Postgres further, a variety of sample databases are available - links to them are listed above.
No comments:
Post a Comment