Thursday, December 31, 2015

SharePoint 2013: Something went wrong. To try again, reload the page and then start the workflow

Problem

When users try to manually start a 2013 workflow on a list item, they experience the following error message:
They experience this error message when attempting to start any 2013 workflow.  They do not experience this error message when starting 2010 workflows.

Solution

  • Verify that all 2013 workflow services have been started.

References

  • None

Notes

  • When I experienced this error message, I first checked if a simple 2013 workflow would run. When that also failed, I suspected that it was 2013 workflow infrastructure related.  For this farm, all workflow services (aside from the usual client services) ran on a single application server.  To begin troubleshooting, I first checked the status of all 2013 workflow services on the application server.  I then discovered that the Service Bus Message Broker service was stopped.  After starting this service again, and I reloaded the page, and I was able to start 2013 workflows again without issue.  No need to re-publish the workflow.

Monday, December 28, 2015

DocAve 6: svchost (968) A significant portion of the database buffer cache has been written out to the system paging file

Problem

You administer a SharePoint 2013 farm.  You have deployed DocAve 6 Manager for SharePoint to a dedicated server to help manage the farm (Windows Server 2012, 8GB RAM). During routine checks, you see the following warning appear in the that server's Application log:
svchost (968) A significant portion of the database buffer cache has been written out to the system paging file.  This may result in severe performance degradation.
See help link for complete details of possible causes.
Resident cache has fallen by 4010 buffers (or 100%) in the last ? seconds.
Current Total Percent Resident: 0% (0 of 4011 buffers)
Reviewing the server Application log, you find that this warning occurs about every few days, sometimes several times in a day.  Checking current memory usage, you find it to be a steady 36%.


Solution

  • Increase RAM

References

  • Virtualized Windows Server 2012.  Static memory.

Wednesday, December 23, 2015

SharePoint 2013: how to build a basic search-driven list

Introduction

This procedure walks through the steps for building a basic search-driven listing.  The specific case presented here involves a need to present in one site collection a filtered view of a listing in another site collection.  The listing is a service ticket listing, and the filtered view will show only those list rows (i.e., tickets) having specific values for the row's Admin Category and SD Status columns, both of which are type Choice.  The approach presented here involves first building a new search result source, and then configuring a a search results web part to use this result source.


Procedure

  1. Obtain the target list URL
    1. Navigate to the target list.
    2. Copy the list URL, but leave out the page that will be a part of this URL.  For example, if the URL is ...[MyWebsite]/Lists/[MyList]/MyView.aspx, leave off the MyView.aspx.
  2. Identify the target list columns and their search property mappings
    1. Navigate to the target list.
    2. Note down the names of the columns that you want to filter by.
      In this case, both columns are Choice columns.  That's a good thing because the Search service automatically creates managed properties for these column types.  You need to have managed properties so that you can filter on these properties when you configure the result source.  Having them created automatically by Search means less work for you to go in and create them yourself.
    3. Now go to Central Administration: CA > Search Administration > Search Schema.  The Search Service: Managed Properties page is presented.
    4. In the Managed property Filter box, enter the name of a property and perform a search for this property.  Look in the Property Name column.  You'll find the column name without any spaces between the property names, and this will be concatenated to some other characters.  For example, a Choice column type named Admin Category would then be indexed as AdminCategoryOWSCHCS.  Note the formulation of this property name: you'll see this again and again.  The SD Status column would then be indexed as SDStatusOWSCHCS.  Finding it verifies that Search has found the list column and has automatically created a managed property for it.  That's all you need to do.  Repeat for each other column that you want to filter by.
      Note: if the column is one of these types: Lookup, Calculated, Task outcome, Summary Links data, or Rich media data for publishing, Search will not automatically create a managed property for it and you will need to do this yourself.  Creating a managed property is outside the scope of this procedure.  However, plenty of guidance is offered in the references listed below.
  3. Create a new result source
    1. Navigate to the site collection, in which you want to build the search-drive list.
    2. Go: Settings > Site Settings > Site Collection Administration > Search Result Sources.
    3. Click New Result Source.
    4. Add a name, and then click the Launch Query Builder button.  The Build Your Query popup appears.

      Looking in the Query text box, you only see this:
      {searchTerms}
    5. From the Property filter dropdown, select Path.
    6. Immediately below this dropdown, you'll see two other dropdowns.  The first one has "Contains" selected and the second has "Select value" selected by default. From the second dropdown, select Manual value.  A new text box appears immediately below it.
    7. Into this textbox, paste the URL you copied previously, and then click the Add property filter button.
      Looking in the Query text box, you now see this:
      {searchTerms} Path:http://[MyWebsite]/Lists/[MyList]/
    8. From the Property filter dropdown, select --Show all managed properties--.  This expands the dropdown.  You'll now see listed all of the managed properties.
    9. Scroll through this list until you find the managed list column property.  For example, I would look for AdminCategoryOWSCHCS.  Select this.
    10. Now, make sure that the first dropdown underneath this displays Contains.  From the second dropdown, select Manual value.  When you do that, a textbox will appear underneath this.  Into this text box, enter the appropriate column value. In my case, i wanted to find tickets categorized as Website Update.
    11. Once you enter the appropriate text, click the Add property filter button to update the Query text box.  You'll now see this:
      {searchTerms} Path:http://[MyWebsite]/Lists/[MyList]/ AdminCategoryOWSCHCS:Website update 
    12. Repeat for the next list column that you want to filter on.  For my case, I wanted to filter on the SD Status column, for those tickets having status Engaged.  Adding that property value to the query obtains this:
      {searchTerms} Path:http://[MyWebsite]/Lists/[MyList]/ AdminCategoryOWSCHCS:Website update SDStatusOWSCHCS:Engaged
    13. Click the Test query button to see the results displayed in the Query Builder popup.
    14. Now click OK.  This closes the Query Builder.
    15. Click Save.  This adds the new result source to the list of managed result sources.  Since this result source was created in a site collection, it will only be visible to web parts used on website pages within that site collection.
  4. Add and configure the Search
    1. Navigate to the page on which you want to present the filtered list view.
    2. Click on the gear icon (Settings), and then select Site Settings.
    3. On the page, click on the Add a Web Part link for the desired zone.
    4. On the Categories group, in the ribbon, select Search, then select Search Results from the Parts group, and then click the Add button.  An instance of the Search Results web part appears on the page.
      Don't worry about the extra text that you see in the web part: this appears only while in edit mode. Once you save the page and go back to view mode, this extra text no longer appears.
    5. On the Search Results web part, look on the title bar and you will see a small down arrow. Click this arrow, and then select Edit Web Part.
    6. Now look for the Properties for Search Results configuration box.  On this box, click the Change query button.
    7. On the BASICS tab, look for the Select a query section and the dropdown in this section.  It might have Local SharePoint Results already selected.  Open this dropdown and note all of the result sources that are listed.
      Result sources created at the farm level will have "(service)" next to their names.  Result sources created at the site collection level will have "(site collection)" next to their names.
    8. From this dropdown, select the result source that you created previously.  There is nothing more that needs to be done here as the result source is already configured to retrieve the list items that you want.
    9. Click the Test query button, lower down, and then wait a few seconds.  The desired items will appear in the SEARCH RESULTS PREVIEW pane.
    10. Click OK.  You now have a basic search-driven listing.  

References

  • Don't confuse "level" here with the scope of the search index that is available for querying. "Level" as used here only involves the visibility of the result source; not the scope of the result source.  For example, a result source created at the site collection level will only be visible to web parts added to website pages within that site collection.  It would not be visible to a web part on a website page in a different site collection.  If you want to make result sources visible to web parts on website pages in all site collections, you must create the result source directly through the search service application itself, which means at the farm level.
  • You don't need to specifically map the list properties (AKA Columns) that are crawled. As noted in Overview of the search schema in SharePoint Server 2013: Managed properties and property mapping,
    Some crawled property types automatically generate a new managed property and a mapping between the crawled and managed property. For example, all site columns from SharePoint libraries have this automatic generation and mapping. When you create a site column in a list, and you crawl that list, a crawled property, a managed property, and a mapping between the crawled and managed property is automatically created for the site column
    Well, not all.  Lookup columns, for example, do not automatically have managed properties created for them.
  • This listing is only as current as the crawl interval.
  • To modify the way in which the results are presented, you will need to create a customized display template.

Tuesday, December 22, 2015

SharePoint 2013: You don't appear to have permission to view the account credentials for this result source

Problem

You navigate to the Result Sources page of a site collection (Site Settings > Site Collection Administration > Search Result Sources).  You then click on one of the result sources listed and then observe this error message:
This error message is confusing in that you are logged in using an account that has both farm administration and site collection administrator privileges.  The key terms in this error message that actually point to the solution lie at the end of the third sentence: "...at that level."
 
Result sources created at the farm administration level, i.e., through Central Administration, can only be edited at that level.  Result sources created at the farm level will be visible both at that level and at the site collection level.  Result sources created at the site collection level will only be visible and editable at the site collection level.  The level at which a result source is created can be seen on the Result Sources page, which will present somewhat different categorizations depending on whether you are viewing this page through the Search Service (farm level) or site collection settings:
 
Search Service: Manage Result Sources (farm level)
  • Defined for this search service
  • Provided by SharePoint
 Result Sources (site collection level)
  • Defined for this site collection
  • Provided by the search service
  • Provided by SharePoint

Solution

  • If you created the result source through the search service's Manage Result Sources page, navigate back to that page to edit the result source.
  • If you created the result source at the site collection level, navigate to the site collection's Search Result Sources page to edit the result source.

References

Thursday, December 17, 2015

SharePoint 2013 TIP: how to set a lookup column via PowerShell

I needed to change a choice column to a lookup column and then update the new lookup column with the values of the old choice column. Lookup columns cannot be updated in the same manner as text and choice columns. The lookup column is a different variable type than plain text. Therefore, to set its contents, a variable of the same type must be created explicitly or implicitly, populated, and then pushed into the lookup column.

In this particular example, I needed to make this change for a service ticket tracking list. The old status column was of type Choice, and I needed to change it to type Lookup, so that I could implement basic metrics using the undocumented count related method. The Choice column had four possible values: Initiated, Engaged, Resolved and Closed. These needed to be pushed appropriately into the corresponding new column. There are several approaches presented here. The approach I used involved explicitly creating the variable type needed.

Script

$SourceWebURL = "http://[yourwebsite/yourlist]" $SourceWeb = Get-SPWeb $SourceWebURL $TicketList = $SourceWeb.Lists["[ticketlistname]"] $StatusList = $SourceWeb.Lists["[lookuplistname]"] $StatusListItemInitiated = $StatusList.GetItemById(1); $StatusListItemInitiatedValue = New-Object Microsoft.SharePoint.SPFieldLookupValue($StatusListItemInitiated.ID,$StatusListItemInitiated.ID.ToString()); $StatusListItemEngaged = $StatusList.GetItemById(2); $StatusListItemEngagedValue = New-Object Microsoft.SharePoint.SPFieldLookupValue($StatusListItemEngaged.ID,$StatusListItemEngaged.ID.ToString()); $StatusListItemResolved = $StatusList.GetItemById(3); $StatusListItemResolvedValue = New-Object Microsoft.SharePoint.SPFieldLookupValue($StatusListItemResolved.ID,$StatusListItemResolved.ID.ToString()); $StatusListItemClosed = $StatusList.GetItemById(4); $StatusListItemClosedValue = New-Object Microsoft.SharePoint.SPFieldLookupValue($StatusListItemClosed.ID,$StatusListItemClosed.ID.ToString()); $total=$TicketList.Items.count; $Count=1; ForEach ($Item in $TicketList.Items) { $percent = [math]::Round(($count/$total)*100,2); Write-Progress -Activity 'Updating Ticket listing ' -Status "$percent percent" -PercentComplete $percent; $SDStatus = $Item["SD Status"]; IF ($SDStatus -eq "Initiated") { $Item["SDStatus2"] = $StatusListItemInitiatedValue; $Item.Update(); $count = $count+1; } ELSEIF ($SDStatus -eq "Engaged") { $Item["SDStatus2"] = $StatusListItemEngagedValue; $Item.Update(); $count = $count+1; } ELSEIF ($SDStatus -eq "Resolved") { $Item["SDStatus2"] = $StatusListItemResolvedValue; $Item.Update(); $count = $count+1; } ELSEIF ($SDStatus -eq "Closed") { $Item["SDStatus2"] = $StatusListItemClosedValue; $Item.Update(); $count = $count+1; } }; $SourceWeb.Close()

References

Tuesday, December 8, 2015

SharePoint Designer 2013: value does not fall within the expected range

Problem

In SharePoint Designer 2013, you attempt to detach a page from its Page Layout.  You select the file, check out the file, and then click the Detach from Page Layout button on the ALL FILES ribbon.  You are then presented with the following error prompt:

Solution

  1. In SharePoint Designer 2013, check out the page.
  2. Export the page to your workstation.
  3. Open the page in NotePad.
  4. Search for <mso:PublishingPageLayout.
  5. Revise the URL string in this tag so that it points to the proper location.
  6. Save the file.
  7. In SharePoint Designer 2013, import the page to the same folder that you exported the original page from.
  8. Overwrite the file.
  9. Now try detaching from page layout again.

References

  • This issue involved a page on our staging/development farm.  This farm is periodically updated, via content database, from the production farm.
  • On downloading and opening the page in NotePad, I found that the <mso:PublishingPageLayout tag pointed to a master page that was in the production farm.  On review, this made sense in that this page was simply the product of a content database copy and mount process, from production to staging/development; and while navigational URLs are updated in this process, the data embedded in content pages is probably not updated.  Note this for future content migration operations.

Monday, November 23, 2015

SharePoint 2013: CREATE TABLE permission denied in database [farm config]

Problem

You installed this month's cumulative update for your SharePoint Server 2013 Enterprise farm.  That Monday, checking the farm's application server Application event log, you see the following error event, #5586, recurring hourly in blocks of 5:
Unknown SQL Exception 262 occurred. Additional error information from SQL Server is included below.
CREATE TABLE permission denied in database '[farm config]'.
You also see server application error event #5617, recurring hourly at at the exact same time as the other error:
There is a compatibility range mismatch between the Web server and database "", and connections to the data have been blocked to due to this incompatibility. This can happen when a content database has not been upgraded to be within the compatibility range of the Web server, or if the database has been upgraded to a higher level than the web server. The Web server and the database must be upgraded to the same version and build level to return to compatibility range.
Reviewing event logs of the web front servers (WFE), you find the same error event messages appearing in their server application logs.

The User for both these error event types is the DocAve SharePoint Administrator service account (eg, spDocAve).  You begin troubleshooting.

Troubleshooting

  1. SQL Server server event logs: found no related events appearing in event logs.
  2. SQL Server security login mappings: found DocAve service account was not mapped to farm configuration database; also found it was not mapped to other farm databases, including:  Config_CA, all content DBs, Profile, Social.
    1. Remapped DocAve service account as db_owner to all farm databases.

Solution

  • Remap DocAve service account as db_owner to appropriate farm databases.

References

  • Farm database server: SQL Server 2012.
  • Occurred for October 2015 and November 2015 CUs.

Friday, November 20, 2015

SharePoint 2013: Application error when access /...[site page] Error=Request timed out

Problem

You administrator a small SharePoint 2013 Enterprise farm having traditional topology: 1 application, 2 web front ends, 1 database server and 1 OWA.  Some users report that they can connect to the customer main website just fine.  However, when they then attempt to navigate to a specific site in that website, their browser stays busy for awhile, and then their browsers display an error message:
Sorry, something went wrong
An unexpected error has occurred.
Technical Details
You do a spot check among some users and find that some have been able to access this particular subsite, but others haven't.

Troubleshooting

  1. Central Administration Health report: you find no error messages.
  2. Server Event Logs: same for the WFE server event logs, no issues.  Given that some users are experiencing this issue and some are not, you suspect that the problem is occurring on just one of the two web front ends.  
  3. ULS logs on both machines: you conduct searches based upon usernames and URL of the site.  On one of the WFEs, you find the following curious entries:
    Application error when access /.../SitePages/Home.aspx, Error=Request timed out.

    System.Web.HttpException: Request timed out. Getting Error Message for Exception

    System.Web.HttpException (0x80004005): Request timed out. Redirect to error.aspx failed.

    Exception: System.Web.HttpException (0x80004005): Cannot redirect after HTTP headers have been sent. at System.Web.HttpResponse.Redirect(String url, Boolean endResponse, Boolean permanent) at Microsoft.SharePoint.Utilities.SPUtility.Redirect(String url, SPRedirectFlags flags, HttpContext context, String queryString) 
  4. SecurityTokenServiceApplicationPool: restarted both.  Problem still occurs.
  5. IIS: performed an IISRESET on the WFE exhibiting the curious ULSlog entries.  Afterwards, all users report they are now able to access the subsite without issue.

Solution

  1. Identify which WFE the issue is localized to.
  2. Perform IISRESET on that WFE.

References

  • None

Friday, November 13, 2015

SharePoint 2013 TIP: Cannot Co-locate SharePoint Designer and Office Web Apps

SharePoint Designer 2013 can be installed to your farm's existing Office Web Apps 2013 Server, and both Designer and OWA will function just fine.  However, updates to OWA will fail.  You will be able to install OWA updates, but you will not be able to rebuild the OWA server, after installing the updates.  In other words, this commandlet will fail:
New-OfficeWebAppsFarm -InternalURL "http://MyOWAServer" -AllowHttp –EditingEnabled
The reason for this is that SharePoint Designer employs Microsoft Office components.  A sparsely documented prerequisite of Office Web Apps 2013 deployment is that Microsoft Office (and Microsoft Office based products) are not installed.

To work around this, if you need to use the OWA server for SharePoint Designer, is to simply uninstall Designer, run the rebuild the OWA farm, and then re-install Designer. This will work fine until next month's patching.

References

Tuesday, November 3, 2015

SharePoint 2013: adding a new content type to an existing list

Introduction

Notes and procedure on adding the ability to capture new meeting request information to an existing help desk ticketing service list.  Though the application is specific, the concepts that are presented here are general and apply to any situation in which you need to add a new content type to be used for capturing a new type of user information.  The help desk ticketing system has a number of different content types, each devoted to specific type of information to be captured from the user.  All of this information, no matter what type, is stored in a single list, the help desk ticketing system list.
   

Procedure

  1. Create new content type
    1. Navigate to the website hosting the list
    2. Go: Settings > Web Designer Galleries > Site content types
    3. Click the Create link.
    4. Complete the information for the new content type.  If you have already created other content types for your help desk ticketing list, be sure to select the appropriate Parent Content Type.  This should be the same parent content type used for the other help desk user request forms used in your list.
    5. Click OK. The Site Content Type Information page is displayed.  Look down in the Columns section.  If your new content type is based upon a general parent content type, you'll see an entry for the Item content type, the Title column (unless you have renamed this), and the other columns associated with your base help desk ticket list content type.
  2. Create new columns for this content type
    1. Navigate to the list.
    2. Go: Ribbon LIST tab > Settings Group > List Settings.
    3. Scroll down to the Columns section.
    4. Click Create column.  Completed as needed.  Main thing is, made sure that the Add to all content types and Add to default view options were unchecked.
    5. Repeat until all new columns have been created that you want to add to the new content type.
  3. Add new content type to list
    1. Navigate to the list.
    2. Go: Ribbon LIST tab > Settings Group > List Settings.
    3. Scroll down to the Content Types.
    4. Click Add from existing site content types.
    5. Select the appropriate content type, and then click the Add > button.
    6. Click OK.  The new content type now appears in the Content Types list.
  4. Add columns to the new content type
    1. Navigate to the list.
    2. Go: Ribbon LIST tab > Settings Group > List Settings.
    3. Scroll down to the Content Types.
    4. Click the link of the new content type.
    5. Add the columns that you created previously. Add them in the order that you want them to appear to the user in the form.
    6. Click OK.
  5. Add new content type form for adding items (Optional)
    1. Launch SharePoint Designer 2013
    2. Open the site containing the target list
    3. In the left Navigation panel, select Lists and Libraries.
    4. In the right Action panel, select the target list.
    5. In the Forms section, in the Action panel, click the New... button.
    6. Enter a name, select New item form, and then select the content type to use.
    7. Click OK.  The new form name will appear listed in the Forms section.  This form will include all list fields.
  6. Modify new item form (Optional)
    1. Launch SharePoint Designer 2013
    2. Open the site containing the target list
    3. In the left Navigation panel, select Lists and Libraries.
    4. In the right Action panel, select the target list.
    5. In the Forms section, click on the form you want to edit.  This opens the form in code view.
    6. Scroll down until you see a number of row elements featuring the names of the new columns you added.  To remove a column from this form, select the entire row, including the row markup, and then delete.  To move elements, cut and paste these rows where desired.
    7. Once you're done, click the Save button at top.  The edited form will be available immediately.

References

Notes

  • If you create a new form for this content type that adds items, this form may appear different from the new item form for this content type available from the New Item drop down on the ITEMS tab of the ribbon.  The form available from the New Item dropdown displays only those fields in the content type.  While the new item form you create via SharePoint Designer will have all fields.

Monday, November 2, 2015

SharePoint 2013 TIP: updating list columns and showing progress

Here's a quick bit of PowerShell that saves the Created and Created By columns to CreatedArchive and CreatedByArchive and also at the same time presented to you a progress bar.  I'm saving these columns data because:

  1. The Created column is overwritten when you perform an export followed by an import and 
  2. The Created By column is overwritten by your username (assuming you are the one performing this import) if the particular username being imported is no longer in Active Directory.  

The loss of that data presents a problem when trying to archive lists for which it is important to preserve these column data, such as in employee time and issue tracking lists.  These lists can be thousands of items long, and it can take several minutes or more to update them and thus it's helpful to have a progress bar.  Using a progress bar gives me instant feedback on how my PowerShell script is progressing.
   

Script

$SourceWebURL = "http:/[yourfarmURL]/yoursite" $SourceListName = "Time log" $SourceWeb = Get-SPWeb $SourceWebURL $SourceList = $SourceWeb.Lists[$SourceListName] $total=$SourceList.Items.count $count=1 $Updated = $FALSE $ItemsUpdated = 0 ForEach ($Item in $SourceList.Items) { $percent = [math]::Round(($count/$total)*100,2); Write-Progress -Activity 'Updating Electronic Attendance Log ArchivedUsername field' -Status "$percent percent" -PercentComplete $percent; $cb = $Item["Created By"]; $cba = $Item["CreatedByArchive"]; $c = $Item["Created"]; $ca = $Item["CreatedArchive"]; If (($cba -eq "") -OR ($cba -eq $NULL)) { $cb = $cb.SubString($cb.IndexOf("#")+1); $Item["CreatedByArchive"] = $cb; $Item.Update(); $Updated = $TRUE; }; If (($ca -eq "") -OR ($ca -eq $NULL)) { $Item["CreatedArchive"] = $c; $Item.Update(); $Updated = $TRUE; }; If ($Updated) { $ItemsUpdated = $ItemsUpdated + 1; $Updated = $FALSE; }; $count = $count+1; }; $count=1; Write-Host $ItemsUpdated


Monday, October 26, 2015

Error 10016: The application-specific permission settings do not grant Local Launch permission for the COM Server application with CLSID {24FF4FDC-1D9F-4195-8C79-0DA39248FF48}

Problem

While performing a routine check of the logs of the machine hosting the SharePoint Server 2010 farm Central Administration, I saw the following error in the machine's System log:

Log Name:      System
Source:        Microsoft-Windows-DistributedCOM
Date:          [date/time]
Event ID:      10016
Task Category: None
Level:         Error
Keywords:      Classic
User:          SYSTEM
Computer:      [servername]
Description:
The application-specific permission settings do not grant Local Launch permission for the COM Server application with CLSID
{24FF4FDC-1D9F-4195-8C79-0DA39248FF48}
and APPID
{B292921D-AF50-400C-9B75-0C57A7F29BA1}
to the user NT AUTHORITY\SYSTEM SID (S-1-5-18) from address LocalHost (Using LRPC). This security permission can be modified using the Component Services administrative tool.
Event Xml:
...
Solution

The problem involves a permission issue and is resolved similar to other instances of this error (see references below).  In this case, the account needing the permission to access the registry keys is the local system account.

References

SharePoint 2013: Microsoft Word stopped working when opening from SharePoint document library

Problem

A user clicks on a Microsoft Word document in a document library in an externally facing SharePoint 2013 farm.  The user's local WinWord launches, and then a login dialog appears.  The user enters the usual authentication information, and then clicks OK.  The user is then prompted again to enter login information.  And so on.  If the user cancels out of the login prompt or clicks the "X", the users sees this error message:
Other users report similar experiences when trying to open other Microsoft Office documents in SharePoint 2013 document libraries.

This issue has been found to be associated with the installation of update KB3055034 for Microsoft Office 2010 that was released on October 13, 2015.

Solution

  • Uninstall KB3055034.

References

  • tbd

DocAve 6: An error occurred while loading the node

Problem

You are using DocAve SharePoint Administrator.  You have a SharePoint Server 2013 Enterprise farm.  You are trying to configure a DocAve Security Search on a farm site.  You were able to successfully execute security searches just fine a few days ago.  You have not made any configuration changes to DocAve SharePoint Administrator since you last used it.  The only thing you have done since then is install the SharePoint cumulative update package for this month.  Now, you can't execute security searches and you experience unusual problems.  For example, when you try to expand the farm in the Scope pane, you see the following error message:
You also find that when you enter a user's name in the User and Group box, when configuring a Security Search on a user account known to be in the content database, you see this error message:
You then log into a farm server and review the server event logs.  You see the following event log occurring repeatedly at the same time as the above DocAve errors:
Log Name:      Application
Source:        Microsoft-SharePoint Products-SharePoint Foundation
Date:          [date/time]
Event ID:      5586
Task Category: Database
Level:         Error
Keywords:      
User:          DOMAIN\SPDOCAVE
Computer:      [a farm server]
Description:
Unknown SQL Exception 262 occurred. Additional error information 
from SQL Server is included below.
CREATE TABLE permission denied in database 'Farm_Config'.
Event Xml:
...
This error message seems to point to an access issue. Checking the AgentService.exe log on the farm application server, you find this error message recurring each time you attempt to configure the security search:
ERROR 10-17 17:01:12,435 8 AgentPreHostingService 0- An error occurred 
while registering the agent. Exception: 
System.ServiceModel.EndpointNotFoundException: There was no 
endpoint listening at 
https://[DocAveSvr]:14000/ControlCore/ControlCoreService.svc that could 
accept the message. This is often caused by an incorrect address or 
SOAP action. See InnerException, if present, for more details. ---> 
System.Net.WebException: The remote name could not be resolved: 'DocAveSvr'

You then launch SQL Server Management Studio and check the mapping of the DocAve service account: you find that it is not longer mapped as DBO to the farm configuration database and other databases.

Solution

  • Verify that the DocAve agent service account has been mapped as DBO for all farm databases, particularly the farm configuration database.

References

  • None

Notes

  • The AgentService.exe.log is located in C:\Program Files\AvePoint\DocAve6\Agent\Logs.

Saturday, October 17, 2015

Hyper-V TIP: How to expand disk drives

One thing you may find yourself needing to do is expanding the disk drives.  This TIP shows you how.

Procedure

  1. Shutdown the SharePoint VM which has the disks you want to re-size.
  2. Launch Hyper-V Manager.
  3. Connect to the Hyper-V server hosting the VM.
  4. Select the VM in the Virtual Machines list.
  5. In the Actions pane, click Settings... A settings dialog appears.  
  6. In the Settings dialog, in the Hardware list pane, select the hard drive you want to re-size.  In my case, I wanted to resize the Logs drive.  The right details pane updates to show configurable parameters for the selected object. These configurable details will only be enabled if the VM is shutdown.
  7. Click the Edit button.  The Edit Virtual Hard Disk Wizard dialog appears.
  8. Select the Expand option, and then click the Next button.
  9. In the New Size text box, increase the size as desired.  In my case, I increased the Logs drive from 100 GB to 250 GB.
  10. Click the Next button.  A summary of the configuration changes is displayed.
  11. Click the Finish button.  The dialog closes and you are returned to the Settings dialog.
  12. Click OK.  After this, you will need to extend the volume from within the VM
  13. Start the VM.
  14. Login to the VM, and then start Computer Management.
  15. In the left object pane, expand Storage and then select Disk Management.
  16. In the main details pane, scroll down the list of disk size visualizations for the disk you expanded in Hyper-V.  You'll see that it appears to have two sections: a Primary Partition and an Unallocated one.
  17. Right-click on the Primary Partition, and then choose Extend Volume...  The Extend Volume Wizard dialog appears.
  18. Just click the Next button to accept the default of maximally extended the primary partition through the full unallocated portion.
  19. Click Finish.  The dialog closes, and you are taken back to Computer Management.  looking at the disk visualization list, you now see that the disk is expanded through the entire unallocated portion as well.
  20. Exit Computer Management.

References

  • In my case, I increased the memory on those farm servers hosting SharePoint Server 2013 Enterprise from 12 GB to 24 GB. This in turn triggered the "Drives are running out of free space" health rule on the Logs drive, which was 100 GB.  The other server drives were already large enough and had sufficient space to handle a full memory dump even with doubling server memory. I could have just disabled this rule.  However, this is not recommended best practice. Instead, I decided to increase the Logs drive from 100 GB to 250.

Friday, October 9, 2015

SharePoint 2013: Notes on Hyper V and replication

Introduction

This posting is a work-in-progress for capturing and consolidating information on SharePoint 2013 vis a vis Hyper V replication as a disaster recovery solution. Generally, in reviewing these references, I have found that Hyper V replication is not a supported disaster recovery solution.

The primary reason being that SharePoint is an asynchronous distributed web application, in which servers are not entirely synchronized.  For example, a single timer job is executed at slightly different times on the different farm servers no matter how fast server network connections may be. Moreover, the replications of all farm servers will can never be fully synchronized, but will occur at slightly different times.

Lastly, the only supported disaster recovery options involve SQL Server and are these:

  • Log Shipping
  • Mirroring
  • AlwaysOn

References

SharePoint 2013: Sorry, we’re having trouble reaching the server.

Problem

You see this message appear when entering usernames, whether for adding new users, using the Check Permissions tool, etc:
Another thing that occurs is that no results drop down appears, listing possibilities as you type.  On the other hand, if you enter the full username, and then click Check Now or Share, the username is in fact accepted and things subsequently happen the way you expect them to happen: permissions are checked or the new username is added to the SharePoint group you wanted to add it to.  You also notice something else.

Completely unrelated to this (or so it seems) is another error message that appears when users attempt to modify list item or document properties.  When users make changes to these properties, and then click OK, the property form remains visible for what seems longer than it should, and then a message is displayed on this form:
and

Troubleshooting

  1. Check server event logs:
    • No events occurring that occurred at same time as the message
  2. Check ULS logs:
    • You see an interesting series of error messages that recur:
      Unknown SPRequest error occurred. More information: 0x80070002
      
      System.IO.FileNotFoundException: The system cannot find the 
      file specified. (Exception from HRESULT: 0x80070002), StackTrace...
      
      Access Denied for /_vti_bin/client.svc/ProcessQuery. StackTrace...
      
      Redirect to AccessDenied.aspx?Source=
      https.../_vti_bin/client.svc/ProcessQuery failed. Exception: 
      System.Web.HttpException (0x80004005): Cannot redirect after
      HTTP headers have been sent. 
       
      
  3. Test other site collections:  
    • Problem still occurs.
  4. Test other web applications
    • You find that this problem occurs for only one of the web applications in your farm and not all.  For example, it does not occur for the Central Administration web application.
  5. Create a new web application and site collection and import problematic web application content
    • You find that the problem does not occur.
  6. Extend the problematic web application:
    • You find that the problem does not occur
  7. Unextend the problematic web application:
    • You find that the problem still does not occur.

Solution

  • Extend and then unextend the problematic web application (see reference 7).

References

  • There are temporary fixes that can be easily implemented with respect to the list item or document property issues, and these fixes involve adding content types (see references 2 and 3).  However, these fixes do not resolve the PeoplePicker error message.
  • The web application extension used for this solution was a simple one using all defaults: a host header (DNS) was not used for the URL - just the web server name.
  • I worked with Microsoft Support to resolve this issue and the apparently related list item and document property issues (see references 2 & 3).  The solution suggested by the support technician was to extend the web application, and this was the solution that ultimately fixed all of the issues noted in this posting.  However, why this one farm web application began presenting this behavior and not the others is still unknown.

Saturday, October 3, 2015

SharePoint 2013: The server was unable to save the form at this time. Please try again. [for lists]

Problem

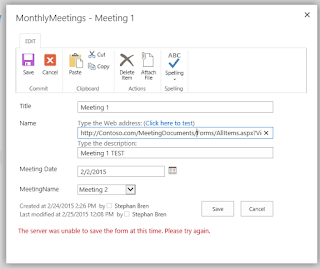
Your users report seeing the following error message, when attempting to modify and save changes to list item properties:
You verify the experience.  You then check other list types and find that this problem is seen for some list types but not all.  For example, it isn't experienced when modifying Calendar list items.  You begin troubleshooting.
NOTE: this posting addresses this problem when experienced for lists.  Not for document libraries.  If you are seeing this message when modifying document properties, please see this article.

Troubleshooting

  1. When did problem first appear? You do not recall having ever experienced this problem for this farm.  Some ad hoc review shows that you were able to modify list properties several months previously without issue.
  2. What changed? The farm is updated through the September 2015 CU.  There was no August 2015 CU, aside from individual updates, which were skipped.  There have been no changes to IIS, certificates or permissions.  Your first guess is that the problem was introduced by the September 2015 CU.
  3. Determine scope: two web applications in farm: Central Administration and user.  Only occurs for user. Ad hoc testing finds issue occurs for: Custom List, Announcements content types.  Does not occur for Calendar content type.
  4. Literature Review and Testing
    1. Restarted SharePoint Search Host Controller service per this article, and then tested: unresolved.
    2. Modified web application's web.config file per this article, and then tested: unresolved.
    3. Added my standard account to Site Collection Administrators group and the site's Owner group, and then tested: unresolved.
    4. Created new SharePoint group in site collection presenting this problem, configured this group with Read permission, and then added my standard account to this group (left my standard account in Site Collection Administrators and Owner groups): unresolved.
    5. Restarted the SecurityTokenServiceApplicationPool and then IIS: unresolved.
    6. Cleared the farm configuration cache per this article, and then tested: unresolved.
    7. Restarted SharePoint server (two-tier farm), and then tested: unresolved.
  5. A hunch: implemented equivalent solution to that which worked (per this article) when this message was seen for document property modifications.  Added Link content type to list, and then tested: resolved.
    • Repeatability: when Link content type is removed from list, issue reappears.

Solution

  1. Go to the list's Settings page.
  2. Scroll down to the Content Types group.  By default, you'll see just one content type here:
    .
  3. Now scroll back up, and then click Advanced settings.
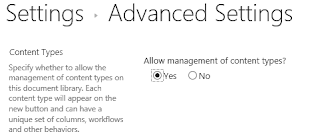
  4. On the Advanced Settings page, look for the Content Types group.
  5. Select Yes, and then click OK.
  6. Back on the Settings page, scroll down to the Content Types group, and then click Add from existing site content types.
  7. In the Available Site Content Types multi-select box, select Link.
    .
  8. Click Add >, and then click OK.
  9. Back on the Settings page, again scroll down to the Content Types group, and now you will see two content types there.
    .
  10. The change is implemented immediately.

References

  • Two-tier farm, externally facing.
  • The solution presented here does not, in my opinion, actually resolve the cause of the problem.
  • As best as I recall, this issue first appeared after installing the September 2015 CU.

Thursday, October 1, 2015

SQL Server 2012: Execution Error: Restore of database failed

Problem

From within SQL Server Management Studio (SSMS), you attempt to restore a SharePoint Server 2013 database, but then experience this error message:
TITLE: Microsoft SQL Server Management Studio ------------------------------
 Restore of database 'YOURDATABASE' failed. (Microsoft.SqlServer.Management.RelationalEngineTasks) ------------------------------
ADDITIONAL INFORMATION: System.Data.SqlClient.SqlError: The operating system returned the error '32(The process cannot access the file because it is being used by another process.)' while attempting 'RestoreContainer::ValidateTargetForCreation' on 'D:\Program Files\Microsoft SQL Server\MSSQL11.CSSP\MSSQL\DATA\YOURDATABASE.mdf'. (Microsoft.SqlServer.SmoExtended) For help, click: http://go.microsoft.com/fwlink?ProdName=Microsoft+SQL+Server&ProdVer=11.0.5058.0+((SQL11_PCU_Main).140514-1820+)&LinkId=20476
 This solution is simple.

Solution

  1. In SSMS, launch the Restore Database dialog, 
  2. Select Files, and then enable Relocate all files to folder.
    .
  3. Click OK.

References

Monday, September 28, 2015

PowerShell TIP: create generic objects to collect and display data

Introduction

Sometimes, there may be a need to collect similar data from different sources and then display that day in a simple way.  This can be accomplished using generic, custom objects.  This posting walks through the steps for building a simple custom collection object that displays a listing of objects and their properties.
 

Procedure

  1. Create an empty collection object. Creating a simple system.object is not enough. This type of object cannot contain a suite of objects: it can only contain a single object.  What is needed is an object that can in turn contain other objects.  For this, use an instance of the System.Collections.ArrayList class, declared like so:
    $MyCollection = New-Object System.Collections.ArrayList
    Leaving off the parentheses creates an empty collection. Here's a short hand way of declaring the same thing:
    $MyCollection = @()
    To declare a finite collection object, use the ArrayList constructor like so:
    $MyCollection = New-Object System.Collections.ArrayList(N)
    where N is some integer.  Or it's possible to rely upon the default value of the constructor to create a typed array, like so:
    $MyCollection = new-object system.object[] N
    where N is again any integer.  Note: this method works for the other types as well (cfi, system.boolean).
     
  2. Create an object with the members you want.  next task is to create an object that contains the properties and values you want to save.  Another name for this is Key:Value pairs. There are several methods for creating such an object.  One method is to create a standard system.object and then add members to it.  This is the formal textbook script for doing this:
    $MyCollection1 = New-Object System.Object
    $MyCollection1 | Add-Member -type "NoteProperty" -name "Property Name" -value "This is property #1"
    $MyCollection1 | Add-Member -type "NoteProperty" -name "Property Value" -value "Red"
    $MyCollection1 | Add-Member -type "NoteProperty" -name "Property Comment" -value "Always used"
    To do a quick check on the values of this object, just use:
    $MyCollection1 | ft -auto
    This is what would be seen in the command shell:
    Let's create a few more of these objects.  Each one must be created uniquely:
    $MyCollection2 = New-Object System.Object
    $MyCollection2 | Add-Member -type "NoteProperty" -name "Property Name" -value "This is property #2"
    $MyCollection2 | Add-Member -type NoteProperty -name "Property Value" -value "Blue"
    $MyCollection2 | Add-Member -type NoteProperty -name "Property Comment" -value "Sometimes used"
    $MyCollection2 | ft -auto

    $MyCollection3 = New-Object System.Object
    $MyCollection3 | Add-Member -type NoteProperty -name "Property Name" -value "This is property #3"
    $MyCollection3 | Add-Member -type NoteProperty -name "Property Value" -value "yellow"
    $MyCollection3 | Add-Member -type NoteProperty -name "Property Comment" -value "Never used"
    $MyCollection3 | ft -auto
    After executing the above script, something like this would be seen in the command shell:
    Let's create a fresh instance of the collection object, and then add to this collection the three objects just created, like so (using the same command shell):
    $MyCollection = New-Object System.Collections.ArrayList
    $MyCollection = $MyCollection + $MyCollection1
    $MyCollection = $MyCollection + $MyCollection2
    $MyCollection = $MyCollection + $MyCollection3
    Or, in shorthand:
    $MyCollection = @()
    $MyCollection += $MyCollection1
    $MyCollection += $MyCollection2
    $MyCollection += $MyCollection3
    The command shell will now display this:
  3. Retrieve object values.  The objects are added to the collection and are indexed in the order in which they were added. To list the contents of the collection, simply enter the collection name itself and pipe it into the Format-Table object, like so:
  4. $MyCollection | Format-Table -auto
    which will  be displayed in the shell as:
    Once the data has been added to a collection object, use standard collection indexing and object notation to retrieve collection values. For example, to retrieve the first object that was added to the collection, just enter:
    $MyCollection[0]
    To retrieve the value of the Property Name field for this object, just enter:
    $MyCollection[0]."Property Name"
    Quotation marks had to be used in this instance due to the field name containing two words. Anyway, this works for all the other object fields as well:
    Here's what it would look like if single-word property names had been used:
    Note how easy it is then to access specific object member values.

References

  1. MSDN: Object Class
  2. MSDN: ArrayList Class
  3. MSDN: Boolean Structure
  4. SS64: Add-Member
  5. Windows PowerShell Tip of the Week: Working With Custom Objects
  6. Windows PowerShell Tip of the Week: Even More Things You Can Do With Arrays
  7. Windows PowerShell Tip of the Week: Working with Hash Tables
  8. C# array of different objects
  9. Windows PowerShell Blog: New-Object PSObject –Property [HashTable]

Monday, September 21, 2015

SharePoint 2013: The server was unable to save the form at this time. Please try again. [for document libraries]

Problem

Your users report seeing the following error message, when attempting to save changes to document properties:
This is an externally-facing SharePoint 2013 instance.  You are able to repeat the user experience, and you find that it occurs regardless of browser type.  The Free Download Manager is not deployed to your users, and restarting the SharePoint Search Host Controller, on the SharePoint application server, has no affect.
NOTE: this posting engages this problem for Document Libraries.  Not for lists.  This error message can also appear when attempting to modify list item properties.   If you see this for lists, please see this article.

Solution

  1. Go to your  document library's Settings page.
  2. Scroll down to the Content Types group.  By default, you'll see just one content type here:
    .
  3. Now scroll back up, and then click Advanced settings.
  4. On the Advanced Settings page, look for the Content Types group.
    .
  5. Select Yes, and then click OK.
  6. Back on the Settings page, scroll down to the Content Types group, and then click Add from existing site content types.
  7. In the Available Site Content Types multi-select box, select Link to a Document.
  8. Click Add >, and then click OK.
  9. Back on the Settings page, again scroll down to the Content Types group, and now you will see two content types there
  10. The change is implemented immediately.

References

  • Thanks to ABitEncrypted for finding this solution.
  • This solution works for Document Libraries.  There is no "Link to Document" content type that can be added to lists.

Saturday, September 19, 2015

DocAve 6: Installation Rule Scanning: TCP Port Sharing Services Failed

Problem

You are installing the DocAve 6 agent onto a SharePoint farm server.  After the pre-installation scan completed, you see a rule failure for the Net Tcp Port Sharing Service:
This problem is easily resolved.  By default, the Net TCP Port Sharing Service Startup Type is Disabled.  Just switch it to Automatic.

Solution

  1. Launch the Services applet.  
  2. Scroll down to the Net. TCP Port Sharing Service.
  3. Change the Startup Type to Automatic:
    .
  4. Start the service manually.
  5. Restart the DocAve 6 Agent scan and continue with the installation.

References

  • I experienced this issue while installing the agent on the farm's SQL Server - the one server I overlooked when verifying that the Port Sharing Service was up and running on the farm's servers.