Problem
You create a new Managed Metadata service application (MMSA). You then navigate to the Term Store Management Tool and see the following error message:

- Granting the Managed Metadata Service Application application pool identity access permission to the service application and
- Associating the Managed Metadata Service Application proxy with the web application.
Solution
- Grant the MMSA application pool service account access to the MMSA
- Navigate to: Central Administration > Application Management > Service Applications > Manage service applications.
- Click on the white space to the right of the Managed Metadata Service Application link (don't click on the link itself). This selects that service application.
- On the SERVICE APPLICATIONS tab of the ribbon, in the Sharing group, click on the Properties button.
- Scroll down to the Application Pool group, and then take note of the name of the application pool that is shown under Use existing application pool. Now you need to find the service account identity of this application pool.
- Click Cancel.
- Launch an elevated SharePoint Management Shell.
- Execute: Get-SPServiceApplicationPool. This returns a list of all SharePoint-related application pools and their identities.
- Find the target application pool, and then note down its ProcessAccountName. This is the service account that is the identity of the application pool.
- Now, on the SERVICE APPLICATIONS tab of the ribbon, in the Sharing group, click on the Permissions button.
- Verify that the application pool service account you identified in the previous step has been granted at least Read Access to Term Store access. If you don't see the service account listed here, grant the service account the level permission access appropriate to your web application, and then click OK.
- Associate the MMSA proxy with the target web application
- Navigate to: Central Administration > Application Management > Service Applications > Configure service application associations.
- From the View dropdown, to the right, select Web Applications.
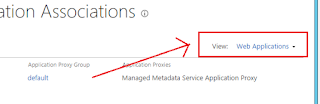
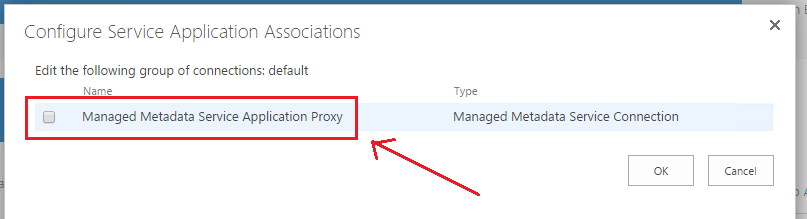
- Click on the Application Proxy Group associated with the target content web application. For default proxy groups, this will be default. The Configure Service Application Associations dialog appears.
- You may see more than one item here. There'll be a proxy listed here for each service application you have created. For this test instance, only the Managed Metadata Service Application has been created and so only one proxy is listed.

- Enter a check for the Managed Metadata Service Application Proxy, and then click OK.
- Back on the Service Application Associations page, you'll now see a Managed Metadata Service Application proxy associated with the target web application. If you have other service applications associated with the target web application, they will also be listed here.
- The configuration you made here is immediately implemented, and the Term Store Management Tool is now accessible.


References
- The Service Application being requested does not have a Connection associated with the Central Administration web application. To access the term management tool use Site Settings from a site configured with the appropriate Connection.
- SharePoint 2010: Issues with Service Application Proxy & Proxy Group Associations
- Get-SPServiceApplicationPool
Notes
- You can recreate this issue by simply unchecking the proxy association.


