Introduction
In this step-by-step walkthrough, you will install and configure the CentOS Directory Server on Centos 5.5 running as a guest OS on VMware Workstation 7.1. The CentOS Directory Server is the CentoOS distribution of the 389 Directory Server [10], which is an open source LDAP server for Linux. The Red Hat documentation provides all necessary information on LDAP [5], but can be challenging to quickly and productively review. A number of online tutorials are also available [3, 4, 6], and the best one that I was able to identify is available at neddix.com [7]. My step-by-step walkthrough retraces the steps presented in the neddix.com tutorial, with some minor modifications, updates, and additional detail and appropriate referencing helpful to those new to LDAP implementation. Note that it assumes the use of the Gnome interface. Total time to completion is about 2 hours. Good luck!
Procedure
Step 1: Configure Networking
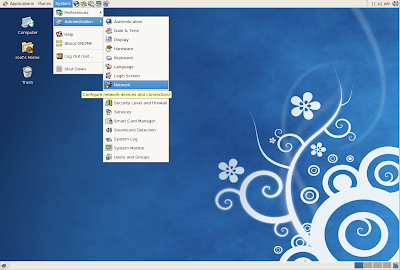
On the Gnome panel, select System, and then select Network.
The Network Configuration tool opens.

On the Network Configuration tool, select the target device, and then click Edit. The Ethernet Device tool appears.

Configure the usual network items, and then click OK. The Ethernet Device tool closes, and you are returned to the Network Configuration tool. On the Network Configuration tool, select the DNS tab.

Enter the Hostname that you want for your network. For this walkthrough, the hostname is:

Click OK, and then exit the Network Configuration tool. On the Gnome panel, point to System, then point to Server Settings, and then select Services.

Click the Restart button. After a few moments, a message will appear.

Click OK. Now, return to the Network Configuration tool, and then select the DNS tab again.

Enter the appropriate DNS data, and then select Save from the File menu again. At the prompt, click OK. And you'll need to restart the Network service again, like you did previously. Once you've done these things, test your configuration. First, open a terminal, and then enter:

Now enter the following:

Running these commands helps determine whether the machine's DNS settings have been properly configured.
Step 2: Enable Network Time Protocol Service
Go to the Services tool, and then scroll down until you see the ntpd service item. Check this item.

Click the Start button. After a few moments, the startup process will complete, and the Status panel will be updated.

This completes the network time protocol service startup. In the next step, you will configure temporary security settings to allow you to install the necessary software. These will be modified again later.
Step 3: Disable Firewall and SELinux
On the Gnome panel, click on System, and then click Security Level and Firewall. On the Firewall Options tab, make sure that Firewall has been set to Disabled.
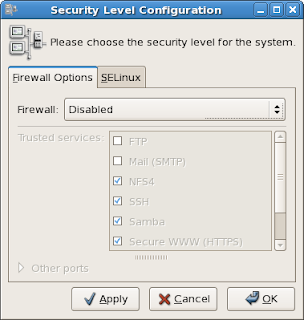
And then on the SELinux tab, make sure that the SELinux Setting has been set to Disabled.

Then click OK.

Click Yes. This completes security settings configuration. In the next step, you will create a new account for use by the LDAP service.
Step 4: Create LDAP Service Account
On the Gnome panel, select System, point to Administration, and then select Users and Groups. The User Manager tool appears.

Click Add User. The Create New User tool appears. Enter the appropriate information.

Click OK. The tool closes, and you are returned to User Manager. The sysadmin account will now be listed.

This completes setup of the LDAP server service account. In the next step, you will check on OpenJDK installation and install it if need be.
Step 5: Install OpenJDK
First, let's check to see whether openjdk has already been installed. You can do this using rpm commands or using the Package Manager GUI tool. Let's try from the command line first. At the terminal, try this:

Next, let's use the GUI tool to determine whether openjdk has already been installed.
Open the Package Manager tool. On the Search tab, perform a search on the string JDK. Scroll down the list of search results and look for the OpenJDK Runtime Environment item.

If it's not checked, go ahead and check it now for installation. Once you check it, the Apply button is enabled, and clicking the Apply button launches the installation of all checked packages.
You can also install it from the command line like this:

This completes JDK installation. In the next step, you'll check on openssl installation and if it's not installed, install it.
Step 6: Install SSL
As in step 5, there are a couple of ways of determining whether a package has already been installed, either from the command line or using the Package Manager GUI tool. Let's first do this from the command line.

To do this using Package Manager, bring up this tool, and then on the Search tab, perform a search on openssl.

In this walkthrough, the openssl package was already installed. That's because the target CentOS machine was installed along with the Server and Server GUI package groups at the time of CentOS installation. These groups include the openssl package. However, if you need to install it, just check the item as seen in Package Manager. This will enable the Apply button. Click the Apply button. This will install openssl. Alternatively, you can install openssl from the command line like so.
Step 7: Install CentOS Directory Server
To start out, let's make sure that this hasn't been installed already. Enter the following command:

Next, let's find out a bit more about this package before installing it. Enter the following command:

You can install CentOS Directory Server in two ways: from the command line using yum command or using Package Manager. If you use Package Manager, open the tool and perform a search on centos-ds. Check the item described as CentOS Directory, Administration, and Console Suite.

Alternatively, from the command line, enter the following command:

Note the dependencies that were also installed for you automatically. In particular, note that cyrus-sasl and ldapjdk dependencies were installed. These no longer need to be installed separately, as discussed elsewhere.
This completes CentOS Directory Server installation. It's not yet ready to run, as it still needs to be setup and configured. But you'll get to that after checking on whether certain support packages have been installed, which is the focus of the next step.
Step 8: Install Support Packages
There are a few support packages required by CentOS Directory Server, as discussed in the CentOS Directory Server Setup HowTo [9]. However, if you are working with a recent installation of CentOS, such as version 5.5, or greater, and you have installed the Server and Server GUI package groups, you may find that you do not need to specifically install these support packages separately. You may find that they're already installed. Let's check. Enter the following four commands in succession, waiting after each one to see its results:

For this walkthrough, each of these support packages was previously automatically installed. For your own particular case, if you find one or more of these support packages missing, install them using standard yum commands. This completes installation of the support packages. In the next step, you will setup and configure CentOS Directory Server instance and the Admin server.
Step 9: Setup and Configure CentOS Directory Server
Open a terminal, and enter the following command:
Would you like to continue with set up? [yes]:
Do you agree to the license terms? [no]: yes
At this point, dsktune runs and performs a system parameters check. It may identify a few areas for improving performance. For example, it may present warnings on memory and file descriptor parameters. Don't worry about these: you can adjust these later. Here's hjow to respond to the prompts during setup:
Would you like to continue? [no]: yes
Choose a setup type [2]: 2
Computer name [CentOS1.corp.local.net]: centos1.corp.local
System User [nobody]: sysadmin
System Group [nobody]: sysadmin
Do you want to register this software with an existing configuration directory server? [no]: hit enter
Configuration directory server administrator ID [admin]: hit enter
Password:
Password (confirm):
Administration Domain [corp.local]: hit enter
Directory server network port [389]: hit enter
Directory server identifier [centos1]: hit enter
Suffix [dc=corp, dc=local]: hit enter
Directory Manager DN [cn=Directory Manager]: hit enter
Password:
Password (confirm):
Administration port [9830]: hit enter
Are you ready to set up your servers? [yes]: hit enter
This completes setup and configuration of CentOS Directory Server. In the next step, you'll make somem additional, minor configuration changes.
Step 10: Additional Configuration
Next, let's configure the openldap-client tools.
You should have something like the following

Next, configure the Directory Server daemon and the Directory Server Admin to startup at boot time. To do this, enter each of the following commands

This completes the additional configuration step. In the last step, you will launch the Directory Server Administration Console.
Step 11: Start the Directory Server Administration Console
Enter the following command in the terminal:

Enter the User ID and password that you configured in Step 9, and then enter the URL using the port number that you also configured in Step 9. Click OK. The CentOS Management Console appears.

Now that you have a working LDAP server installed and configured and ready, you'll need to start connecting other Linux machines to authenticate from this LDAP server, but that's outside the scope of this walkthrough.
Summary
Congratulations! You've installed and configured the CentOS LDAP Directory Server. Happy computing!
References
In this step-by-step walkthrough, you will install and configure the CentOS Directory Server on Centos 5.5 running as a guest OS on VMware Workstation 7.1. The CentOS Directory Server is the CentoOS distribution of the 389 Directory Server [10], which is an open source LDAP server for Linux. The Red Hat documentation provides all necessary information on LDAP [5], but can be challenging to quickly and productively review. A number of online tutorials are also available [3, 4, 6], and the best one that I was able to identify is available at neddix.com [7]. My step-by-step walkthrough retraces the steps presented in the neddix.com tutorial, with some minor modifications, updates, and additional detail and appropriate referencing helpful to those new to LDAP implementation. Note that it assumes the use of the Gnome interface. Total time to completion is about 2 hours. Good luck!
Procedure
Step 1: Configure Networking
On the Gnome panel, select System, and then select Network.

The Network Configuration tool opens.
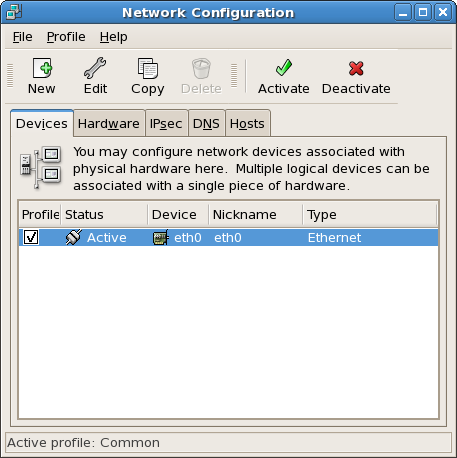
On the Network Configuration tool, select the target device, and then click Edit. The Ethernet Device tool appears.

Configure the usual network items, and then click OK. The Ethernet Device tool closes, and you are returned to the Network Configuration tool. On the Network Configuration tool, select the DNS tab.

Enter the Hostname that you want for your network. For this walkthrough, the hostname is:
centos1.corp.localJot down what your hostname and domain name are, as you'll need these data later, when you perform a setup and configuration of CentOS Directory Server. Don't worry about the DNS entries - anything you enter here will be reset anyway when you reset the Network service. Then, from the File menu, select Save.

Click OK, and then exit the Network Configuration tool. On the Gnome panel, point to System, then point to Server Settings, and then select Services.
TIP: if you did not install the Server GUI package, during CentOS install, you will not see the Server Settings submenu. Instead, the Services menu item will simply be grouped under the System menu.The Service Configuration tool appears. Scroll down until you see the network item. Select this item.

Click the Restart button. After a few moments, a message will appear.

Click OK. Now, return to the Network Configuration tool, and then select the DNS tab again.

Enter the appropriate DNS data, and then select Save from the File menu again. At the prompt, click OK. And you'll need to restart the Network service again, like you did previously. Once you've done these things, test your configuration. First, open a terminal, and then enter:
hostnamewhich returns the machine's hostname, and then
hostname -fwhich returns the machine's fully qualified domain name. You should see the following:

Now enter the following:
ping -c 1 localhostfollowed by
ping -c 1 centos1.corp.localEither command sends a single ICMP echo request. You should get something like the following.

Running these commands helps determine whether the machine's DNS settings have been properly configured.
TIP: to get quick help on these and other standard UNIX commands, just enter:
man [command]This completes network configuration. In the next very quick step, you'll enable the time service.
Step 2: Enable Network Time Protocol Service
Go to the Services tool, and then scroll down until you see the ntpd service item. Check this item.

Click the Start button. After a few moments, the startup process will complete, and the Status panel will be updated.

This completes the network time protocol service startup. In the next step, you will configure temporary security settings to allow you to install the necessary software. These will be modified again later.
Step 3: Disable Firewall and SELinux
On the Gnome panel, click on System, and then click Security Level and Firewall. On the Firewall Options tab, make sure that Firewall has been set to Disabled.

And then on the SELinux tab, make sure that the SELinux Setting has been set to Disabled.

Then click OK.

Click Yes. This completes security settings configuration. In the next step, you will create a new account for use by the LDAP service.
Step 4: Create LDAP Service Account
On the Gnome panel, select System, point to Administration, and then select Users and Groups. The User Manager tool appears.

Click Add User. The Create New User tool appears. Enter the appropriate information.

Click OK. The tool closes, and you are returned to User Manager. The sysadmin account will now be listed.
This completes setup of the LDAP server service account. In the next step, you will check on OpenJDK installation and install it if need be.
Step 5: Install OpenJDK
First, let's check to see whether openjdk has already been installed. You can do this using rpm commands or using the Package Manager GUI tool. Let's try from the command line first. At the terminal, try this:
rpm -qa | grep openjdkThis searches through all of the packages for the search string openjdk. If this command returns nothing then the package hasn't been installed. Otherwise, it will return the the package name and version.
NOTE: if, during your initial CentOS installation, you performed an install of the Server and Server GUI packages, the openjdk package will already have been installed for you, since it comes as part of the Server package group.As of this walkthrough, the latest version of openjdk was 1.6.0, but your version may vary.

Next, let's use the GUI tool to determine whether openjdk has already been installed.
Open the Package Manager tool. On the Search tab, perform a search on the string JDK. Scroll down the list of search results and look for the OpenJDK Runtime Environment item.

If it's not checked, go ahead and check it now for installation. Once you check it, the Apply button is enabled, and clicking the Apply button launches the installation of all checked packages.
You can also install it from the command line like this:
yum install java-1.6.0-openjdkwhere your version number may vary. After installing openjdk, do the following check to make sure the libraries have been appropriately installed and configured. Enter the following:
/usr/sbin/alternatives --config javaThis finds all of the java versions available on your machine. You may find more than one available. What's important is that a version is available that matches the one you installed and that this is the default version. CentOS Directory Server requires OpenJDK or Sun JDK. Make sure that one of these is the default.

This completes JDK installation. In the next step, you'll check on openssl installation and if it's not installed, install it.
Step 6: Install SSL
As in step 5, there are a couple of ways of determining whether a package has already been installed, either from the command line or using the Package Manager GUI tool. Let's first do this from the command line.
rpm -qa | grep opensslThis will search through all installed packages for the string openssl. If it doesn't find anything, it returns nothing. Otherwise, it returns the full name and version of the package.

To do this using Package Manager, bring up this tool, and then on the Search tab, perform a search on openssl.

In this walkthrough, the openssl package was already installed. That's because the target CentOS machine was installed along with the Server and Server GUI package groups at the time of CentOS installation. These groups include the openssl package. However, if you need to install it, just check the item as seen in Package Manager. This will enable the Apply button. Click the Apply button. This will install openssl. Alternatively, you can install openssl from the command line like so.
yum install opensslThis will install the latest version of openssl along with all of its dependencies. This completes installation of openssl. In the next step, you will perform the installation of CentOS Directory Server itself.
Step 7: Install CentOS Directory Server
To start out, let's make sure that this hasn't been installed already. Enter the following command:
rpm -qa | grep centos-dsThis will likely return nothing, but it doesn't hurt to check.

Next, let's find out a bit more about this package before installing it. Enter the following command:
yum info centos-dsThis returns info on the package that is on the yum server.

You can install CentOS Directory Server in two ways: from the command line using yum command or using Package Manager. If you use Package Manager, open the tool and perform a search on centos-ds. Check the item described as CentOS Directory, Administration, and Console Suite.

Alternatively, from the command line, enter the following command:
yum install centos-dsInstallation takes a minute or two. You'll be prompted once for input.

Note the dependencies that were also installed for you automatically. In particular, note that cyrus-sasl and ldapjdk dependencies were installed. These no longer need to be installed separately, as discussed elsewhere.
This completes CentOS Directory Server installation. It's not yet ready to run, as it still needs to be setup and configured. But you'll get to that after checking on whether certain support packages have been installed, which is the focus of the next step.
Step 8: Install Support Packages
There are a few support packages required by CentOS Directory Server, as discussed in the CentOS Directory Server Setup HowTo [9]. However, if you are working with a recent installation of CentOS, such as version 5.5, or greater, and you have installed the Server and Server GUI package groups, you may find that you do not need to specifically install these support packages separately. You may find that they're already installed. Let's check. Enter the following four commands in succession, waiting after each one to see its results:
rpm -qa | grep xorg-x11-xauthExecuting each of these commands should return something like that shown below.
rpm -qa | grep bitstream-vera-fonts
rpm -qa | grep dejavu-lgc-fonts
rpm -qa | grep urw-fonts

For this walkthrough, each of these support packages was previously automatically installed. For your own particular case, if you find one or more of these support packages missing, install them using standard yum commands. This completes installation of the support packages. In the next step, you will setup and configure CentOS Directory Server instance and the Admin server.
Step 9: Setup and Configure CentOS Directory Server
Open a terminal, and enter the following command:
setup-ds-admin.plYou shouldn't need to specifiy the path, as the /etc/sbin directory should already be a part of the machine's PATH. You'll be prompted along the way.
Would you like to continue with set up? [yes]:
Do you agree to the license terms? [no]: yes
At this point, dsktune runs and performs a system parameters check. It may identify a few areas for improving performance. For example, it may present warnings on memory and file descriptor parameters. Don't worry about these: you can adjust these later. Here's hjow to respond to the prompts during setup:
Would you like to continue? [no]: yes
Choose a setup type [2]: 2
Computer name [CentOS1.corp.local.net]: centos1.corp.local
System User [nobody]: sysadmin
System Group [nobody]: sysadmin
Do you want to register this software with an existing configuration directory server? [no]: hit enter
Configuration directory server administrator ID [admin]: hit enter
Password:
Password (confirm):
Administration Domain [corp.local]: hit enter
Directory server network port [389]: hit enter
Directory server identifier [centos1]: hit enter
Suffix [dc=corp, dc=local]: hit enter
Directory Manager DN [cn=Directory Manager]: hit enter
Password:
Password (confirm):
Administration port [9830]: hit enter
Are you ready to set up your servers? [yes]: hit enter
This completes setup and configuration of CentOS Directory Server. In the next step, you'll make somem additional, minor configuration changes.
Step 10: Additional Configuration
Next, let's configure the openldap-client tools.
gedit /etc/openldap/ldap.confThis opens the ldap configuration file. Add the following lines to this file:
BASE dc=corp, dc=local
HOST localhost
PORT 389
You should have something like the following

Next, configure the Directory Server daemon and the Directory Server Admin to startup at boot time. To do this, enter each of the following commands
chkconfig dirsrv onAfter configuring these, do a quick check to make sure these services are running by using the service command:
chkconfig dirsrv-admin on

This completes the additional configuration step. In the last step, you will launch the Directory Server Administration Console.
Step 11: Start the Directory Server Administration Console
Enter the following command in the terminal:
centos-idm-consoleThe console login prompt will appear.

Enter the User ID and password that you configured in Step 9, and then enter the URL using the port number that you also configured in Step 9. Click OK. The CentOS Management Console appears.

Now that you have a working LDAP server installed and configured and ready, you'll need to start connecting other Linux machines to authenticate from this LDAP server, but that's outside the scope of this walkthrough.
Summary
Congratulations! You've installed and configured the CentOS LDAP Directory Server. Happy computing!
References
- OpenSSL - OpenSSL Project
- OpenLDAP - OpenLDAP Organization
- Install Directory Server in CentOS 5.5 - Roger Carhuatocto - Holism and Technology blog
- CentOS Directory Server On CentOS 5.2 - HowToForge - Linux Tutorials
- Red Hat Directory Server - Red Hat Documentation
- Installing 389 Directory Server - LinuxMail.info
- How to setup the CentOS Directory Server (389 Directory Server) neddix.com wiki
- NTP: The Network Time Protocol
- CentOS Directory Server, Basic Install - Centos HowTos
- Setting up CentOS Directory Server on CentOS 5.4 Linux - Raining Packets - December 30, 2009
- How can I change the TCP/IP tuning parameters? - Red Hat Magazine - 1/25/2007
- Linux: tcp keep alive setting - The R71 web dump - 25 November 2009
- VNC ( Virtual Network Computing ) - CentOS Documentation
- 389 Directory Server - The Fedora Project
- Chapter 11. Package Management Tool - Red Hat Documentation
- How do I find what dependencies a rpm file has? - nixCraft - January 14, 2006
- RPM Commands - CentOS Resources
- Yum Commands - CentOS Resources
- Chapter 11. Package Management Tool - Red Hat 5 Documentation
- Install and Configure OpenLDAP on CentOS 5 - HowToForge - January 28, 2011
- 11.1. Introduction to SSL in the Directory Server - Red Hat 5 Documentation
- 1.4. Starting the Console - Red Hat 5 Documentation
- None


