Monday, September 28, 2015

PowerShell TIP: create generic objects to collect and display data

Introduction

Sometimes, there may be a need to collect similar data from different sources and then display that day in a simple way.  This can be accomplished using generic, custom objects.  This posting walks through the steps for building a simple custom collection object that displays a listing of objects and their properties.
 

Procedure

  1. Create an empty collection object. Creating a simple system.object is not enough. This type of object cannot contain a suite of objects: it can only contain a single object.  What is needed is an object that can in turn contain other objects.  For this, use an instance of the System.Collections.ArrayList class, declared like so:
    $MyCollection = New-Object System.Collections.ArrayList
    Leaving off the parentheses creates an empty collection. Here's a short hand way of declaring the same thing:
    $MyCollection = @()
    To declare a finite collection object, use the ArrayList constructor like so:
    $MyCollection = New-Object System.Collections.ArrayList(N)
    where N is some integer.  Or it's possible to rely upon the default value of the constructor to create a typed array, like so:
    $MyCollection = new-object system.object[] N
    where N is again any integer.  Note: this method works for the other types as well (cfi, system.boolean).
     
  2. Create an object with the members you want.  next task is to create an object that contains the properties and values you want to save.  Another name for this is Key:Value pairs. There are several methods for creating such an object.  One method is to create a standard system.object and then add members to it.  This is the formal textbook script for doing this:
    $MyCollection1 = New-Object System.Object
    $MyCollection1 | Add-Member -type "NoteProperty" -name "Property Name" -value "This is property #1"
    $MyCollection1 | Add-Member -type "NoteProperty" -name "Property Value" -value "Red"
    $MyCollection1 | Add-Member -type "NoteProperty" -name "Property Comment" -value "Always used"
    To do a quick check on the values of this object, just use:
    $MyCollection1 | ft -auto
    This is what would be seen in the command shell:
    Let's create a few more of these objects.  Each one must be created uniquely:
    $MyCollection2 = New-Object System.Object
    $MyCollection2 | Add-Member -type "NoteProperty" -name "Property Name" -value "This is property #2"
    $MyCollection2 | Add-Member -type NoteProperty -name "Property Value" -value "Blue"
    $MyCollection2 | Add-Member -type NoteProperty -name "Property Comment" -value "Sometimes used"
    $MyCollection2 | ft -auto

    $MyCollection3 = New-Object System.Object
    $MyCollection3 | Add-Member -type NoteProperty -name "Property Name" -value "This is property #3"
    $MyCollection3 | Add-Member -type NoteProperty -name "Property Value" -value "yellow"
    $MyCollection3 | Add-Member -type NoteProperty -name "Property Comment" -value "Never used"
    $MyCollection3 | ft -auto
    After executing the above script, something like this would be seen in the command shell:
    Let's create a fresh instance of the collection object, and then add to this collection the three objects just created, like so (using the same command shell):
    $MyCollection = New-Object System.Collections.ArrayList
    $MyCollection = $MyCollection + $MyCollection1
    $MyCollection = $MyCollection + $MyCollection2
    $MyCollection = $MyCollection + $MyCollection3
    Or, in shorthand:
    $MyCollection = @()
    $MyCollection += $MyCollection1
    $MyCollection += $MyCollection2
    $MyCollection += $MyCollection3
    The command shell will now display this:
  3. Retrieve object values.  The objects are added to the collection and are indexed in the order in which they were added. To list the contents of the collection, simply enter the collection name itself and pipe it into the Format-Table object, like so:
  4. $MyCollection | Format-Table -auto
    which will  be displayed in the shell as:
    Once the data has been added to a collection object, use standard collection indexing and object notation to retrieve collection values. For example, to retrieve the first object that was added to the collection, just enter:
    $MyCollection[0]
    To retrieve the value of the Property Name field for this object, just enter:
    $MyCollection[0]."Property Name"
    Quotation marks had to be used in this instance due to the field name containing two words. Anyway, this works for all the other object fields as well:
    Here's what it would look like if single-word property names had been used:
    Note how easy it is then to access specific object member values.

References

  1. MSDN: Object Class
  2. MSDN: ArrayList Class
  3. MSDN: Boolean Structure
  4. SS64: Add-Member
  5. Windows PowerShell Tip of the Week: Working With Custom Objects
  6. Windows PowerShell Tip of the Week: Even More Things You Can Do With Arrays
  7. Windows PowerShell Tip of the Week: Working with Hash Tables
  8. C# array of different objects
  9. Windows PowerShell Blog: New-Object PSObject –Property [HashTable]

Monday, September 21, 2015

SharePoint 2013: The server was unable to save the form at this time. Please try again. [for document libraries]

Problem

Your users report seeing the following error message, when attempting to save changes to document properties:
This is an externally-facing SharePoint 2013 instance.  You are able to repeat the user experience, and you find that it occurs regardless of browser type.  The Free Download Manager is not deployed to your users, and restarting the SharePoint Search Host Controller, on the SharePoint application server, has no affect.
NOTE: this posting engages this problem for Document Libraries.  Not for lists.  This error message can also appear when attempting to modify list item properties.   If you see this for lists, please see this article.

Solution

  1. Go to your  document library's Settings page.
  2. Scroll down to the Content Types group.  By default, you'll see just one content type here:
    .
  3. Now scroll back up, and then click Advanced settings.
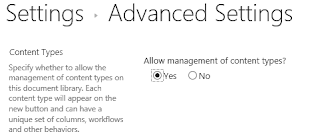
  4. On the Advanced Settings page, look for the Content Types group.
    .
  5. Select Yes, and then click OK.
  6. Back on the Settings page, scroll down to the Content Types group, and then click Add from existing site content types.
  7. In the Available Site Content Types multi-select box, select Link to a Document.
  8. Click Add >, and then click OK.
  9. Back on the Settings page, again scroll down to the Content Types group, and now you will see two content types there
  10. The change is implemented immediately.

References

  • Thanks to ABitEncrypted for finding this solution.
  • This solution works for Document Libraries.  There is no "Link to Document" content type that can be added to lists.

Saturday, September 19, 2015

DocAve 6: Installation Rule Scanning: TCP Port Sharing Services Failed

Problem

You are installing the DocAve 6 agent onto a SharePoint farm server.  After the pre-installation scan completed, you see a rule failure for the Net Tcp Port Sharing Service:
This problem is easily resolved.  By default, the Net TCP Port Sharing Service Startup Type is Disabled.  Just switch it to Automatic.

Solution

  1. Launch the Services applet.  
  2. Scroll down to the Net. TCP Port Sharing Service.
  3. Change the Startup Type to Automatic:
    .
  4. Start the service manually.
  5. Restart the DocAve 6 Agent scan and continue with the installation.

References

  • I experienced this issue while installing the agent on the farm's SQL Server - the one server I overlooked when verifying that the Port Sharing Service was up and running on the farm's servers.

Friday, September 18, 2015

SharePoint 2013 TIP: edit user profile properties using PowerShell

Use the UserProfileManager class to edit SharePoint user profile properties via PowerShell. You can use this method if you have deployed My Sites to your farm. To use this method, you must create an instance of the UserProfileManager based upon your farm's My Site deployment. here's how:
$mySiteUrl = "[My Site URL]" $adAccount = "DOMAIN\username" $site = Get-SPSite $mySiteUrl $context = Get-SPServiceContext $site $UserProfileManager = New-Object Microsoft.Office.Server.UserProfiles.UserProfileManager($context) $up=$UserProfileManager($adAccount)
To then edit a property, e.g., the name that is displayed for a user, you would write:
$pp = "First Middle Last" $up["PreferredName"].Value = $pp $up.commit()
To view a list of all user profile properties, just do:
$up.Properties | sort-object name | ft name,displayname,isalias -auto
To find out what you can do with these properties, just do:
$up.Properties | Get-Member

Not all of these properties are of type string and can be edited. I don't know what the rule is, but from my experience, those properties that do not begin with SPS can be edited and those that do cannot be edited.

References

Thursday, September 17, 2015

SharePoint 2013: Creating Chart Areas using the Chart Webpart

Introduction


This posting consolidates my notes regarding creating two or more chart areas within single chart object or web part.  Chart areas are separate graphs that involve completely separate data sets but that are still displayed within the same chart web part.  Using a single chart web part to display multiple graphs enables you to conserve page area and also present related graphs in a more intuitive manner. This posting walks through creating a single chart web part that displays two graphs, a line graph and a scatter graph, as show below.
This posting also shows how to configure various chart properties so as to display them as close to standard Cartesian format (centralized axes) as possible. Before going on, a few notes on notation are important.

Notation

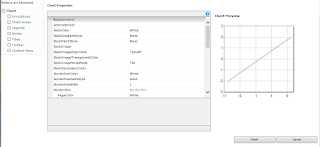
After adding the Chart web part, and then clicking on Advanced Properties, this is what you see initially:
Note the locations of Select and Element, at left, and the Details pane in the middle.  Note also that, in the details pane, configuration items are grouped by a bolded header, such as Appearance in the above image.  The Select and Element and Details pane are the configuration tools that you will be using extensively from here on out.  
For this posting, a configuration step will be shown using this notation: 
  • Select an Element > Chart: [subelement] > [Details group header] > [subgroup header] > [configuration item]: Value
As an example,
  • Select an Element > Chart: Chart Areas > Grid&TickMarks > MajorGrid > Interval: 10
If it can already be understood that items in the Details pane are to be configured, then the entire path won't be written down but abbreviated and indented like so:
    • [Details group header] > [subgroup header] > [configuration item]: Value
As an example,
    • Grid&TickMarks > MajorGrid > Interval: 10
For some elements, there is an additional configuration item situated atop the Details pane.  For example, if you select the Chart Areas element, you initially see this:
Note the Axis Menu drop down.  The existence of this additional configuration item and its type are strictly dependent on the element that you select in the Select an Element, at left.  For those cases where you need to select from this configuration item, the following notation will be used:
  • Select an Element > Chart: [subelement] > [Configuration item]: [Configuration item selection]

Procedure


1) Create a list and populate it with two data sets, F1(x) and F2(x).  F1 will be data generated from a simple line function: F1(x) = ax, where a = 0.2 and x = {-10 to 10}. F2 contains random data, where x = {-10 to 10} and y = {-10 to 10}.  For this posting, the list has four columns: X, Y and X2, Y2.

2) Add a single Chart web part to a page.  
If you are not able to find the chart web part, perhaps because you have not enabled the Publishing feature, you can still easily make this web part available without having to activate the Publishing feature.  See reference [1] for details.
 2) Choose the list as the data source, and then bind the chart to the appropriate columns in that list like so:

3) Clicking Finish then returns this:
What you see here is a chart object displaying a single chart area.  Now let's configure this chart area to make it look like the chart displayed at the beginning of this posting.
4) Click on Advanced Properties. and then make the following configuration changes to this
  1. Select an Element > Chart: Chart Areas > Axis Menu: X-axis
    • Grid&TickMarks > MajorGrid > Interval: 10
    • Grid&TickMarks > MajorGrid > LineColor: Black
    • Grid&TickMarks > MajorTickMark > TickMarkStyle: AcrossAxis
    • Grid&TickMarks > MajorTickMark > Size: 3
    • Grid&TickMarks > MajorTickMark > Interval: 5
    • Grid&TickMarks > MajorTickMark > Enabled: True
    • Grid&TickMarks > MinorGrid > Interval: 1
    • Grid&TickMarks > MinorGrid > LineColor: Gainsboro
    • Grid&TickMarks > MinorGrid > Enabled: True
    • Grid&TickMarks > MinorTickMark > TickMarkStyle: AcrossAxis
    • Grid&TickMarks > MinorTickMark > Size: 1
    • Grid&TickMarks > MinorTickMark > Interval: 1
    • Grid&TickMarks > MinorTickMark > Enabled: True
    • Labels > LabelStyle > Interval: 1
    • Scale > Crossing: 0
    • Scale > IsMarginVisible: False
    • Scale > Maximum: 10
    • Scale > Minimum: -10
  2. Select an Element > Chart: Chart Areas > Axis Menu: Y-axis
    • Repeat above
After making these configuration changes, you will have this:
Now let's configure a second chart area and display it in the same chart object
5) Click on Advanced Properties. Look up above the Details pane and look for the Axis Menu.  Now look to the right of this: do you see the little plus "+" symbol?  Click on this. After you do this, the page will refresh.  After this finishes, if you look in the Axis Menu, you will no longer see Default menu option showing but ChartArea1.  Note also how the first chart area has compressed vertically: it's height is now half of what it was before.  This is because another chart area object has been created and the first chart area object size properties have been modified to give room for the second chart area object.  Click Finish.
6) Click Data and Appearance, and then click Connect Data to your Chart.  Look for the Series Properties item and then expand it.  You'll see something like this:
Now open the Series dropdown: you can't because only one series exists so far.  I've named the first data series F1.  You can change it to whatever you like by simply editing what you see in the Series Name text box.  Edit the text there and then click somewhere else: the change Note also the Series Chart Area configuration item.  This is the critical one for you.  This is how you associated different data series with different chart areas, effectively assigning different data to different charts.  Anyway, another data series needs to be added.
Click the plus sign "+" next to the Series dropdown.  Series 2 now appears in this dropdown.  I'm going to change its name to F2 by editing its name in the Series Name text box.
7) Configure new data series.  Now that I have this second data series, it remains to configure it.  I want this to be a scatter or point plot, so, from the Series Type dropdown, select Point.  Next, I want to associate it with the second chart area object, so, from the Series Chart Area dropdown, select ChartArea1.  Lastly, I need to assign the appropriate list columns to the X and Y axis values.  To do this, select Y2 from the Y Field dropdown and X2 from the X Field dropdown.  At this point, the configurations will look like so:

 Click Finish.  You will then see the following:
The Chart object is now configured with two chart area objects, each displaying a different graph using different data sources.  Now let's configure the second chart area object.
8) Click Advanced Properties, and then make the following configuration changes like so:
  1. Select an Element > Chart: Chart Areas > Axis Menu: ChartArea1: X axis
    • Grid&TickMarks > MajorGrid > Interval: 10
    • Grid&TickMarks > MajorGrid > LineColor: Black
    • Grid&TickMarks > MajorTickMark > TickMarkStyle: AcrossAxis
    • Grid&TickMarks > MajorTickMark > Size: 3
    • Grid&TickMarks > MajorTickMark > Interval: 5
    • Grid&TickMarks > MajorTickMark > Enabled: True
    • Grid&TickMarks > MinorGrid > Interval: 1
    • Grid&TickMarks > MinorGrid > LineColor: Gainsboro
    • Grid&TickMarks > MinorGrid > Enabled: True
    • Grid&TickMarks > MinorTickMark > TickMarkStyle: AcrossAxis
    • Grid&TickMarks > MinorTickMark > Size: 1
    • Grid&TickMarks > MinorTickMark > Interval: 1
    • Grid&TickMarks > MinorTickMark > Enabled: True
    • Labels > LabelStyle > Interval: 5
    • Scale > Crossing: 0
    • Scale > IsMarginVisible: False
    • Scale > Maximum: 10
    • Scale > Minimum: -10
  2. Select an Element > Chart: Chart Areas > Axis Menu: ChartArea1: X axis
    • Repeat above.
At the end of all this configuration, click Finish.  You'll now see the following:
The next to last step is to make this align horizontally rather than vertically.
9) Click Advanced Properties, and then configure as follows:
  1. Select an Element > Chart: Chart Areas > Axis Menu: Default (this is the first chart area)
    • Alignment > AlignmentOrientation: Horizontal (you need to doubleclick on this menu option in order to set them - different from other menu options)
    • Alignment > AlignmentStyle: Position (you need to doubleclick on this menu option in order to set them - different from other menu options)
    • Appearance > Position > X: 0
    • Appearance > Position > Y: 0
    • Appearance > Position > Width: 50
    • Appearance > Position > Height: 100
  2. Select an Element > Chart: Chart Areas > Axis Menu: ChartArea1
    • Alignment > AlignmentOrientation: Horizontal (you need to doubleclick on this menu option in order to set them - different from other menu options)
    • Alignment > AlignmentStyle: All (you need to doubleclick on this menu option in order to set them - different from other menu options)
    • Appearance > Position > X: 50
    • Appearance > Position > Y: 50
    • Appearance > Position > Width: 50
    • Appearance > Position > Height: 100
At this point, before clicking Finish, you will see this:
Notice how the two chart areas still occupy the same space as previously. In fact, they now occupy the same space that the original chart area occupied previously, before the second one is configured.  Keep in mind that the chart area object is separate from the chart object.  Thus far, most of our configuration has been on the chart area objects.  We haven't made any changes to the chart object size properties. So, the chart object continues to be presented at the same width and height as originally configured by default, or 300px x 300px.  If packing two chart areas into the default width chart object reduced the graph widths by half, doubling the chart object width should restore the chart area widths to what we want to see.  Click Finish.
10) Click Advanced Properties, and then configure as follows:
  1. Select an Element > Chart (do not select a subelement)
    • Layout > Width: 600
Click Finish.  You'll now see the same chart that you saw at the beginning of this posting:

References

  • I have not been able to find any Microsoft documentation that adequately covers all of the many configuration items of the SharePoint Chart web part.  Instead, I have used the MSDN documentation on the .NET System.Windows.Forms.DataVisualization.Charting Namespace, which though sparsely descriptive, does provide helpful insight into what properties and methods do.

Thursday, September 10, 2015

SharePoint 2013: Missing Blank Site Template

Problem

You want to create a new site based upon the Blank site template.  However, this site template is not shown when you try to select it:
This template is still available, but it is hidden.  You can see it when you run 
Get-SPWebTemplate | Select-Object Name, ID, Title, IsHidden | Ft -auto 
The IsHidden property is read only from PowerShell.  However, you can edit this property by editing the WEBTEMP.XML file in folder
C:\Program Files\Common Files\Microsoft Shared\Web Server Extensions\15\TEMPLATE\1033\XML
on each farm WFE.  You'll need to set the IsHidden property to False.  Note however that this approach isn't supported and may be overwritten by future updates. Another approach is to create a custom WEBTEMP*.XML file in this folder.  Further details about this approach can be found in Understanding WebTemp*.xml Files.  All things considered, it's much simpler to use the New-SPSite or New-SPWeb commandlets and including the Template option, when needing to create sites based upon this template.

Solution

  1. Run the New-SPSite or New-SPWeb commandlet using the -Template option

References

  • tbd

Tuesday, September 8, 2015

SharePoint 2013: User Not Found error when accessing a My Site scheduled for deletion

Problem

Managers want to view the My Sites of employees who have recently left the organization. However, they report that when they click the link in employee My Site deletion messages,
The My Site of [USERNAME] is scheduled for deletion in 14 days. As 
their manager you are now the temporary owner of their site. This temporary 
ownership gives you access to the site to copy any business-related 
information you might need. To access the site use this URL: 
http://[USER_MYSITE_URL]/personal/[USERID] 
they see an error message:
There are two solutions you can engage. Both are discussed next.

Solutions

  • Through Central Administration (Application Management > Site Collections > Change site collection administrators), update the user mysite's Primary site collection administrator to the user's manager.
  • Send the manager the direct URLs to the mysite's application pages:
    http://[USER_MYSITE_URL]/personal/[USERID]/Documents/Forms/All.aspx
    http://[USER_MYSITE_URL]/personal/[USERID]/_layouts/viewlsts.aspx

References

  1. SharePoint My Site Deletion and the Person.aspx Redirect Problem
  2. “Getting the most out of SharePoint” Auto-Generated SharePoint 2013 MySite Personal Site Email
  3. How to update “The My site of user is scheuled for deletion” email message in SharePoint 2013

Notes

  • The URL in the email message is hard-coded.  A quick check through resource files in the Web Server Extensions folder,
    C:\Program Files\Common Files\microsoft shared\Web Server Extensions\
    didn't reveal one for this email text.  Other administrators have reported the same problem (see references 1-3).
  • To check to see if the user's mysite is already deleted, use Get-SPDeletedSite.  Use Restore-SPDeletedSite to get it back, if you need to.

Wednesday, September 2, 2015

SharePoint 2013: this workbook cannot be opened

Problem

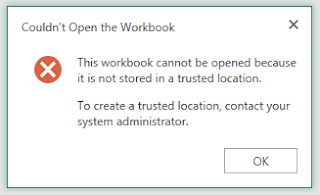
You have newly deployed an Internet-facing SharePoint farm.  A user reports that he is unable to open an Excel spreadsheet stored in a folder at this farm.  On clicking the filename in the SharePoint folder, the user sees this error: This workbook cannot be opened because it is not stored in an Excel Services Application trusted location...
Creating a new instance of the Excel Services Application automatically configures a default trusted location of http://. This works fine for internal, non-secured web applications.  However, this won't work for secured Internet-facing deployments, for which you need https://.

Solution

  1. Launch Central Administration as farm administrator.
  2. Go: Application Management > Service Applications > Manage service applications.
  3. On the Manage Service Applications page, look for your farm's Excel Service Application listing, and click on this.
  4. On the Manage Excel Services Application page, click Trusted File Locations.
  5. Click Add Trusted File Location. and complete as desired.
  6. Click OK.  The change will take affect immediately.

References

Tuesday, September 1, 2015

SharePoint 2013: [workflow] failed to start or run

Problem

You have created a workflow attached to a list that is triggered via a custom information management policy involving retention date. You find that the workflow does complete, but only after a long delay.  Looking in the Workflow History for the list item, you see the following:

Date OccurredEvent TypeUser IDDescriptionOutcome
9/1/2015 10:25 AMErrorSystem Account[workflow] failed to start
9/1/2015 10:25 AMErrorSystem Account[workflow] failed to run
9/1/2015 10:49 AMCommentSystem Account[workflow] triggered

And this experience is repeatable.  Each time the workflow is triggered; it first fails to start; it then fails to run; and then, a few minutes later, it does in fact complete.  The workflow history provides no immediate clues as to what the cause might be.  However, it does at least provide a time stamp, and using this, along with the ULS logs, will enable the cause to eventually be identified and resolved.  In this case, the cause was eventually found to involve McAfee On-Access Scan (OAS), and the solution was simply to turn off and on OAS.  Next, I present my troubleshooting steps.

Troubleshooting

  1. Reviewed list item workflow history.
  2. Created new list items configured to trigger information management retention policy, and then re-ran appropriate timer jobs: issue was repeatable.
  3. Checked server system and application event logs on both WFE, seeking events that occurred at about the same time as the workflow time stamps: no events found.
  4. Reviewed ULS logs on both WFE's for events occuring at about the same time: identified key ULS entry (among others having same correlation ID):
    Process: OWSTIMER.EXE
    Product: SharePoint Foundation
    Category: Legacy Workflow Instrastructure
    Level: Unexpected
    tbdRunWorkflow: Microsoft.SharePoint.SPException: <error><compilererror column="-1" line="-1" text="Compilation failed. Could not load file or assembly 'Xoml.8a0e3a04_01c8_4fa3_a7dc_a23122cdcf10.2.4096.-1.0.dll' or one of its dependencies. Access is denied."></compilererror></error>  
     at Microsoft.SharePoint.Workflow.SPNoCodeXomlCompiler.LoadXomlAssembly(SPWorkflowAssociation association, SPWeb web)  
     at Microsoft.SharePoint.Workflow.SPWinOeHostServices.LoadDeclarativeAssembly(SPWorkflowAssociation association, Boolean fallback)  
     at Microsoft.SharePoint.Workflow.SPWinOeHostServices.CreateInstance(SPWorkflow workflow)  
     at Microsoft.SharePoint.Workflow.SPWinOeEngine.RunWorkflow(SPWorkflowHostService host, SPWorkflow workflow, Collection`1 events, TimeSpan timeOut)  
     at Microsoft.SharePoint.Workflow.SPWorkflowManager.RunWorkflowElev(SPWorkflow workflow, Collection`1 events, SPWorkflowRunOptionsInternal runOptions)
  5. Created new list item configured to trigger information management retention policy, re-ran appropriate timer jobs, and then reviewed ULS logs to determine if above entry was repeated: it was.
  6. Performed Internet search: found promising posting [4] indicating that anti-virus may be involved.
  7. Disabled McAfee OAS, created new list item configured to trigger information management retention policy, and then re-ran appropriate timer jobs: workflow completed without any issue.
  8. Created new list items configured to trigger information management retention policy, and then re-ran appropriate timer jobs: workflow completed without any issue.
  9. Re-enabled McAfee OAS, created new list item configured to trigger information management retention policy, and then re-ran appropriate timer job: workflow completed without any issue.
  10. Created new list items configured to trigger information management retention policy, and then re-ran appropriate timer jobs: workflow completed without any issue.

Solution

  • Disable anti-virus.

References

  • Information Management Policy for retention involves to key timer jobs: Expiration policy and Information management policy.  The first look at each list item and applies the information management policy retention setting that you configured, updating the hidden Expiration Date column for a list item.  The second jobs reviews the Expiration Date column and then executes the information management policy configured for the condition if the condition requirement is met.
  • Farm topology: small, three-tier, having one app, two WFEs, and one SQL Server instance.
  • Due to employing network load balancing (in this case Windows NLB), you will need to check both ULS logs to find the ULS entries mentioned above.  This is due to the fact that information management policy may be run on either WFE and you don't know which.
  • .NET version being used: to determine this, launch IIS, and then go to the Application Pools listing. One column that is displayed is the .NET Framework Version.
  • Location of Temporary ASP.NET Files folder: for default installations, patched through June 2015, this would be: C:\Windows\Microsoft.NET\Framework\v4.0.30319\Temporary ASP.NET Files