Wednesday, August 27, 2014

SharePoint 2013: Product / patch installation or server upgrade required (BDC)

Problem

You perform a standard update of the farm, applying patches and then running the SharePoint Products Configuration wizard on all SharePoint servers.  The patches are installed and the Wizard complete successfully without issues on all servers.  However, a little while later, you find the following entry in the SharePoint 2013 Central Administration Review problems and solutions All Reports listing:

TitleProduct / patch installation or server upgrade required.
Severity1 - Error
CategoryConfiguration
ExplanationAll required products must be installed on all servers in the farm, and all products should have the same patching and upgrade level across the farm.

Upgrade is required on server [ServerName]. Without the upgrade, the server is not in a supported state
 
RemedyOn server [ServerName], once all required products and/or patches are installed, perform an upgrade by either running PSConfigUI.exe or by executing the command "PSConfig.exe -cmd upgrade -inplace b2b -force -cmd applicationcontent -install -cmd installfeatures". If a former upgrade attempt has failed, you may need to resolve upgrade specific issues before attempting upgrade again.  Refer to the upgrade status page (http:/ocs-vs-bat13d1:5000/_admin/UpgradeStatus.aspx) for information about current and prior upgrade attempts, and to determine issues that may be preventing upgrade from succeeding. For more information about this rule, see [URL].
Failing Servers 
Failing ServicesSPTimerService (SPTimerV4)
Rule SettingsView
 
You then check Upgrade and Migration > Review database status and see that the Health Analyzer message applies to just one database, a service application database for Business Data Connectivity (BDC).  You then open a command prompt with elevated privileges (as administrator) and execute the command presented in the health notice (above), but find that this still doesn't resolve the problem.

Solution
  1. Login as the Setup User Administrator account to any farm server hosting SharePoint 2013.
  2. Open a SharePoint 2013 management shell with elevated privileges (as administrator).
  3. Execute Get-SPDatabase.  This returns a list of all the farm databases, including their IDs.  Look through this list to find the one for the BDC.
  4. Mark its ID, and then past it into Notepad for safekeeping.  Let's refer to it as 1234567890 for this posting.
  5. In the same shell, execute the following:
    (Get-SPDatabase 1234567890).Provision()
    Among other things, this updates the database.
  6. After the command returns, execute the following to check the BDC database status:
    (Get-SPDatabase 1234567890).NeedsUpgrade
    This returns either True or False.
References
Notes
  • Mark its ID: to do this, and you don't know how (don't worry: I was in IT for 15 years before I was shown how to do this), click the little icon in the title bar of the shell.  This opens a menu. On this menu, point to Edit, and then select Mark.  Now, click and hold and drag over any text appearing in the shell.  Once you select what you want, just press the ENTER key: it's then pasted into the Windows clipboard.
  • This Health Analyzer issue was experienced after installing the August 2014 PU.

Thursday, August 21, 2014

SharePoint 2013: How to install updates using PatchIt

Introduction

Patching can take longer on SharePoint 2013 than previously experienced with 2010.  Use Russ Maxwell's PowerShell script to significantly reduce the amount of time consumed by patching SharePoint.  This posting presents the simple steps necessary for using his script and includes AlsTechTips notes from the field.  A few words of caution: be sure to read through the Notes section, as there are some limitations regarding this script that can be confusing to troubleshoot.

Procedure
  1. Preparation
    1. Login to a SharePoint server using any administrator account. 
    2. Copy the update executables to a local folder on each server hosting SharePoint Server 2013.  Call it updates.
    3. Add another folder off the root system drive.  For this posting, the new folder is called patchit.
    4. Copy the script file PatchIt.PS1 to this folder.
    5. Logout of the machine.
    6. Repeat this for each server in the farm hosting SharePoint Server 2013.
  2. Installation
    1. Logon to the first WFE using the SharePoint Setup User Administrator account (eg, spAdmin).
      NOTE: it is imperative that you login using this account and perform the update installation using this account.  Not doing so may introduce subtle inconsistencies into SharePoint operations that may lead to odd and confusing behavior difficult to troubleshoot and resolve.
    2. Copy the first update executable to the folder containing PatchIt.PS1. 
      NOTE: only one update executable can be in this folder at a time.  PatchIt can only install one update at a time.
    3. Launch the SharePoint Management Shell with elevated privilege (as administrator).
    4. Navigate to the patchit folder containing PatchIt.PS1.
    5. Execute the following:
      .\PatchIt.PS1
      After a few moments, you may be presented with the usual licensing terms prompt
    6. Check the box, and then click Continue.
    7. A new prompt will appear, Open File - Security Warning, requesting permission to run the file.
    8. Click Run.  You will see various messages appearing in the shell, as Search and other services stopped; then the patch is installed; and then Search is started.
    9. Repeat for each update that needs to be installed.
    10. Logoff
    11. Repeat for each SharePoint Server that needs to be updated.
      NOTE: check SharePoint services on each server, after completing update installation.  Also check to be sure that any paused crawls are resumed.  I have found that I sometimes need to start services and resume crawls after installing updates using PatchIt.
References
Notes
  • Thanks to Russ Maxwell for making this outstanding script available to the SharePoint IT community.
  • If the Search Service application is not installed, there's no need to choose option 1 after launching PatchIt.  If you do, you'll see the error, You cannot call a method on a null-valued expression.  But don't worry: this error can be ignored, as the script will proceed past this.
  • If you see the following error message appear in the management shell,
    get-process : Cannot find a process with the name "[process name]". Verify the process name and call the cmdlet
    don't worry: it just means that the update is already installed or unnecessary.
  • If, after installing updates, you launch the SharePoint Products Configuration Wizard, and the Wizard informs you that a patch hasn't been installed that you know you just now installed using PatchIt, don't worry: 1) exit the Wizard; 2) manually install the update by right-clicking on it and choosing Run as Administrator; run through the entire process: it will eventually inform you that it doesn't need to be installed; that's OK: when you close that last prompt, the system will be updated to recognize that the path was installed; and finally step 3), re-run the Products Configuration Wizard.
  • If that doesn't work, exit the SharePoint Products Configuration Wizard, open an elevated SharePoint Management Shell, and then execute: Get-SPProduct -Local.
  • Listed below are times and durations captured for a typical update session.  Start was 7:30 PM
    • WFE1 (1:05hr)
      • Preparation: 7:30PM (20m)
      • KB2880994: 7:50PM (13m)
      • KB2881034: 8:01PM (8m - not installed)
      • Review: 8:10PM (15m)
      • KB2760319: 8:25PM (5m)
      • KB2880998: 8:30PM (11m)
      • Reboot: 8:31PM (2m)
      • Run WU: 8:35PM (2m)
    • WFE2 (45m)
  • get-process : Cannot find a process with the name "...". Verify the process name and call the cmdlet again...  If you see this error message, it's OK, but you have some work ahead of you, since most likely your web application will be down.  Completely down.  The reason being that PatchIt shut everything down, but then failed to start things back up after it encountered this error.  So.... you need to start everything back up again.  On application servers - and particularly the one hosting CA:
    1. Start the Windows Process Activation and World Wide Web Publishing Services.
    2. Start all application pools
    3. Start web applications
    4. Start Service Bus Gateway and Service Bus Message Broker services.
    5. Check the WFEs also, but likely they're OK - you only need to check on those servers on which the error was generated.

Sunday, August 17, 2014

SharePoint 2013: The exclusive inplace upgrader timer job failed

Print Now
Problem

You run the SharePoint Products Configuration Wizard, after installing patches.  The Wizard runs through configuration steps 1 - 8 without issue, but then fails on step 9.  You review the diagnostics log (PSCDiagnostics_...) and see the following error message:
The exclusive inplace upgrader timer job failed. 
You then review the Upgrade log and see the following:
08/16/2014 23:46:36.44 OWSTIMER (0x2F90) 0x1330 SharePoint Foundation Upgrade SPContentDatabaseSequence al2pi ERROR Error running SQL DDL Script:                   IF  EXISTS (SELECT TOP 1 1 FROM sys.database_principals WHERE name = N'db_owner' A.... System.Data.SqlClient.SqlException (0x80131904): Cannot alter the role 'db_owner', because it does not exist or you do not have permission.   
Procedure
  1. Identify SharePoint Timer service account
    1. Login to any machine in the farm hosting SharePoint.
    2. Open the Services control panel.
    3. Scroll down to the SharePoint Timer Service
    4. Identify the account running this service (this will usually be the SharePoint farm service account, eg, spFarm).
    5. Logout
  2. Update farm service account database mapping
    1. Login to the farm's SQL Server as an administrator
    2. Open SQL Server Management Studio
    3. Expand Security > Logins
    4. Double-click on the farm service account
    5. In the left-hand Select a page panel, select User Mapping
    6. In the right Results panel, select each database in turn and check to see whether the db_owner checkbox is checked.  Don't worry about the system databases (master, model, msdb, tempdb), nor the workflow databases (eg, sbGatewayDatabase, WFInstanceManagement), though, it would be a good thing to do so, if you also used the farm service account as the workflow service account.
    7. Click OK.
  3. Update SharePoint
    1. Login to the first WFE as the SharePoint Setup user Administrator account. 
      NOTE: it is imperative that you run this using the SharePoint Setup User Administrator account.  Using another account, such as your own administrator account, may complete the Wizard, but may also introduce subtle inconsistencies into the server and farm configuration that can be very confusing and challenging to resolve.
    2. Launch the SharePoint Products Configuration Wizard.
    3. etc...
References
Notes
  • Thanks to Bernado Nguyen-Hoan for posting the original solution to this problem.
  • Bernado implemented this solution by granting the farm service account the sysadmin role to the database server.  While this certainly works, a least-permissions approach is what I took, ensuring that the farm service account was granted dbo permissions to all farm databases.
  • This problem was encountered after installing the August 2014 PU patches for SharePoint 2013.
  • If after launching SQL Management Studio, you don't see all the databases listed, or you see the momentary prompt appear, [some] databases were unavailable and so won't be listed, be sure you launched Management Studio with elevated privileges.

Tuesday, August 12, 2014

SharePoint 2013: Chart Web Part Missing

Introduction

Sometimes, the Chart web part may not appear, even after you enable the Publisher Infrastructure.  Or, maybe you want to add the chart web part without having to enable Publisher Infrastructure.  This posting shows you how.

Procedure
  1. Login to any farm server hosting SharePoint as a Site Collection Administrator.
  2. Go to: Settings > Site Settings > Go to top level site settings > Web Designer Galleries > Web parts.
  3. Click the FILES tab.
  4. Click New Document.
  5. Scoll down the list and look for: Microsoft.Office.Server.WebControls.ChartWebPart.
  6. Check this item.
  7. Scroll back up to the top, and then click the Populate Gallery button.
  8. Wait for it to refresh.
  9. Scoll down the list and look for: ChartWebPart.webpart.
  10. Click its Edit button.
  11. Enter the value, Content Rollup, or enter any other web part group value appropriate to your needs.
  12. Click Save.
  13. That's it.  The next time you open a web page in edit mode and search for a web part to add to it, you'll see the Chart web part there.
References
Notes
  • Content Rollup may not appear in the Group dropdown list.  But don't worry, just enter the text for a group that you know exists, and it will appear in that list the next time you edit a page and look for the web part.

SharePoint 2013: How to Audit Collaboration Sites

Introduction

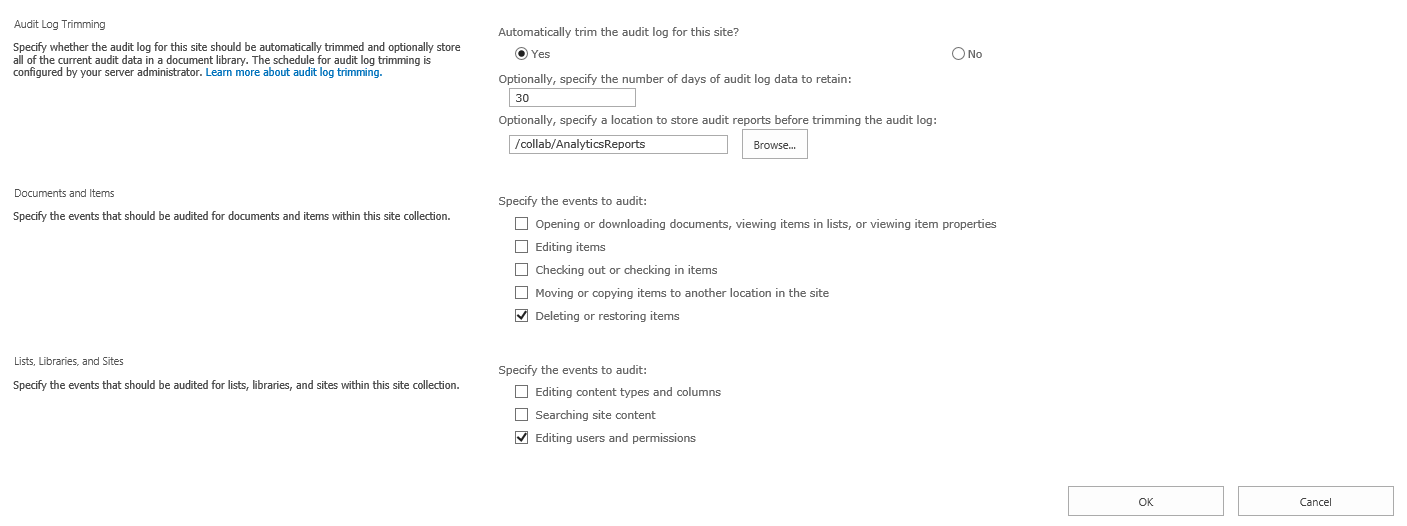
This posting walks through the process of configuring auditing for a collaboration site collection.  It engages the scenario where: as the farm administrator, you want to push down administration of collaboration sites but you still want to monitor critical activities, such as permission change and content deletions.

Procedure
  1. Navigate to the collaboration site.
  2. Go to: Settings > Site Settings.  Look for Site collection audit settings.
  3. Click this link.  Look for Automatically trim the audit log for this site?
  4. Select Yes.
  5. Enter 30
    Note: you will not actually obtain a report until this amount of days have passed.  Therefore, if you want to obtain these report files on a more timely basis, set this to a smaller number of days.
  6. Click the Browse... button.  A popup will appear.
  7. Select the document library where you want the audit log stored to.  For this example, the Customized Reports document library was selected. 
  8. Click OK.  The relative URL to this library is inserted.  Note that the popup displays Customized Reports, but that the URL to this library seems to call it AnalyticReports.
  9. Enable the Deleting or restoring items and Editing users and permissions checkboxes. 
    The audit data generated by these two events will be sufficient for me as the administrator to track significant activities involving the collaboration site.
  10. Click OK.
  11. Go to: Settings > Site Settings. Look for Audit Log Reports.  It should appear in the Site Collection Administration group, just under the Site collection audit settings link. 
References
Notes
  • If you don't see the Audit Log Reports link, it may be that the site collection Reporting feature has not been activated.  Activate that feature, and the link should appear directly.
  • Also, be sure that you have enabled the Audit log enabled setting in the Secure Store Service Properties.