Showing posts with label Hyper-V. Show all posts

Saturday, October 17, 2015

Hyper-V TIP: How to expand disk drives

One thing you may find yourself needing to do is expanding the disk drives.  This TIP shows you how.

Procedure

  1. Shutdown the SharePoint VM which has the disks you want to re-size.
  2. Launch Hyper-V Manager.
  3. Connect to the Hyper-V server hosting the VM.
  4. Select the VM in the Virtual Machines list.
  5. In the Actions pane, click Settings... A settings dialog appears.  
  6. In the Settings dialog, in the Hardware list pane, select the hard drive you want to re-size.  In my case, I wanted to resize the Logs drive.  The right details pane updates to show configurable parameters for the selected object. These configurable details will only be enabled if the VM is shutdown.
  7. Click the Edit button.  The Edit Virtual Hard Disk Wizard dialog appears.
  8. Select the Expand option, and then click the Next button.
  9. In the New Size text box, increase the size as desired.  In my case, I increased the Logs drive from 100 GB to 250 GB.
  10. Click the Next button.  A summary of the configuration changes is displayed.
  11. Click the Finish button.  The dialog closes and you are returned to the Settings dialog.
  12. Click OK.  After this, you will need to extend the volume from within the VM
  13. Start the VM.
  14. Login to the VM, and then start Computer Management.
  15. In the left object pane, expand Storage and then select Disk Management.
  16. In the main details pane, scroll down the list of disk size visualizations for the disk you expanded in Hyper-V.  You'll see that it appears to have two sections: a Primary Partition and an Unallocated one.
  17. Right-click on the Primary Partition, and then choose Extend Volume...  The Extend Volume Wizard dialog appears.
  18. Just click the Next button to accept the default of maximally extended the primary partition through the full unallocated portion.
  19. Click Finish.  The dialog closes, and you are taken back to Computer Management.  looking at the disk visualization list, you now see that the disk is expanded through the entire unallocated portion as well.
  20. Exit Computer Management.

References

  • In my case, I increased the memory on those farm servers hosting SharePoint Server 2013 Enterprise from 12 GB to 24 GB. This in turn triggered the "Drives are running out of free space" health rule on the Logs drive, which was 100 GB.  The other server drives were already large enough and had sufficient space to handle a full memory dump even with doubling server memory. I could have just disabled this rule.  However, this is not recommended best practice. Instead, I decided to increase the Logs drive from 100 GB to 250.

Friday, October 9, 2015

SharePoint 2013: Notes on Hyper V and replication

Introduction

This posting is a work-in-progress for capturing and consolidating information on SharePoint 2013 vis a vis Hyper V replication as a disaster recovery solution. Generally, in reviewing these references, I have found that Hyper V replication is not a supported disaster recovery solution.

The primary reason being that SharePoint is an asynchronous distributed web application, in which servers are not entirely synchronized.  For example, a single timer job is executed at slightly different times on the different farm servers no matter how fast server network connections may be. Moreover, the replications of all farm servers will can never be fully synchronized, but will occur at slightly different times.

Lastly, the only supported disaster recovery options involve SQL Server and are these:

  • Log Shipping
  • Mirroring
  • AlwaysOn

References

Saturday, July 19, 2014

SharePoint 2013: How to expand server disks on HyperV

Introduction

This posting walks through the process of expanding a SharePoint Server system disk for Windows Server 2012 servers hosted on Hyper-V.

Procedure
  1. Compile a listing:
    1. Name of SharePoint server
    2. Current disk sizes
  2. Shutdown all servers on this list (PowerShell: Shutdown /s)
  3. Launch Hyper-V Manager
  4. Connect to the appropriate Hyper-V host.
  5. Under Virtual Machines, select the SharePoint server.
  6. In the Actions panel, click Edit Disk...
  7. Navigate to the folder containing the virtual disk file, and then select this file.
  8. Click Open.
  9. Click Next.
  10. Select the Expand option, and then click Next.
  11. Click Finish.
References
Notes
  • The expanded disk is available immediately.

Sunday, November 24, 2013

How to migrate a VHD to VMware Workstation

Introduction

This posting walks you through the process of migrating a pre-configured Microsoft Virtual Hard Disk (VHD) system to VMware, using nothing more complex than a text editor.  This posting integrates relevant postings on this topic from other authors.  Links to all references uses in researching and developing this posting are provided in the References section, below.  This posting was developed on VMware Workstation 7.1.3 build-324285, but applies to other VMware products, including ESX and Player.

In this posting, you will migrate the Microsoft Windows Server 2003 R2 Enterprise Edition VHD to VMware Workstation 7.1.3.

Step 1: Prepare VHD
  1. Download or locate the Source VHD. For this posting, the source VHD filename is Win2k3R2EE.vhd.
  2. Create a new folder in your VMware VM directory.  For this posting, a new folder win2k301 was created.
  3. Copy the source VHD to your VMware directory
    While not absolutely necessary, it facilitates file management to keep the VHD source file co-located in the same folder as the target VMware VM folder.
Step 2: Create New VM
  1. Launch VMware Workstation.
  2. From the File menu, point to New and then point to Virtual Machine..
  3. Click Virtual Machine.  The first page of the New Virtual Machine Wizard appears.
  4. Select the Custom (advanced) option
  5. Click Next.
  6. On the Choose the Virtual machine Hardware Compatibility page, select the appropriate virtual machine hardware compatibility from the Hardware dropdown, and then click Next.
  7. On the Guest Operating System Installation page, select the I will install the operating system later option, and then click Next.
  8. On the Select a Guest Operating System page, from the Guest operating system group, select Microsoft Windows, and then click Next.
  9. On the Processor Configuration page, leave all settings default, and then click Next.
  10. On the memory for the Virtual Machine page, change the memory to 1 GB (1024 MD), and then click Next.
  11. On the Network Type page, choose the network configuration desired.  For this posting, the Use bridged networking option was selected
  12. Click Next.
  13. On the Select I/O Controller Types page, leave the default (LSI Logic), and then click Next.  The next page is the most important in the VM creation process.
  14. On the Select a Disk page, select Use an existing virtual disk.
  15. Click Next.  The Select an Existing Disk page appears
  16. On the Select an Existing Disk page, click Browse, and then navigate to the location of the VHD
  17. Select the VHD file, and then click Open.  The navigation dialog closes, and you are returned to the Select an Existing Disk page
  18. Back on the Select an Existing Disk page, verify that the path and file name are correct, and then click Next.
  19. On the Ready to Create Virtual Machine page, click Finish.  The VM is created and a new tab appears in VMware
  20. Verify that the VM folder now has VMSD, VMX and VMXF files
Step 3: Edit VMX File
  1. Exit VMware Workstation.  If you are using ESX, remove the new VM (but don't delete the files).
  2. Navigate to the VM folder created in Step 1.  This folder should contain the VHD file along with a VMSD, VMX and VMXF files
  3. Right-click the VMX file, in this posting named win2k301.vmx, point to Open With, and then choose Notepad.  The VMware VM settings file opens in NotePad.
  4. Edit the scsi0.present setting from TRUE to FALSE.
  5. Edit the scsi0:0.present setting from TRUE to FALSE.
  6. Add the following settings:
    ide1:1.present = "TRUE" ide1:1.deviceType = "disk" ide1:1.fileName = "Win2k3R2EE.vhd"
  7. Save and close the VMX file.
Step 4: Launch the VM
  1. Launch VMware Workstation.  If you are using ESX, add the VM back.
  2. Start the VM.
  3. If you repeatedly experience this blue screen,
    you may not have correctly edited the VMX settings file.  Review this file and try again.
  4. You'll see the usual Windows settings screen appear
    and then various Windows Setup dialogs will also appear; and the rest is normal Windows startup
  5. If, after logging into the Windows VM, you find the cursor missing or stuck in the bottom right corner, see Troubleshooting I below.
  6. If after trying to shutdown Windows VM, you find that it appears to hang, see Troubleshooting II below.
Summary

This posting has presented one method for migrating Microsoft VHD systems to VMware Workstation without the need for third party conversion tools.  The process merely involves minor changes to the VMware settings file for the VM.

Troubleshooting I: Mouse cursor does not appear within the virtual machine window
This can occur if the original VHD system had Microsoft Virtual Machine Additions installed.  To verify this, perform the following tests:
  1. Right-click anywhere in the virtual machine window: does a pop-up appear repeatedly in the bottom right corner no matter where you right-click?
  2. Using your keyboard navigation skills, check the installed software: is Virtual Machine Additions listed?
If either is the case, try the following:
  1. Re-open the VHD in Virtual PC or Hyper-V, remove the Virtual Machine Additions, and then repeat steps 1-4 above.
  2. Re-install or update the VMware tools, but leave out the mouse driver, and then reboot.
  3. Launch Regedit, navigate to
    HKEY_LOCAL_MACHINE\SYSTEM\CurrentControlSet\Control\... ...Class\{4D36E96F-E325-11CE-BFC1-08002BE10318}
    look for the UpperFilters setting, and remove msvmmouf and any spaces from its value, leaving the mouclass value still there
Troubleshooting II: Shutdown Locks
This occurs after attempting a normal shutdown of the server.  The screen changes, the message appears indicating that server is shutting down, the message disappears, and then only a normal desktop is displayed that is unresponsive to keyboard and mouse input.  The only way to force the server to shutdown us using VMware shutdown option.  There is significant discussion and troubleshooting steps on this issue to be found in the VMware knowledgebase.  However, the workaround is simple:
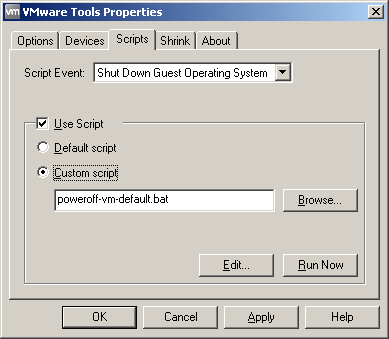
  1. On the VM server (guest OS), from the Start menu, point to Control Panel, and then point to VMware Tools.
  2. Click this item.  The VMware Tools dialog appears
  3. Select the Scripts tab:
    1. On the Scripts tab, from the Script Event dropdown, select Shut Down Guest Operating System.
    2. Enable Use Script.
    3. Select Custom script
    4. Click the Edit button.
    5. In that file, add the following:  shutdown /s /t 10 /d P:0:0 /c "VM guest shutdown".
  4. Save and close the file
  5. Click OK.
  6. Test by performing a normal shutdown of the server.
References
Notes