Introduction
In this step-by-step walkthrough, you will be shown how to fully implement an anonymous user in JIRA. Setting up Anonymous User in JIRA involves three discrete steps: 1) configuring the permission scheme, 2) configuring the field configuration scheme, and 3) configuring the default assignee. Each of these steps is presented here. Additionally, you'll also perform a fourth step involving test and verification of the implementation. All references used in this walkthrough are listed below in the References section. Good luck!
Procedure
Step 1: Configure Permission Scheme
Open JIRA. From the Administration menu, select your target project. The main project page appears.

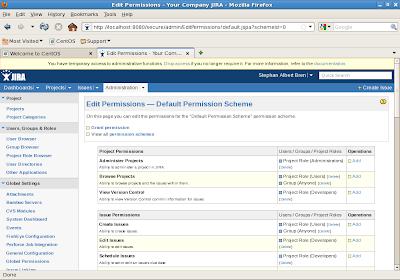
Look for Permission Scheme, and then click Edit. The Edit Permissions - Default Permission Scheme page appears.
 In the Project Permissions table, look for Browse Projects, and then click Add.

For my project, I want anonymous users to be able to create issues and also to browse projects. Using the CTRL key, select both of these. Then, to the right, select the Group radio button, and make sure that the Anyone group is selected.

Then click the Update button. The settings will be saved, and your browser will be navigated back to the Edit Permissions - Default Permission Scheme page. If you check the Browse Projects and Create Issues project permissions, you'll see that these have been updated to include the Anyone group.
Step 2: Configure Field Configuration Scheme
Go back to the main project page. Look for Field Configuration Scheme, and then click System Default Field Configuration. The View Field Configuration page appears. Note: if you have Secure Administrator Sessions enabled, you will need to login in order to proceed to this page.

Scroll down the table until you see the Reporter row. Note that it currently indicates Required. You'll need to change this.

Click the Optional, in the third column over. The page will refresh. If you then scroll down to the Reporter row again, you'll see that this link has now changed to Required. Note: you may need to refresh the page again in order to see this link updated.

Step 3: Configure the Default Assignee
You can configure the default assignee as either a user or as Unassigned. You'll review both options here. Let's start with Unassigned.
From the Administration menu, select your target project. On the left navigation bar, under Global Settings, look for the Global Configuration link.

Click General Configuration. A page appears listing general configuration settings.

Scroll down until you see the Options table. Look for the Allow unassigned issues item.

By default, this is set to OFF. To enable it, click Edit Configuration, at the bottom of this page.

Make the change, and then click the Update button at the bottom of the page. If you take a look, the setting will have been changed.

Now, lets review configuring a user as the default assignee. From the Administration menu, select the target project. Look for Permission Scheme. Click Edit. The Edit Permissions - Default Permission Scheme page appears. Scroll down the table until you see the Assignable User row.

Click Add. The Add New Permission page appears. Select the Single User radio button, at right, and then enter or select the user that you want to be the assigned user. Also, even though the Assignable User permission is selected by default, at left, be sure to click on it once. This actually sets it.
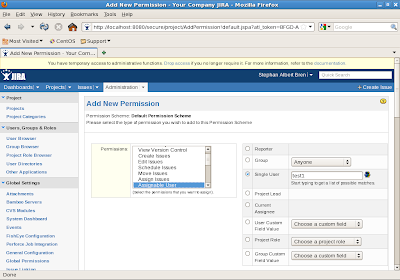
Now click the Add button, at bottom. The browser is navigated back to the Edit Permissions - Default Permission Scheme page. Scroll down a bit until you see the Assignable User issue permission. Note that now a specific user is also shown (in this case test1).

That's it. You're done. In the next and final step, you will perform a test on this change to verify its implementation. For this test, the Assigned User option was implemented and will be tested.
Step 4: Verification
Exit out of the browser instance you used to configure JIRA. Then open a new browser instance and point it to the JIRA main page, but don't login just yet.

In the upper right-hand corner, look for Create Issue. Click on this. A small popup will appear, requesting additional information.

Select the project and type of issue, and then click Create.

Enter the information as desired for your test.

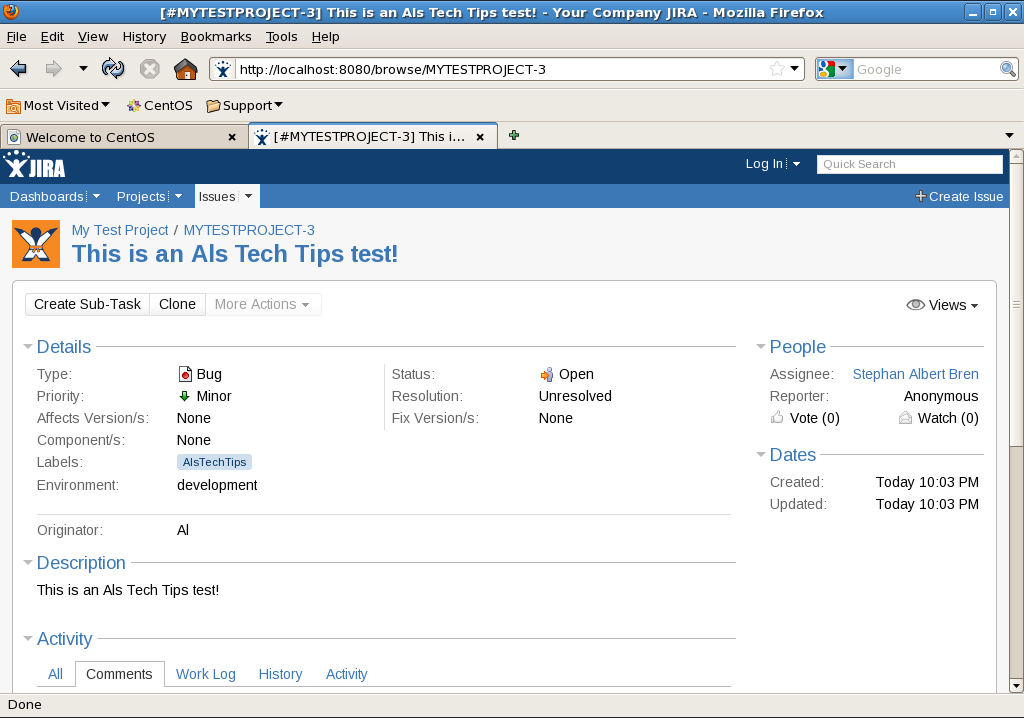
When done, click the Create button, at bottom. The browser will be navigated to a page displaying the new issue.

Congratulations! This completes this walkthrough. Happy coding!
References
In this step-by-step walkthrough, you will be shown how to fully implement an anonymous user in JIRA. Setting up Anonymous User in JIRA involves three discrete steps: 1) configuring the permission scheme, 2) configuring the field configuration scheme, and 3) configuring the default assignee. Each of these steps is presented here. Additionally, you'll also perform a fourth step involving test and verification of the implementation. All references used in this walkthrough are listed below in the References section. Good luck!
Procedure
Step 1: Configure Permission Scheme
Open JIRA. From the Administration menu, select your target project. The main project page appears.

Look for Permission Scheme, and then click Edit. The Edit Permissions - Default Permission Scheme page appears.


For my project, I want anonymous users to be able to create issues and also to browse projects. Using the CTRL key, select both of these. Then, to the right, select the Group radio button, and make sure that the Anyone group is selected.

Then click the Update button. The settings will be saved, and your browser will be navigated back to the Edit Permissions - Default Permission Scheme page. If you check the Browse Projects and Create Issues project permissions, you'll see that these have been updated to include the Anyone group.
Step 2: Configure Field Configuration Scheme
Go back to the main project page. Look for Field Configuration Scheme, and then click System Default Field Configuration. The View Field Configuration page appears. Note: if you have Secure Administrator Sessions enabled, you will need to login in order to proceed to this page.

Scroll down the table until you see the Reporter row. Note that it currently indicates Required. You'll need to change this.

Click the Optional, in the third column over. The page will refresh. If you then scroll down to the Reporter row again, you'll see that this link has now changed to Required. Note: you may need to refresh the page again in order to see this link updated.

Step 3: Configure the Default Assignee
You can configure the default assignee as either a user or as Unassigned. You'll review both options here. Let's start with Unassigned.
From the Administration menu, select your target project. On the left navigation bar, under Global Settings, look for the Global Configuration link.

Click General Configuration. A page appears listing general configuration settings.

Scroll down until you see the Options table. Look for the Allow unassigned issues item.

By default, this is set to OFF. To enable it, click Edit Configuration, at the bottom of this page.

Make the change, and then click the Update button at the bottom of the page. If you take a look, the setting will have been changed.

Now, lets review configuring a user as the default assignee. From the Administration menu, select the target project. Look for Permission Scheme. Click Edit. The Edit Permissions - Default Permission Scheme page appears. Scroll down the table until you see the Assignable User row.

Click Add. The Add New Permission page appears. Select the Single User radio button, at right, and then enter or select the user that you want to be the assigned user. Also, even though the Assignable User permission is selected by default, at left, be sure to click on it once. This actually sets it.

Now click the Add button, at bottom. The browser is navigated back to the Edit Permissions - Default Permission Scheme page. Scroll down a bit until you see the Assignable User issue permission. Note that now a specific user is also shown (in this case test1).

That's it. You're done. In the next and final step, you will perform a test on this change to verify its implementation. For this test, the Assigned User option was implemented and will be tested.
Step 4: Verification
Exit out of the browser instance you used to configure JIRA. Then open a new browser instance and point it to the JIRA main page, but don't login just yet.

In the upper right-hand corner, look for Create Issue. Click on this. A small popup will appear, requesting additional information.

Select the project and type of issue, and then click Create.

Enter the information as desired for your test.

When done, click the Create button, at bottom. The browser will be navigated to a page displaying the new issue.
Congratulations! This completes this walkthrough. Happy coding!
References
- Allowing users to create issues anonymously, JIRA 4.4 EAP Documentation
- Defining a Project, JIRA 4.4 EAP Documentation
- Configuring JIRA Options, JIRA 4.4 EAP Documentation
- Managing Project Permissions, JIRA 4.4 EAP Documentation
- Creating a Notification Scheme, JIRA 4.4 EAP Documentation
- This walkthrough was performed using JIRA 4.3.3 installed in stand-alone configuration on CentOS 5.5 running as a guest OS in VMware Workstation 7.1.4.
- Whether going with Unassigned or setting up a default assignee, you can configure alerts that will be triggered regardless. Alerts are triggered on state changes. To learn more about configuring alerts, see the link in the References section, above.
No comments:
Post a Comment