Friday, January 23, 2015

SharePoint 2013: site collection subsite enumeration report

Introduction

I needed to generate a listing of all sites within a site collection that included the size of each site.  So, I put something together that could get the result done quickly.  It builds upon a script foundation previously developed by Phil Childs.  The link to his posting is provided below.  The script presented here generates site collection size report as an HTML file.  Through suitable modifications you can include other site web parameters in the listing and also get user input for other report customizations.

Script
###############################################################
# Name:        Subsite Report Generator
# Author:
# Date:
# Description: enumerates all sites within the site collection
#              and their sizes. Note that if you enter a path
#              that includes a subsite, this will still analyze
#              the entire site collection.
###############################################################
# Get the site to be analyzed
$SiteURL = Read-Host "Enter a site URL: "
# Create the report container
# ---------------------------
# Save the data and time.  This date and time
# will be used also for generating the report
# filename.
$DateTime = Get-Date
# Use this date/time to generate the report file name
$DateTimeFileString = $DateTime.ToString("yyyyMMddHHmmss")
# Now generate the path/file string
$FilePathString = "D:\SubsiteReport." + $DateTimeFileString + ".html"
# Create a new text file
New-Item $FilePathString -Type File
# Add web page header
Set-Content $FilePathString "<html>"
Add-Content $FilePathString "<body>"
Add-Content $FilePathString "<head>"
Add-Content $FilePathString "<style>"
Add-Content $FilePathString "td.number{text-align:right;}"
Add-Content $FilePathString "</style>"
Add-Content $FilePathString "</head>"
# Add the date/time to the top of the file
[string]$StringToWrite = "<p> Date:" + $DateTime + "</p>"
Add-Content $FilePathString $StringToWrite
# Add a header to the report
# --------------------------
$StringToWrite = "<p>Site Collection Subsites Report</p>"
Add-Content $FilePathString $StringToWrite
$StringToWrite = "<p>Generated on host " + $env:Computername + " by " + $env:UserName + "</p>"
Add-Content $FilePathString $StringToWrite
Add-Content $FilePathString "<p>=====================================================</p>"
Add-Content $FilePathString "<table border='1'>"
Add-Content $FilePathString "<tr><th>#</th><th>Site Name</th><th>Path</th><th>Size (MB)</th></tr>"
#Get Size of all Sub-sites in a Site Collection
[void][System.Reflection.Assembly]::LoadWithPartialName("Microsoft.SharePoint")
$SiteNumber = 1
$TotalSize = 0
# Function to calculate folder size
Function CalculateFolderSize($Folder)
{
    [long]$FolderSize = 1
    foreach ($File in $Folder.Files)
    {
   #Get File Size
        $FolderSize += $file.TotalLength;
   #Get the Versions Size
        foreach ($FileVersion in $File.Versions)
        {
            $FolderSize += $FileVersion.Size
        }
    }
#Iterate through all subfolders
    foreach ($SubFolder in $Folder.SubFolders)
    {
#Call the function recursively
        $FolderSize += CalculateFolderSize $SubFolder
    }
    return $FolderSize
}
$Site = new-object Microsoft.SharePoint.SPSite($SiteURL)
  foreach($Web in $Site.AllWebs)
  {
    #Call function to calculate Folder Size
    [long]$WebSize = CalculateFolderSize($Web.RootFolder)
    #Get Recycle Bin Size
    foreach($RecycleBinItem in $Web.RecycleBin)
        {
           $WebSize += $RecycleBinItem.Size
        }
        $Size = [Math]::Round($WebSize/1MB, 2)
        $TotalSize = $TotalSize + $Size
        $Size = "{0:N2}" -f $size
        $StringToWrite = "<tr><td>" + $SiteNumber + "</td><td>" + $web.Name + "</td><td>" + $web.url + "</td><td class='number'>" + $Size + "</td></tr>"
        Write-Host  $web.Name ":`t" $Size "MB"
        Add-Content $FilePathString  $StringToWrite
        $SiteNumber = $SiteNumber +1
     #Dispose the object
     $web.dispose()
   }
   $StringToWrite = "<tr><td colspan=4>Total size of subsites: " + $totalsize + " MB</td></tr>"
   Add-Content $FilePathString  $StringToWrite
   Add-Content $FilePathString "</table>"
   Add-Content $FilePathString "</html>"
References

Wednesday, January 21, 2015

SharePoint 2013: How to implement NLB

Introduction

This posting walks through the necessary steps for implementing Windows Server 2012 network load balancing with respect to an internal SharePoint 2013 farm hosted on Hyper-V. A unicast configuration will be implemented. Encrypted communication is not used. NLB will be implemented in four stages:
  1. Identify all relevant network information.
  2. Install/verify NLB feature on WFEs.
  3. Configure NLB.
  4. Restart WFEs.
Procedure
  1. Identify Relevant Network Information (note this information down for later reference):
    1. Assigned name of the website
    2. Assigned IP address and subnet mask of the website (AKA the cluster IP address and subnet mask) - be sure to verify this with your NOC
    3. External IPs, subnet masks and network addressesfor each WFE
    4. Determination of whether you will be using unicast or multicast cluster operation
  2. Install/Verify NLB Feature on WFEs
    1. Verify NLB feature installation
    2. If not installed, install it. Use the Add Roles and Features Wizard to install, as it will automatically include other necessary features.
  3. Configure NLB
    1. Using an account that is a member of the local Administrators group, log into the WFE that you want to use as the primary cluster member.
    2. Launch the Network Load Balancing Manager. The Network Load Balancing Manager GUI appears.
    3. Right-click on Network Load Balancing Clusters, and then select New Cluster. The Connect pageof the New Cluster wizard appears, New Cluster: Connect.
    4. Enter the machine name for the Host, and then click the Connect button. On successful connection, a list of NICs will appear below along with their IP addresses.
    5. Select the external NIC, and then click Next.The New Cluster: Host Parameters page is presented.
    6. Select the IP address that you want to use, leave everything else default, and then click Next. The Cluster IP Addresses page of the New Cluster wizard is presented.
    7. Enter the IP address to be used for the cluster, it's subnet mask and full internet name; and then select Unicast from the Cluster generation mode group. Then click Next. The Port Rules page of the New Cluster wizard appears. A default rule will be listed.
    8. Click the Edit button. The Add/Edit Port Rule dialog appears.
    9. Configure as follows:
      1. Cluster IP address: enter this if not entered (do not check the All box).
      2. Port range: leave at default (0 - 65535).
      3. Protocols: Both.
      4. Filtering mode: Multiple host
      5. Affinity: Network.
      6. Timeout: 0
    10. Click OK. The Add/Edit Port Rule dialog closes, and the Port Rules page is displayed again.
    11. Click Finish. The New Cluster dialog closes, and you are returned to the Manager GUI.
  4. Restart WFEs
    NOTE: we found from experience that it is absolutely necessary to restart the WFE's after configuring the NLB.  This seemed to force the network configuration to update and properly associate the domain name with the cluster IP address.
References
Notes
  • Five server SharePoint 2013 farm: one app, one sql, one owa and two wfes.
  • Windows Server 2012 on Hyper-V 2012.
  • Each server: external and private vlan NICs.

Windows Server 2012: The remote host has an ActiveX control installed with multiple vulnerabilities

Problem

System admins informed me that they had ran a scan on one the SharePoint 2013 farm servers and found that flash installation generating warnings:
Synopsis: The remote host has an ActiveX control installed with multiple vulnerabilities.
Description: The remote host is missing KB2758994.  It may, therefore, be affected by the following vulnerabilities related to the installed version of the Adobe Flash ActiveX control :
  - Multiple memory corruption errors exist that could lead to code execution...
  - Multiple buffer overflow errors exist that could lead to code execution...
  - An unspecified issue exists having unspecified impact...
Solution: Install Microsoft KB2758994.
Checked Windows Programs and Features, View Installed Updates, but wasn't listed.

Solution

  • Install patch KB2758994.

References

Sunday, January 18, 2015

SharePoint 2013: Optimizing the Search Crawl interval

Introduction

This posting captures the steps performed with regard to optimizing the SharePoint 2013 search crawl interval for a customer farm.  Content size includes approximately 100,000 items in two content databases, totaling approximately 60 GB.  The customer farm has approximately 320 users, of which about 30% engage the farm on any given workday.  Query usage is minimal.  However, a number of new search-driven web parts have been implemented and other, content query web parts are being migrated to search-driven implementations.  The move to search-driven web parts was precipitated by the migration to SharePoint 2013.

Originally, a crawl interval of 2 hours had been adequate.  However, after the migration to 2013, the customer implemented search-driven web parts requiring more a current index.  Before implementing a shorter crawl interval, a study was performed to examine crawl intervals and determine what the optimum crawl interval would be.

Much more data was collected then presented here.  This posting presents just the most salient charts and data that was collected.  The study found that a crawl interval of 30 minutes was optimal for the customer content.  Further decreases in the crawl interval did not realize any significant gains in crawl freshness - neither did the use of continuous crawling.

Procedure
  1. Determine baseline
    1. Configuration
      1. Full crawl: weekly on Sundays 10:00 PM.
      2. Incrementals: daily, M-F, every 2 hours, 7:00 AM - 6:00 PM
      3. Topology
    2. Application Server Performance
      1. Baseline: 2-hour Daily Incrementals
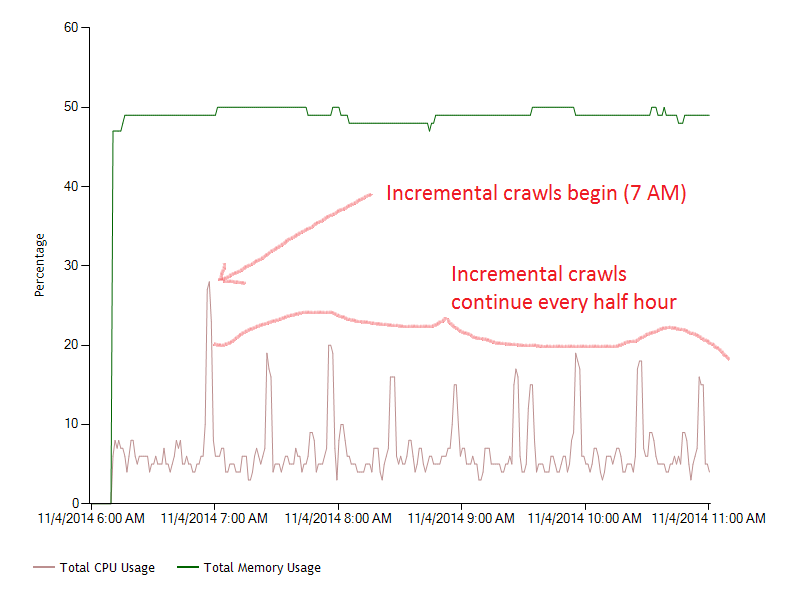
        1. CPU and Memory: the spikes are the semi-hourly incremental crawls.  memory usage averages 50%.  This allocation is not solely for crawl but is harnessed for all search system components.
        2. Processes
        3. Percentage CPU usage: Contrast NodeRunner memory usage in the above graph with CPU usage in this one:
        4. Analysis: these graphs showed reasonable application server resource usage.  No issues.
      2. Baseline: Weekly
        1. CPU and Memory: These 8-day charts indicate a fairly reliable understanding of CPU and memory impacts of crawl component.
        2. Processes: There does seem to be a general upward trend in nodeRunner resource usage.  I don’t believe that this is associated with crawl rate since the crawl rate has remained unchanged during this period.  I suspect it is associated with increasing content size.  Whatever the case may be, this deserves monitoring for its own sake as crawl rate is increased.
        3. Percentage CPU usage: CPU usage frequently peaks at 60% for full crawls.  Incremental crawl peaks are peaking at 30%.
        4. Analysis: these results demonstrated to me that application server load was well within acceptable limits, and that these results were consistent.
  2. Performing Testing
    1. Test: 60-minute Incremental Crawls
      1. Process size
        1. Daily
      2. Percentage CPU usage
        1. Daily
        2. Weekly
      3. Crawl Freshness 
        Summary
        Distribution by freshness
        Content Source
        Aggregate Freshness
        # Documents
        < 10 min
        < 30 min
        < 1 hour
        < 4 hours
        < 12 hours
        < 1 day
        < 2 days
        < 3 days
        > 3 days
        Local SharePoint sites
        < 1 hour
        155
        17%
        60%
        95%
        98%
        98%
        98%
        98%
        100%
        100%
      4. Analysis: No significant crawl-related adverse trends and impacts observed.
    2. Test 30-minute Incremental Crawls
      1. CPU and Memory
        1. Daily 
      2. Process size
        1. Daily 
      3. Percentage CPU
        1. Daily 
      4. Crawl Freshness (over entire workday)
        Summary
        Distribution by freshness
        Content Source
        Aggregate Freshness
        # Documents
        < 10 min
        < 30 min
        < 1 hour
        < 4 hours
        < 12 hours
        < 1 day
        < 2 days
        < 3 days
        > 3 days
        Local SharePoint sites
        < 30 min
        200
        53%
        96%
        100%
        100%
        100%
        100%
        100%
        100%
        100%
      5. Analysis: no significant crawl-related adverse trends and impacts observed; content freshness improved.
    3. Test 15-minute Incremental Crawls
      1. CPU and memory
      2. Process size 
      3. Percentage CPU Usage 
         
      4. Crawl Freshness (over entire workday)
        Summary
        Distribution by freshness
        Content Source
        Aggregate Freshness
        # Documents
        < 10 min
        < 30 min
        < 1 hour
        < 4 hours
        < 12 hours
        < 1 day
        < 2 days
        < 3 days
        > 3 days
        Local SharePoint sites
        < 30 min
        88
        78%
        100%
        100%
        100%
        100%
        100%
        100%
        100%
        100%
      5. WFE Impacts 
      6. Analysis: no significant crawl-related adverse trends and impacts observed; crawl processes seem now close to overlapping; no improvement in crawl freshness.
    4. Test 10-minute Incremental Crawls
      1. Crawl Freshness (over entire workday)
        Summary
        Distribution by freshness
        Content Source
        Aggregate Freshness
        # Documents
        < 10 min
        < 30 min
        < 1 hour
        < 4 hours
        < 12 hours
        < 1 day
        < 2 days
        < 3 days
        > 3 days
        Local SharePoint sites
        < 30 min
        244
        78%
        93%
        93%
        93%
        94%
        100%
        100%
        100%
        100%
      2. Analysis: no improvement.
    5. Test Continuous Crawl
      1. Crawl processes 
      2. Crawl Freshness (over entire workday)
        Summary
        Distribution by freshness
        Content Source
        Aggregate Freshness
        # Documents
        < 10 min
        < 30 min
        < 1 hour
        < 4 hours
        < 12 hours
        < 1 day
        < 2 days
        < 3 days
        > 3 days
        Local SharePoint sites
        < 30 min
        44
        86%
        100%
        100%
        100%
        100%
        100%
        100%
        100%
        100%
      3. Analysis: no improvement.
  3. Determine Conclusions
    Decreasing the crawl interval to less than 30 minutes led to no discernible improvement in crawl freshness. Implementing continuous crawl also did not improve crawl freshness.  Given the results of testing, setting the crawl interval to 30 minutes accomplishes the best crawl freshness performance reasonably achievable for this system.
References
Notes
  • Working through the process of optimizing search crawling significantly improved my understanding of search crawl processes in general across the SharePoint distributed system.

Friday, January 16, 2015

SharePoint 2013: The application-specific permission settings do not grant Local Launch permission for the COM Server application with CLSID 05D1D5D8-18D1-4B83-85ED-A0F99D53C885

Problem

You see the following in a farm server's System log:
Log Name:      System
Source:        Microsoft-Windows-DistributedCOM
Date:          [date/time]
Event ID:      10016
Task Category: None
Level:         Error
Keywords:      Classic
User:          SYSTEM
Computer:      [FarmServer]
Description:
The application-specific permission settings do not grant Local Launch 
permission for the COM Server application with CLSID 
{05D1D5D8-18D1-4B83-85ED-A0F99D53C885}
 and APPID 
{AD65A69D-3831-40D7-9629-9B0B50A93843}
 to the user NT AUTHORITY\SYSTEM SID (S-1-5-18) from address LocalHost 
(Using LRPC) running in the application container Unavailable SID 
(Unavailable). This security permission can be modified using the Component 
Services administrative tool.
Event Xml:
...
Reviewing the event log, you find the error recurring several times a month at various times, but with no immediately evident pattern.

This issue involves the SMS Agent Host application.  You can find this association by launching regedit, and then searching for the AppID in the registry.  From my experience, this issue has not appeared to involve any immediately identifiable problems and so I have ignored it.  If there are subtler issues here, I have not observed them yet.

There is one, perhaps two, solutions to this issue.  The first involves straightforwardly granting application-specific Local Launch permission to the SYSTEM account.  The second involves adding the SYSTEM account to the Distributed COM Users group.  The first method appears to be the one most widely posted.  The second one I found a posting on and tried out, but found that it failed to resolve the problem.

Solution 1: Grant application-specific local launch permission to the SYSTEM account
  1. Login to the target machine using an administrator account.
  2. Launch the Component Services tool.
  3. In the navigation panel, at left, expand: Console Root > Component Services > Computers > My Computer > DCOM Config.
  4. Scroll down to SMS Agent Host.
  5. Right-click and choose Properties.
  6. Select the Security tab.
  7. In the Launch and Activation Permissions group, click the Edit button.
  8. If the SYSTEM account is not listed, add it.
  9. Select the SYSTEM account and then check Allow for all permissions

  10. CLick OK and OK again.
Solution 2: Add SYSTEM account to Distributed COM Users group
  1. Launch Computer Management as an administrator.
  2. In the left navigation panel, expand the tree under Computer Management to Local Users and Groups \ Groups.
  3. Select Distributed COM Users
  4. Double-click Distributed COM Users.
  5. Click the Add button.
  6. Click the Locations button.
  7. Select the server name.
  8. Click OK.
  9. Click the Advanced button.
  10. Click the Find Now button.
  11. Scroll down and select SYSTEM, and then click OK.
  12. Click OK again.
References

SharePoint 2013: The Execute method of job definition Microsoft.Office.Server.UserProfiles.UserProfileImportJob... threw an exception.

Problem

You see the following error occur in a farm application server Application log:
Log Name:      Application
Source:        Microsoft-SharePoint Products-SharePoint Foundation
Date:          [date/time]
Event ID:      6398
Task Category: Timer
Level:         Critical
Keywords:      
User:          [FarmServiceAccount]
Computer:      [FarmAppServer]
Description:
The Execute method of job definition 
Microsoft.Office.Server.UserProfiles.UserProfileImportJob 
(ID a170d607-3f04-4bdd-8d50-4a28c530399d) threw an exception. 
More information is included below.

There was no endpoint listening at 
http://[FarmAppServer]:5725/ResourceManagementService/MEX 
that could accept the message. This is often caused by an 
incorrect address or SOAP action. See InnerException, if 
present, for more details.
Event Xml:
...
This error occurs at one minute intervals and started happening after you rebooted the server (although you didn't catch it right then).  The regularity indicates that this error likely arises from a failed SharePoint scheduled farm job, and this is further corroborated by noting this portion of the error message: Microsoft.Office.Server.UserProfiles.UserProfileImportJob.

Solution

  1. Open the Services control panel.
  2. Look for these two services:
    • Forefront Identity Manager Service
    • Forefront Identity Manager Synchronization Service
  3. Verify that both are started. If they are not, start them right here.
Notes
  • From experience I have observed that some services do not restart on boot and that they must be started manually.  The Forefront Identity Manager Service is one such.  Others include AppFabric, SharePoint Search Host Controller, SharePoint Timer Service and other.
  • The error message here is another example where the hints presented in the error do not adequately point to the underlying cause and can even lead to pursuing unproductive troubleshooting pathways.  The salient clue that I spotted and acted upon was this portion: Microsoft.Office.Server.UserProfiles.UserProfileImportJob.  

SharePoint 2013: The machine-default permission settings do not grant Local Activation permission for the COM Server application with CLSID 000C101C-0000-0000-C000-000000000046

Problem

The following error appears in a SharePoint Server 2013 farm server system log (Windows Server 2012):
Log Name:      System
Source:        Microsoft-Windows-DistributedCOM
Date:          [date/time]
Event ID:      10016
Task Category: None
Level:         Error
Keywords:      Classic
User:          NETWORK SERVICE
Computer:      [farmserver]
Description:
The machine-default permission settings do not grant Local Activation 
permission for the COM Server application with CLSID 
{000C101C-0000-0000-C000-000000000046} and APPID 
{000C101C-0000-0000-C000-000000000046}  to the user 
NT AUTHORITY\NETWORK SERVICE SID (S-1-5-20) from address LocalHost 
(Using LRPC) running in the application container Unavailable SID 
(Unavailable). This security permission can be modified using the 
Component Services administrative tool.
Event Xml:
...
The error seems to occur in a block of times, randomly on any given day.  There error seems simple to resolve: just grant NETWORK SERVICE local activation permission.  However, checking in the server Component Services for the component,
and then viewing the properties of that component,
you find that you cannot modify its properties.

Solution
  1. Login to the machine using an administrator account.
  2. Launch an elevated command prompt.
  3. Execute: regedit.exe.
  4. Navigate the tree to: HKEY_LOCAL_MACHINE\SOFTWARE\Classes\AppID\{000C101C-0000-0000-C000-000000000046}. 
  5. Right-click the key and then select Permissions.
  6. Click the Advanced button.  By default, the TrustedInstaller account has full control.
    Though it may appear that you can edit the permissions of the listed accounts and groups, if you attempt to do so, you will experience an error:
  7. Click the Change link at the top right.
  8. Enter the local Administrators group, and then click OK.
  9. Now select the local administrators group, and then click the Edit button.
  10. Change the permissions to Full Control, and then click OK.
  11. Click OK again and again.
  12. Close the registry editor.
  13. Close the Component Services control panel.
    You can try again right-clicking the component and editing its security settings, but you will likely find them still disabled.  This is because the Component Services panel reflects the security settings that were active at the time you first opened it.  To see the changes, you need to close and re-open the panel.
  14. Open the Component Services control panel as Administrator.
  15. Expand the tree under Console Root to DCOM Config.
  16. In the right panel, scroll down until you find 000C101C-0000-0000-C000-000000000046.
  17. Right-click this component, and then select Properties.
  18. Select the Security tab.
  19. In the Launch and Activation Permissions group, select the Customize option and then click the Edit button.
  20. Add the NETWORK SERVICE account, and then grant it Local Launch (likely already selected) and Local Activation.
  21. Click OK.
References
  1. Error 10016: The machine-default permission settings do not grant Local Activation permission for the COM Server application with CLSID {000C101C-0000-0000-C000-000000000046}
  2. Event ID 10016, KB 920783, and the WSS_WPG Group
  3. Event ID error messages 10016 and 10017 are logged in the System log after you install Windows SharePoint Services 3.0
Notes
  • This seems to be a common error that occurs in farms, as I have seen it occur 2007, 2010 and now 2013 SharePoint versions, across all server types (WFE, App, etc).
  • All farm servers are Windows Server 2012.