Monday, June 30, 2014

SharePoint 2013: Errors were found when compiling the workflow.

Problem

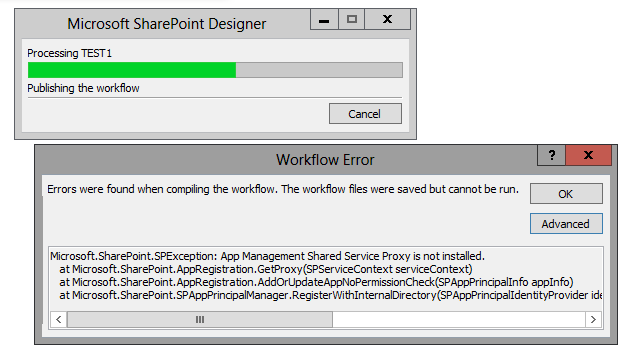
You installed Workflow Manager 1.0 on a SharePoint 2013 farm batch (application) server, and then you installed the Workflow Manager client on all the other farm servers hosting SharePoint Server 2013.  Users then inform you that the SharePoint 2013 Workflow option is available when creating new workflows.  However, whereas, before you installed Workflow Manager 1.0, users could still create 2010 workflows, now, after you installed the client, they experience an error when attempting to publish 2010 workflows:

Solution
  • Reboot the servers on which you installed the Workflow Manager client.  All of them.
References

SharePoint 2013: Session OfficeSearchHealthSession failed to start with the following error: 0xC0000035

Problem

The following error appears in a SharePoint 2013 farm server's Application log:
Log Name:      Microsoft-Windows-Kernel-EventTracing/Admin
Source:        Microsoft-Windows-Kernel-EventTracing
Date:          [Date/Time]
Event ID:      2
Task Category: Session
Level:         Error
Keywords:      Session
User:          [farm service account]
Computer:      [a farm server]
Description:
Session "OfficeSearchHealthSession" failed to start with the following 
error: 0xC0000035
Event Xml:
...
Solution
  • Ignore this error.
  • You can generate it manually by executing the following PowerShell script on the server:
    Start-Job -ScriptBlock {Restart-Service sptracev4}
    $job = Get-SPTimerJob -Identity "Search Health Monitoring - Trace Events"
    $job.Execute([System.Guid]::Empty)
    
    Refresh the Application log.
References
Notes
  • Thanks to Janis Norvelis for presenting the script.  Janis originally presented this script with respect to seeing this error appearing in SharePoint Server 2010 application logs.
  • I have seen this error appear in the Application log of all farm servers hosting SharePoint Server 2013, every 24 hours, separated by approximately one minute intervals among the farm servers.  It occurs on all my farms, both 2010 and 2013.  One example:
    • WFE1: 6:12:03 AM
    • APP1:  6:13:02 AM
    • WFE2: 6:14:03 AM

SharePoint 2013: How to move Central Administration to a new farm server

Introduction

The following simple procedure enables you to move a SharePoint farm's Central Administration web application to another farm server, while also updating the URL shortcut.  There is no need to modify registry entries to accomplish this.  The SharePoint Products Configuration Wizard does everything for you.

Solution
  1. Repeat the following steps on each farm server hosting the Central Administration web application:
    1. As the farm setup user administrator account (eg, spAdmin), remote into the farm server currently hosting the Central Administration web application.
    2. Run the SharePoint Products Configuration Wizard as administrator.
    3. At the Modify server farm Settings page of the wizard, verify that the option Do not disconnect from this server farm is selected, and then click Next.
    4. At the Modify SharePoint Central Administration Web Application Settings page of the wizard, select the option Yes, I want to remove this web site from this machine, and then click Next.
    5. Click Next again.
    6. Once the wizard has finished the configuration, exit the wizard.
    7. Log out of the machine.  At this point, your farm does not have a Central Administration web application.  That's OK.  Don't fret.  You'll be re-installing it momentarily.
  2. Repeat the following steps on each farm server on which you want to host the Central Administration web application:
    1. As the farm setup user administrator account (eg, spAdmin), remote into a farm server on which you want to host the Central Administration web application.
    2. Run the SharePoint Products Configuration Wizard as administrator.
    3. At the Modify server farm Settings page of the wizard, verify that the option Do not disconnect from this server farm is selected, and then click Next.
      • If this is the first time that you are running the wizard to install CA, you will be presented with the Configure SharePoint Central Administration Web Application page, where you can specify a port and authentication provider for the CA web application.  Enter this information, and then click Next.
      • If you are installing CA to yet another farm server (ie, to have two or more instances of CA available), you will be presented with the Completing the SharePoint Productions Configuration Wizard page, but having the Advanced Settings button enabled:
        1. Click the Advanced Settings button.  The Advanced Settings page is displayed.
        2. Select the option, Use this machine to host the web site, and then click OK.  This will not remove the other instance of CA already installed.  It only installs another instance.
    4. Click Next again.
    5. Once the wizard has finished the configuration, exit the wizard.
References
Notes
  • It is imperative that you engage in this procedure while logged in as the farm setup user administrator account.  Only this account (if you installed your farm as this account) has the appropriate permissions necessary to access required folders and registry keys to make the necessary changes.
  • Thanks to Kenneth Marsner and his response to a Central Administation URL change posted in TechNet for describing how to do this.
  • There is absolutely no need to edit the registry in order to move the CA web application and have URLs updated, such as discussed here and here.  While this registry entry is effectively how individual instances of SharePoint Server actually track the URL for CA, editing this key will not update the farm's configuration database and will cause the farm configuration database to be out-of-sync with farm servers with respect to this parameter.  You can see this more clearly by examining the actual syntax of the Central Administration URL: the URL points to psconfigui with a command specified.
  • I was not able to find any specific Microsoft documentation that describes how to do this.  If any reviewer of this posting happens to know, please leave note and URL.
  • After running the SharePoint Products Configuration Wizard, you may see the Missing server side dependencies issue appear again in the farm's Health Report.  I have experienced this every time I run the configuration wizard or psconfig.

Friday, June 27, 2014

SharePoint 2013: Popularity and Search Reports option missing

Problem

You navigate to the top level Site Settings for a site collection and do not see the Popularity and Search Reports in the Site Collection Administration group.  This is likely due to not yet activating the Reporting feature for the site collection.

Solution
  1. Navigate to the top level site collection's Site Settings page.
  2. In the Site Collection Administration group, click Site Collection Features.
  3. On the Site Collection Features page, scroll down until you see the Reporting feature, and then click the Activate button.  The page will refresh to show the new status of the feature.
  4. Navigate back to the top level site collection's Site Settings page.
  5. In the Site Collection Administration group, click the Popularity and Search Reports link.  You will also find a new link in the Site Administration group, Popularity Trends
  6. A new report now appears in the Usage Reports group: Usage.
  7. You'll also see a new option appear in the FILES ribbon's Share & Track group:
  8. But look: the Site Collection Web Analytics reports and Site Web Analytics reports links are no longer displayed in the Site Actions group after activing the Reporting feature for the site collection:
  9. The actual pages, though, are still there: only the links to them have been removed from Site Settings.  To see these reports, just append the following to your site or site collection path: _layouts/15/usageDetails.aspx. Note though that there isn't much to these reports anymore.  SharePoint 2013 does not provide as much usage data nor organize it as well as SharePoint 2010 did.  There are some tools available to help you build usage reports via web server logs: The SharePoint Flavored Weblog Reader(SFWR) v1.4.
References

Wednesday, June 25, 2014

SharePoint 2013: Move a list template from one site collection to another

Tip

When you save a list or library as a template, that template is saved to the site collection's Template Gallery.  This template will then be available to any site in the site collection.  However, it will not be available to sites in other site collections.  To make it available to other site collections, you will need to copy if over.  This tip shows you how.

Steps
  1. Navigate to the list or library that you want to save as a template.
  2. Click LIST, to display the LIST ribbon, and then click List Settings.
  3. In the Permissions and Management group, click Save list as template.
  4. Once done, go to Site Settings, and then click Go to top level site settings, if you aren't yet.
  5. In the Web Designer Galleries group, click List templates.
  6. Select the template you want to copy.
  7. Click FILES above, to display the FILES ribbon, and then click Download a Copy.
  8. Save the copy to any convenient location.
  9. Navigate to the site where you want to create the new list or library based upon this template.
  10. Go to Site Settings, and then click Go to top level site settings, if you aren't yet.
  11. In the Web Designer Galleries group, click List templates.
  12. Click FILES, to display the FILES ribbon, and then click Upload Document.
  13. Upload the template file you created previously.
  14. Now your new template is available in the other site collection.
References

Monday, June 23, 2014

SharePoint 2013: Moving Lists using the Site Content and Structure Tool

Introduction

The Site Content and Structure tool presents a tree navigational structure to all farm objects.  It's made available, after activating the Publishing feature. Using this tool, the administrator can copy, move, add and delete objects within a farm site collection.  It's also handy if you need to migrate a smaller list from on site to another, within a site collection, since it can do this whilst preserving critical security data, such as the identities of those who made changes to a list item. By "small" I mean around 5000 or less. However, there are a few caveats you might not be aware of when using this tool that can adversely impact the migration in unusual ways. These involve: how to copy entire lists and libraries and preserving ID for each moved or copied item.

Copying Entire Lists and Libraries

To begin with, Site Content and Structure cannot copy or move entire lists and libraries - when selected at that list or library object level.  By this I mean that if you select a site in the left tree view pane, and then select the list or library in the right results pane, the Copy and Move options are not available to you from the Actions dropdown.  On the other hand, you can move the entire list or library, if you go about this by selecting the list or library contents, and then selecting Copy or Move.  Here's how to do this:
  1. Connect to the site collection as farm administrator (eg, spAdmin).
  2. Navigate to the target list of library.
  3. Click the LIST tab, and then click List Settings.
  4. Under Permissions Management group, click Save list as template.
  5. Enter information as desired, but be sure NOT to enable the Include Content option.
  6. Click OK.  This saves the list or library as a template to the site collection's Template Gallery from whence you can create new instances of this list or library anywhere else in the site collection.
  7. From the Settings menu, select Site Settings.
  8. On the Site Settings page, look under Site Administration, and then click Content and structure.
  9. In the left tree view pane, open the tree to the desired list or library, and then click this list or library.
  10. In the right pane, increase the list item count sufficiently to include either all of the list items you want migrate or at least to limit the number of times you need to perform this operation.
  11. From the Actions dropdown, select Copy.  You could select Move, but I like to be on the safe side and only delete a source item if I am absolutely sure it is safe to do so.
  12. Navigate to the next 100, 500 or 1000 and repeat.
Preserving List or Library Item ID

If you use the method above to migrate list or library items, and you need to preserve existing item IDs, you must perform the migration correctly each time, one time and without mistakes.  Let me explain.

Let's say you had 100 items in a list.  You want to migrate these to an archive.  You migrate 10 of these over to your archive list.  You check and observe that these ten items in the archive have the same IDs as their counterparts in the live list.  You then migrate another ten, but then realize, after migrating these that you made a mistake and selected the wrong ten.  You then delete these mistaken ten items from the archive.  At this point, your archive list contains the first ten that you migrated over.  Now, you go back to the source list and migrate the next ten over, this time correctly selecting them.  Once the migration completes, you check the IDs of all of the items in the archive and note a curious finding: of the ten new items that you just now migrated to the archive some have IDs that are incremented by 10 from their original values.  So you delete these and again perform the migration.  Now, some of these newly added ten items have IDs that are incremented by 20 from their original values and some by 10.  Do you see what is happening here?  Once an ID is used in a list or library, that's it: it isn't used again.  The more you try to correct this, the more complex become the ID assignments.

Thus, in using the above method, note that it does get the job done without having to purchase a dedicated list migration tool when migrating small lists.  However, when using it, one has to perform the migration correctly.  If any mistakes are made, it's best to delete the destination list or table, recreate it, and start all over again.

References

Thursday, June 19, 2014

SharePoint 2013: The option for the SharePoint 2013 Workflow platform is not available

Problem

I administer a SharePoint 2013 farm.  I had a user who wished to create a workflow using the new SharePoint 2013 Workflow platform.  When the user connected to a website on the farm, using Designer 2013, and then launched the Create workflow process for a list, the following message was displayed in the Create dialog:
The option for the SharePoint 2013 Workflow platform is not available because the workflow service is not configured on the server.  Please contact your server administrator.
This message seemed odd since I knew I had installed the Workflow Manager 1.0 on the application server just fine.  I begen troubleshooting.

Troubleshooting
  1. Check software installation:
    1. Workflow Manager 1.0 installed to application server.
    2. Workflow Manager Client 1.0 installed to all SharePoint servers in farm.
  2. Check workflow services are running.
    1. These should be running on the application server hosting Workflow Manager.
    2. The following services were verified as being started:
      1. Service Bus Gateway
      2. Service Bus Message Broker
      3. Windows Fabric Host Service
      4. Workflow Manager Backend
  3. Check the Workflow Service Application Proxy was started and connected.
  4. Check that the workflow service was registered for HTTP and a valid URL existed (Get-SPWorkflowServiceApplicationProxy).
  5. Check that the Workflow Management Site is started  and correctly served the service configuration schema (h-t-t-p://AppServer:12291).
  6. Check that the Workflow Management Application Pool was started.
  7. Check that web front end reboot after workflow manager client installation.
Solution
  1. Install the Workflow Manager Client on all web front end servers.
  2. Reboot each server after installation.
References

SharePoint 2013: App Management Shared Service Proxy is not installed

Problem

Users report the following error message when trying to publish their 2013 workflows:
Errors were found when compiling the workflow.  The workflow files were saved but cannot be run.
Microsoft.SharePoint.SPException: App Management Shared Service Proxy is not installed.
   at Microsoft.SharePoint.AppRegistration.GetProxy(SPServiceContext serviceContext)
   at Microsoft.SharePoint.AppRegistration.AddOrUpdateAppNoPermissionCheck(SPAppPrincipalInfo appInfo)
   at Microsoft.SharePoint.SPAppPrincipalManager.RegisterWithInternalDirectory(SPAppPrincipalIdentityProvider identityProvider, String nameIdentifier, String displayName, List`1 appEndpointAuthorities, List`1 redirectAddr


Solution
  1. Remote into a SharePoint 2013 farm server using the Administation user setup account.
  2. Launch Central Administration
  3. Navigate to: Application Management > Service Applications > Manage service applications.
  4. On the Service Applications ribbon, click the New button, and then select App Management Service.
  5. Enter configuration information as appropriate.  This is your opportunity to create a simple database name, rather than have one with a long GUID.
    1. This service can use an existing application pool just fine.  I recommend using your farm's general application services app pool.
  6. Click OK.  It takes 1 - 2 minutes for the new service application to be created.  On completion, the page will refresh, and you will see it listed at the top as started.  Though the service application and service application proxy are started, the App Management service itself must still be started.
  7. Navigate to: Application Management > Service Applications > Manage services on server.  Start the service.
References
Notes
  • See the references for details on doing all of this via PowerShell.
  • The App Management service only needs to run on one farm server.   Microsoft does not provide a recommendation on which farm server(s) should run this service.  I recommend starting it on one of your farm's application (or "batch") servers. Having it run on just one server is all that's necessaryto enable users to publish their 2013 workflows. 

Monday, June 16, 2014

SharePoint 2013 Deployment: How to Configure Cache

Introduction
SharePoint 2013 Deployment Series
How to setup a database server alias
How to configure Cache
How to deploy a search service application using PowerShell
This posting walks you through the steps necessary for configuring your SharePoint 2013 farm's caching functions, including: object cache, disk-based (BLOB) cache, and the new (AppFabric) distributed cache.  This posting assumes a traditional SharePoint farm three-tiered topology, where the application server(s) host most services, as well as the farm's CA web application, and the WFEs host primarily the customer-facing web applications and the search query and indexing services.

Preparation
  1. Use only the SharePoint Setup/Administration account when remoting into any SharePoint server to make modifications and configurations.
  2. Verify that the SharePoint Setup/Administration account is a member of the Administrators group on each server.
  3. Verify that the account that you want to use to run the distributed cache service is a member of the Administrators group on each server running SharePoint Server 2013.
  4. Identify domain accounts that you want to use as the Object cache Reader and User accounts (eg, spSuperR, spSuperU).
  5. If you are using HOST files to configure external or internal (or both) static routing amongst your farm servers, check the HOST file on each of the farm servers and verify that the host names in the file are fully qualified.  Otherwise, you may see error event IDs 1000 and 1026 appearing in the application event log of the server hosting the AppFabric service.

Procedure
  1. Configure Object Cache
    1. Add Object Cache Accounts
      1. Reference: Configure object cache user accounts in SharePoint Server 2013
      2. Remote into the application server under the SharePoint setup Administration account.
      3. Go to: Central Administration > Application Management > Manage Web Applications.
      4. Select a web application.
      5. From the ribbon, click User Policy.
      6. Click Add Users.
      7. Leave the zone default as All zones, and then click Next.
      8. In the Choose Users section, add the account that you want to use as the Object Cache Reader.
      9. In the Choose Permissions section, check Enable Read - Has full read-only access.
      10. Click Finish.
      11. Click Add Users again.
      12. Leave the zone default as All zones, and then click Next.
      13. In the Choose Users section, add the account that you want to use as the Object Cache User.
      14. In the Choose Permissions section, check Full Control - Has full control.
      15. Click Finish.
    2. Add Object Cache Account Claims User Names [see note]
      1. Open a SharePoint Management Shell as administrator
      2. Execute the following script:
        $wa = Get-SPWebApplication -Identity "<webapplication>" $wa.Properties["portalsuperuseraccount"] = "i:0#.w|Domain\spSuperU" $wa.Properties["portalsuperreaderaccount"] = "i:0#.w|Domain\spSuperR" $wa.Update()
      3. Execute IISReset on all machines.
    3. Configure Disk-based Cache Settings
      1. Reference: Configure BLOB cache settings
      2. The following steps must be performed on each WFE.
      3. Remote into the WFE under the SharePoint Administrator account.
      4. Go to: C:\inetpub\wwwroot\wss\VirtualDirectories\.
      5. Look for the folder corresponding to your web application and open it.
      6. Look for the file Web.Config.
      7. Open this file in any text editor.
      8. In this file, look for the XML tag, <BlobCache...
      9. Look for these attributes of this tag:
        1. location
        2. enabled
      10. Change the location attribute to whatever is appropriate to your system. 
        Best Practice is to point it to another drive on the WFE so that its write operations do not impact the system drive write operations.
      11. Change the enabled attribute to true.
      12. Save the file.
      13. Repeat for each WFE.
  2. Remove Unnecessary Cache Host
    1. Check AppFabric Status
      1. References: Cache Administration with Windows PowerShell (Windows Server AppFabric Caching) , SharePoint 2013 + Distributed Cache (AppFabric) Troubleshooting
      2. Remote into the application server as the SharePoint setup user administrator account.
      3. Launch the SharePoint Management Shell as administrator.
      4. Run the following script:
        Get-SPServiceInstance | ? {($_.service.tostring()) -eq "SPDistributedCacheService Name=AppFabricCachingService"} | select Server, Status
        This returns a list of your hosts and their network status. You want them all to be online.
      5. In the same shell, run the next script:
        Use-CacheCluster
        Get-CacheHost
        
        This returns the AppFabricCacheService status on each host. They should all be UP.
      6. If these are not UP, the removal will fail.
    2. Remove the host
      1. References: Manage the Distributed Cache service in SharePoint Server 2013, SharePoint 2013: Distributed Cache (AppFabrikCache) part 2/2
      2. Remote into the application server as the SharePoint setup user administrator account.
      3. Launch the SharePoint Management Shell as administrator.
      4. Run the following script:
        $instanceName = “SPDistributedCacheService Name = AppFabricCachingService” $serviceInstance = Get-SPServiceInstance | ? {( $_.service.tostring()) –eq $instanceName –and ($_.server.name) –eq $env:computername $serviceInstance.UnProvision() Remove-SPDistributedCacheServiceInstance
  3. Change Distributed Cache Service Account
    1. Reference: Manage the Distributed Cache service in SharePoint Server 2013: Change the service account, Changing the Distributed Cache Service Account
    2. Remote into the application server as the SharePoint setup user administrator account.
    3. Launch the SharePoint Management Shell as administrator.
    4. Run the following script:
      $Farm = Get-SPFarm $CacheService = $Farm.Services | Where {$_.Name -eq "AppFabricCachingService"} $Account = Get-SPManagedAccount -Identity "Domain\ServiceAccountNamer" $CacheService.ProcessIdentity.CurrentIdentityType = "SpecificUser" $CacheService.ProcessIdentity.ManagedAccount = $Account $CacheService.ProcessIdentity.Update()
Reference
Notes
  • If you implement claims-based authentication, you must add the cache account claims user names to each web application's User Policy.  You do this using PowerShell, and you must use the claims user name format as shown.
  • By default, the distributed cache service is installed on each server to which you installed and configured SharePoint Server 2013.  Thus, if you installed SharePoint Server 2013 first to an application server, this server will be the first to host a cache service instance.  Now, if you are deploying a traditional topology (application server running most services and the CA web application and customer websites running on two or more WFEs), it is unnecessary to run the distributed cache service on the application server as it performs no useful customer function.  Therefore, it can be safely removed from the application server(s) if you want to.  If you are deploying SharePoint Server 2013 to more than three servers, you will definitely need to remove it from at least one of these.
  • To avoid deploying Distributed Cache to a new farm server entirely, use the "-SkipRegisterAsDistributedCacheHost" parameter.
  • It isn't absolutely necessary to remove the distributed cache running an application server.  It will not adversely impact farm operation leaving it there.

Friday, June 13, 2014

SharePoint 2013: Insufficient SQL database permissions for user

Problem

You see the following critical error in a SharePoint Server 2013 farm server hosting a Search service query processing component, occuring at about 13-hour intervals:
Log Name:      Application
Source:        Microsoft-SharePoint Products-SharePoint Foundation
Date:          [date/time]
Event ID:      5214
Task Category: Database
Level:         Critical
Keywords:      
User:          [Search service account]
Computer:      [A query processing host server, eg WFE]
Description:
Insufficient SQL database permissions for user 'Name: [Search service 
account] SID: [SID] ImpersonationLevel: None' in database 
'[FarmConfigurationDB]' on SQL Server instance '[SQL Server Name]'. 
Additional error information from SQL Server is included below.

The EXECUTE permission was denied on the object 'proc_GetTimerRunningJobs', 
database '[FarmConfigurationDB]', schema 'dbo'.
Event Xml:
...
Solution

There are several ways of granting the search service account the necessary permission: granting it the SPDataAccess role to the database; adding the WSS_Content_Application_Pools Database Role to proc_GetTimerRunningJobs and granting that role the Execute permission; and granting the service account the DBO role for the configuration database.  These methods are presented here.  These approaches require that you remote into your farm's SQL Server host and launch SQL Server Management Studio.
  1. Adding the SPDataAccess role:
    1. In Object Explorer, expand the Security node, and then double-click on the search service account (eg, spSearch).  The Login Properties dialog appears.
    2. In the Select a page navigation panel, select User Mapping.
    3. In the Users mapped to this login panel, select the farm configuration database (eg, farm_Config).
    4. Enable the SPDataAccess role
    5. Click OK.
  2. Add WSS_Content_Application_Pools role to proc_GetTimerRunningJobs:
    1. In Object Explorer, expand the Databases node, and then look for the farm configuration database (eg, farm_config).
    2. Under this database node, expand Programmability > Stored Procedures.
    3. Under the Stored Procedures node, scroll down until you find dbo.proc_GetTimerRunningJobs.
    4. Right-click on this object, and then select Properties.  The Stored Procedure Properties dialog appears.
    5. In the Select a page frame, select Permissions.
    6. Click the Search button.  The Select Users or Roles dialog appears.
    7. Enter WSS_Content_Application_Pools and then click the Check Names button.  Brackets should appear around what you entered, indicating that this object name was recognized.
    8. Click OK. The Select Users or Roles dialog closes.  You will see this new role now appear under Users or roles.
    9. Select the WSS_Content_Application_Pools role.
    10. Below, in the Permissions for WSS_Content_Application_Pools panel, enable Grant for the Execute permission.
    11. Click OK.
    12. Exit SQL Server management Studio.
  3. Grant DBO role
    1. Login to the farm's SQL Server instance as administrator.
    2. Launch SQL Server Management Studio and connect to the farm database server.
    3. In the Object Explore pane at left, expand Security, then Logins, and then look for the search service account (eg, spSearch).
    4. Double-click this item.
    5. In the Select a page panel, select User Mapping.
    6. In the Users mapped to this login panel (upper one), select the farm configuration database.
    7. In the Database role membership for panel (lower one), check db_owner.
    8. Click OK.
References
  1. Event ID 5214 (Windows SharePoint Services health model)
  2. Insufficient SQL Server database permissions - Event 5214 (SharePoint 2010 Products)
  3. Search account got - Insufficient sql database permissions for user. EXECUTE permission was denied on the object proc_Gettimerrunningjobs
  4. EXECUTE permission denied on SharePoint Config DB
  5. My Sites and The SPDataAccess SQL Role
  6. Account permissions and security settings in SharePoint 2013
Notes
  • It's unclear to me at this point, which method (1 or 2) is better.  Reading reference [3] would seem to indicate to indicate the second method.  But reference [5] raises an intriguing alternative.  More generally, it's unclear from existing Microsoft documentation (namely, reference [6]), what role the search service account should have with respect to the farm configuration database and the proc_GetTimerRunningJobs stored procedure specifically.  Clarification from Microsoft on what it intended here would be helpful.
  • This posting assumes a farm having a single SQL Server instance.

Thursday, June 12, 2014

SharePoint 2013: People search relevance is not optimized when the Active Directory has errors in the manager reporting structure

Problem

You find the following entry in the SharePoint 2013 Central Administration, Review problems and solutions, All Reports listing:

TitlePeople search relevance is not optimized when the Active Directory has errors in the manager reporting structure
Severity2 - Warning
CategoryConfiguration
ExplanationIn Active Directory, only company leaders should have the 'manager' property set to NULL. As a result of errors, the Active Directory can incorrectly have the 'manager' property set to NULL for other users that can cause a decrease in people search relevance. By specifying the actual leaders of the company, these inconsistencies are not taken into account and the relevance problem is corrected.
RemedySpecify the company leaders explicitly. Use the following PowerShell commands: $upap = Get-SPServiceApplicationProxy [appid]; Add-SPProfileLeader $upap [Domain]\[UserName]. Run 'Get-SPProfileLeader $upap' to check whether the leader was successfully added. As a last step, run a full crawl on the content source containing the start address (URL) of the user profile application. For more information about this rule, see "http://go.microsoft.com/fwlink/?LinkID=248249".
Failing Servers 
Failing ServicesUserProfileService
Rule SettingsView
  
Solution
  1. Determine the company leader or leaders that you want to define.  For example, DOMAIN\Department.Head.
  2. Remote into a farm server (that hosts SharePoint Server) as the farm setup user administrator account.
  3. Grant the farm setup user administrator account full control to the User Profile Service connection.
  4. Open a SharePoint Management Shell as administrator.
  5. Get the User Profile Service application proxy ID by executing the following command:
    Get-SPServiceApplicationProxy
    This returns a list of all the application proxies (and their IDs) on your farm.
  6. Using the ID you obtained in the previous step, now get an instance of the User Profile Service application proxy by executing the following command:
    $upaProxy = Get-SPServiceApplicationProxy [YourUpsApplicationProxyID]
  7. Now add the leader or leaders by repeatedly executing the following command as needed against this instance:
    Add-SPProfileLeader -ProfileServiceApplicationProxy $upaProxy -Name "DOMAIN\Department.Head"
  8. Close the shell.
  9. Navigate to: General Application Settings > Search > Farm Search Administration > Search Service > Content Sources.
  10. Launch a full crawl of user profile content.
  11. Navigate back to the Review problems and solutions page.
  12. Re-analyze the issue.  The results should be immediate.
References
Notes
  • If you are working within an department that is part of a larger organization, and your farm access is limited to the department, identify the most senior leader or leaders in your department. Scope is important here.  For example, for one customer, the farm is accessible only within a specific department of the organization; and thus I configured the User Profile Service connection to only pull those user profiles from the organization's AD that are within the department.  Therefore, in this scenario, the profile leader is the head of the department, because, within the bounds of the department, the department head does not report to anyone else.
  • If you haven't done so yet, configure your User Profile Service content as a separate content source for Search purposes.  Doing so makes it more convenient to perform focus content crawls and thereby minimize impact search crawls may have on farm performance during normal business hours.
  • If you get this error,
    Add-SPProfileLeader : UserProfileApplicationNotAvailableException_Logging :: UserProfileApplicationProxy.ApplicationProperties ProfilePropertyCache does not have 011651c9-c8ce-4520-9eab-d4bcad5534fe At line:1 char:1 + Add-SPProfileLeader + ~~~~~~~~~~~~~~~~~~~ + CategoryInfo : InvalidData: (Microsoft.Offic...CmdletAddLeader:SPCmdletAddLeader) [ Add-SPProfileLeader], UserProfileApplicationNotAvailableException + FullyQualifiedErrorId : Microsoft.Office.Server.UserProfiles.PowerShell.SPCmdletAddLeader
    the account you are running the shell under does not have the necessary permissions.  To fix this, use this procedure.

Wednesday, June 11, 2014

SharePoint 2013: UserProfileApplicationNotAvailableException_Logging... ProfilePropertyCache does not have...

Problem

You've opened a SharePoint 2013 Management Shell as the farm setup user administrator account (eg spAdmin).  You are attempting to add, remove or get SPProfileLeader data.  You can get an instance of the service application proxy just fine; but when you try to perform a command against it, you experience the following error shown in the shell:
Get-SPProfileLeader : UserProfileApplicationNotAvailableException_Logging ::
UserProfileApplicationProxy.ApplicationProperties ProfilePropertyCache 
does not have 48c36bfc-c2de-4a8a-afd5-04885b11c9bb
At line:1 char:1
+ Get-SPProfileLeader -ProfileServiceApplicationProxy $upaProxy
+ ~~~~~~~~~~~~~~~~~~~~~~~~~~~~~~~~~~~~~~~~~~~~~~~~~~~~~~~~~~~~~
    + CategoryInfo          : InvalidData: (Microsoft.Offic...CmdletGetLeader:
SPCmdletGetLeader) [
   Get-SPProfileLeader], UserProfileApplicationNotAvailableException
    + FullyQualifiedErrorId : 
      Microsoft.Office.Server.UserProfiles.PowerShell.SPCmdletGetLeader
Solution
  1. Login to a farm server (that hosts SharePoint Server) as the farm setup user administrator account.
  2. Launch Central Administration as administrator.
  3. Go: Application Management > Service Applications > Manage service applications.
  4. Select (don't click on) your user profile service application.
  5. Up above, on the Service Applications ribbon, click the Permissions button.
  6. Add the farm setup administrator account.
  7. Enable Full Control for this account.
  8. Click OK.
  9. Close out the shell that produced the error message and open a new one as Administrator.
  10. Re-run your commands.
References
Notes
  • Thanks to Network Steve's post and Bram de Jager's post (referenced above) for providing the clues needed to solve this issue.  Steve suggested running the shell and commands under the farm service account to solve the problem I was experiencing.  This hinted at a permissions issue.  Bram's post was completely unrelated to the issue I was experiencing, but reminded me about how accounts are granted access to the User Profile service application.  Integrating the two discussions produced the necessary solution.
  • Traditional SharePoint Server 2013 farm; hosted on Windows Server 2012 VMs.  Hyper-V.  Patched through April 2014 CU.

SharePoint 2013: Add a Link to My Site Quick Launch

Tip

To add a new link to your users My Site quick launch, follow these steps:
  1. Connect to the root site  of the My Site web application as the SharePoint setup administrator account (eg, spAdmin).
  2. Go: Settings > Site Settings > Look and Feel > Quick Launch.
  3. Click New Heading, and then configure as desired.
References
Notes
  • For my users, I added a heading link that navigates users back to their organization's home page.  I changed the order so that this link appears at the top of the quick launch list of links.
  • My 2013 farms are updated through the April 2014 CU.

Thursday, June 5, 2014

SharePoint 2013: Processing this item failed because of an unknown error when trying to parse its contents

Problem

You perform a crawl, and then, checking the crawl log, you see an overwhelming number of errors like the following:
Processing this item failed because of an unknown error when trying to parse its contents...
and
The content processing pipeline failed to process the item...
Solution
  1. Description: the Search Service account requires specific local user rights assignments to function fully, including:
    1. Adjust memory quotas for a process
    2. Impersonate a client after authentication
    3. Replace a process level token
  2. Short term: add the search service account (and the content access service account, if you use such) to the local Administrators group on each server in the farm hosting SharePoint Server.  By default, the members of the local Administrators group are automatically granted most all user rights, including those listed above.
  3. Long-term: request your network administrators to modify your organization's GPO to grant your farm's Search Service account these rights.
References

SharePoint 2013: You do not have an email address

Problem

You recently deployed User Profile Service application to your 2013 farm.  The service runs without issue.  User information appears in their My Sites.  However, when they attempt to configure alerts on lists or document libraries, they experience the following error message:

Troubleshooting
  • Check repeatability: explore the issue further and find that you can't create alerts either; not even with your administrator account. 
  • Determine scope: conduct inquiries among IT staff, you learn that staff are receiving email notifications from process workflows; and from your users you discover that they are receiving notifications when you grant them new permissions.  Therefore, you can logically conclude that the cause is not due to firewall or email server communication issues.
  • Research indicators:  a standard search found a few references involving the error message, all of which seemed to indicate that the problem involved user profile service application configuration, specifically, appropriate mapping of the AD email field.
  • Verify conclusion: perform ad-hoc search of user profiles to view random selection, and then check email address.  None indicated for any user.  Check email field mapping: currently set to default, or aCSPolicyName.
Solution
  1. Launch Central Administration.
  2. Go to: Application Management > Service Applications > Manage service applications > User Profile Service > Manage User Properties.
  3. Scroll down to the Contact Information section and then look for Work email.
  4. Hover the cursor over the Work email field, to expose the drop down, and then select Edit from this drop down.
  5. Scroll down to the Property Mapping for Synchronization section.
  6. Click the Remove button.
  7. In the Add New Mapping section, select mail from the Attribute drop down.
  8. Click the Add button.  A new entry will appear in the Property Mapping for Synchronization.
  9. Click OK.
  10. Go to: Go to: Application Management > Service Applications > Manage service applications > User Profile Service.
  11. In the Synchronization section, click Start Profile Synchronization.
  12. After this completes, wait an additional hour before engaging in any significant testing of alert creation.
References
  1. email not working : The following users do not have e-mail addresses specified
  2. SharePoint 2013 Alert Error: You do not have an email address
  3. Error when you create an alert in Microsoft SharePoint Online in Office 365 for enterprises pre-upgrade: "You do not have an email address"
  4. Configure alert settings for a Web application (SharePoint Server 2010)
  5. Manage user profile synchronization in SharePoint Server 2013
  6. Synchronize user and group profiles in SharePoint Server 2013
  7. Timer job reference (SharePoint 2013)
  8. Troubleshooting Steps for SharePoint Alert Email Does Not Go Out
Notes
  • User email addresses will not be immediately available to the alert creation process after completion of the user profile synchronization.  This is because further internal process must be complete that update internal user profile tables with the new email data.  This internal process involves various User Profile Service jobs that may take some time to complete.  From my own experience, it took upwards of an hour before all users could successfully receive list and library alerts.

Wednesday, June 4, 2014

SQL Server 2012: SQLServer Error: 15404 Could not obtain information about Windows NT group/user

Problem

In SQL Server 2012, you are configuring scheduled backup maintenance plans for your SharePoint 2013 farm databases. When you attempt to execute a maintenance plan, you experience the following error:
[date] [time],,Error,[298] SQLServer Error: 15404 <c/> Could not obtain 
information about Windows NT group/user [Account you are logged in as]<c/> 
error code 0x5. [SQLSTATE 42000] (ConnIsLoginSysAdmin)
Solution
  1. Determine the domain account that you will use to login to SQL Server as (eg, spAdmin) to create the farm database maintenance plans. 
  2. Launch Active Directory Users and Computers as administrator.
  3. Navigate to this account in the directory.
  4. Right-click this account and choose Properties.
  5. Select the Security tab.
  6. Click the Add button.
  7. Enter the SQL Server service domain account and click OK.
  8. On the Properties dialog, select this account in the Group or user names list.
  9. Ensure that Read is enabled and all its subpermissions (eg, Read account restrictions, Read general information, etc).  Disabling and enabling Read automatically enables all the Read subpermissions. 
  10. Click OK.
References
Notes
  • The error presented above appears in the SQL Server Error Logs: [ServerName] > Management > SQL Server Agent > Error Logs.

Tuesday, June 3, 2014

SharePoint 2013: Event 8193: A failure was reported when trying to invoke a service application: EndpointFailure

Problem

You recently rebuilt your SharePoint 2013 farm's Managed Metadata service application, and it runs without issue.  A day later, you check the SharePoint application server application event log, and see the following events:
Log Name:      Application
Source:        Microsoft-SharePoint Products-SharePoint Foundation
Date:          [Date/Time]
Event ID:      8313
Task Category: Topology
Level:         Error
Keywords:      
User:          [Farm Service Account]
Computer:      [Application Server]
Description:
A failure was reported when trying to invoke a service application: EndpointFailure
Process Name: OWSTIMER
Process ID: 1884
AppDomain Name: DefaultDomain
AppDomain ID: 1
Service Application Uri: urn:schemas-microsoft-com:sharepoint:service: 
26fdc21debf74e8a8fbb25146d98c2c4#authority=urn:
uuid:3e1fa89c3f23469f8e4947ba8a99c448&authority=
[Application Server]/Topology/topology.svc
Active Endpoints: 1
Failed Endpoints:1
Affected Endpoint: [Application Server]/26fdc21debf74e8a8fbb25146d98c2c4/
SearchService.svc
Event Xml:
...
and
Log Name:      Application
Source:        Microsoft-SharePoint Products-SharePoint Foundation
Date:          [Date/Time]
Event ID:      8313
Task Category: Topology
Level:         Error
Keywords:      
User:          [Farm Service Account]
Computer:      [Application Server]
Description:
A failure was reported when trying to invoke a service application: 
EndpointFailure
Process Name: w3wp
Process ID: 15280
AppDomain Name: /LM/W3SVC/522633276/ROOT-1-130460993295064685
AppDomain ID: 2
Service Application Uri: urn:schemas-microsoft-com:sharepoint:service:
7c3ac0e364d64a9bad706582b3ae004d#authority=
urn:uuid:3e1fa89c3f23469f8e4947ba8a99c448&authority=
[Application Server]/Topology/topology.svc
Active Endpoints: 1
Failed Endpoints:1
Affected Endpoint: [Application Server]/7c3ac0e364d64a9bad706582b3ae004d/
MetadataWebService.svc
Event Xml:

Solution
  1.  Rebuild the search service application.
References
Notes
  • The reference cited above did not directly apply to our situation but pointed the way to the solution: namely, rebuilding the affected service.