Showing posts with label Security. Show all posts

Sunday, May 5, 2013

SharePoint 2010 SPSecurityTrimmedControl Permissions Enumeration

Introduction

When working with the SPSecurityTrimmedControl, it can be tricky knowing what combination of permissions to employ in order to accomplish the desired security trimming.  The Enumeration List below can help you make that determination easily.  This listing shows the combination of permissions to use to enable Visitors, Contributors, Designers, and/or Owners (full control) to view the items trimmed by this control.

Enumeration List
 
Group Permissions Name Description V C D O
List ManageLists Create and delete lists, add or remove columns in a list, and add or remove public views of a list.       X
List CancelCheckout Discard or check in a document which is checked out to another user.     X X
List AddListItems Add items to lists, add documents to document libraries, and add Web discussion comments.   X X X
List EditListItems Edit items in lists, edit documents in document libraries, edit Web discussion comments in documents, and customize Web Part Pages in document libraries.   X X X
List DeleteListItems Delete items from a list, documents from a document library, and Web discussion comments in documents.   X X X
List ViewListItems View items in lists, documents in document libraries, and view Web discussion comments. X X X X
List ApproveItems Approve a minor version of a list item or document.     X X
List OpenItems View the source of documents with server-side file handlers. X X X X
List ViewVersions View past versions of a list item or document. X X X X
List DeleteVersions Delete past versions of a list item or document.   X X X
List CreateAlerts Create e-mail alerts. X X X X
List ViewFormPages View forms, views, and application pages, and enumerate lists. X X   X
Site ManagePermissions Create and change permission levels on the Web site and assign permissions to users and groups.       X
Site ViewUsageData View reports on Web site usage.       X
Site ManageWeb Grant the ability to perform all administration tasks for the Web site as well as manage content. Activate, deactivate, or edit properties of Web site scoped Features through the object model or through the user interface (UI). When granted on the root Web site of a site collection, activate, deactivate, or edit properties of site collection scoped Features through the object model. To browse to the Site Collection Features page and activate or deactivate site collection scoped Features through the UI, you must be a site collection administrator.       X
Site ManageSubWeb Create subsites such as team sites, Meeting Workspace sites, and Document Workspace sites.       X
Site AddAndCustomizePages Add, change, or delete HTML pages or Web Part Pages, and edit the Web site using a SharePoint Foundation–compatible editor.     X X
Site ApplyThemeAndBorder Apply a theme or borders to the entire Web site.     X X
Site ApplyStyleSheets Apply a style sheet (.css file) to the Web site.     X X
Site CreateGroups Create a group of users that can be used anywhere within the site collection.       X
Site BrowseDirectories Enumerate files and folders in a Web site using Microsoft Office SharePoint Designer 2007 and WebDAV interfaces   X X X
Site CreateSSCSite Create a Web site using Self-Service Site Creation.        
Site ViewPages View pages in a Web site. X X X X
Site EnumeratePermissions Enumerate permissions on the Web site, list, folder, document, or list item.       X
Site BrowseUserInfo View information about users of the Web site. X X X X
Site ManageAlerts Manage alerts for all users of the Web site.       X
Site UseRemoteAPIs Use SOAP, WebDAV, or Microsoft Office SharePoint Designer 2007 interfaces to access the Web site. X X X X
Site UseClientIntegration Use features that launch client applications; otherwise, users must work on documents locally and upload changes. X X X X
Site Open Allow users to open a Web site, list, or folder to access items inside that container. X X X X
Site EditMyUserInfo Allows a user to change his or her user information, such as adding a picture.   X X X
Site ManagePersonalViews Create, change, and delete personal views of lists.   X X X
Site AddDelPrivateWebParts Add or remove personal Web Parts on a Web Part Page.   X X X
Site UpdatePersonalWebParts Update Web Parts to display personalized information.   X X X

References

Sunday, July 17, 2011

How to Secure Your Small-network Firewall Step-by-step

Introduction
 
The following procedure walks you through the process of securing your small network firewall.  Specifically, it walks you through securing an integrated cable gateway/firewall device that functions as your small network's primary access point.  This walkthrough is based upon securing the Linksys WCG200 integrated cable gateway modem access pont.  However, the methods presented here are applicable to all home and small network access points.  This walkthrough assumes that you have correctly configured your gateway for ISP connection and that you are able to access the gateway's administration web page.  It assumes a wired network and does not examine wireless security. It does not address all aspects of home network gateway configuration: only those specific aspects associated with firewall security.  This walkthrough is organized into five steps: 1) disabling remote administration, 2) enabling stateful packet inspection, 3) enabling common packet inspection rules, 4) configuring port filtering, and 5) enabling VPN passthrough.  References pointing to additional details on the topics covered in this walkthrough are provided in the References section.  Good Luck!

Procedure

Step 1: Disable Remote Administration

Remote administration can be hacked using dictionary attack methods.  Best to disable it.  Set Remote Administration to Disable.


The default password on Linksys appliances is often "admin."  Now you know it.  So does everyone else.  Best to change it to something different; something difficult.  Best to create a password that meets the following minimum guidelines:
  • Minimum 8 characters
  • At least one number
  • At least one upper and one lower case numbers
  • At least one special character (subject to what your firewall allows)
One last thing: it's bad practice to allow an external device to be able to remotely reconfigure your gateway/firewall.  What happens if a trojan hijacks your machine and discovers your machine can reconfigure your firewall?  That's what UPnP allows.  Disable it.  It's not worth the trouble to use it.

Step 2: Enable Stateful Packet Inspection

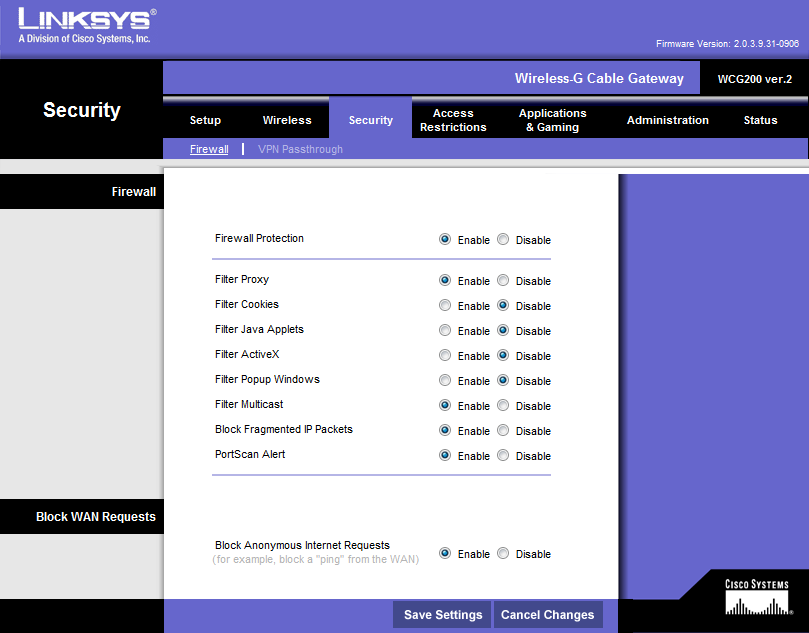
To enable your firewall to look inside packets and filter them based upon their contents, you need to enable Stateful Packet Inspection (SPI). Without SPI switched on, your firewall is handicapped.  Go to the security section of the admin console.  For the WCG200, go: Security > Firewall.  Select Enable for Firewall Protection.


Step 3: Enable common Packet Handling Rules

Some common packet handling rules that you should enable include rules for blocking:
  • Fragmented packets: used to perform IP fragmentation attacks
  • Anonymous Internet requests: used to discover your network topology, including IPs and ports, and to initiate connections to machines on your network - bad news: block these
  • Multicast: used to perform DDoS and remote code execution attacks
Go to the appropriate page to enable these rules.  For the WCG200, go: Security > Firewall.  Then enable options as discussed:


Don't disable Cookies, Java Applets, ActiveX, or popups, as they are needed for most browser viewing of websites. Proxy should be blocked.  It's aslso useful to enable Port Scan alerting: this will log such scans for later analysis. Port scanning is performed by attackers to discover open ports.

Step 4: Configuring Port Filtering

There are 65,535 ports.  You only need to use a few of these.  The rest are open doors to trojans and drive-by surveillance efforts.  A number of ports are known entry/exit points for various trojans, viruses and worms.  Lock them up and block them out.

Before blocking them out, do your homework.  Take an inventory of your special needs: some applications (e.g., games) use special ports; distributed applications may employ special ports; if you VPN to special URLs, log the ports you connect to.  Use terminal commands, such as netstat, to monitor ports and build a baseline inventory of those ports that are commonly used.  TCPView is also a good tool for this.  After a few days of monitoring, you'll build a pretty good idea of what to block and what not to block.  You can do this incrementally: block a certain range; see what happens; if nothing, then block another range - in this fashion, you slowly and inexorably lock down the firewall. Don't panic if you block a port range and then discover that something no longer works.  Just unblock the port range.  That will fix the problem.  Here are common ports you need to keep open:

Port Number Service Description
3389 RDP Remote desktop, both TCP/UDP
995 POP3 Incoming POP3
587 SSL Outgoing SMTP
443 SSL Encrypted website access
110 POP3 Unencrypted email transfer to email server from your machine
80 WWW standard WWW access
68 DHCP Communication with your ISP for modem configuration information
67 DHCP Communication with your ISP for modem configuration information
53 DNS DNS queries
25 SMTP Unencrypted email transfer from email server to your machine
23 SSH Secure shell connection to machine on private network
22 SSH Secure shell connection to machine on private network
21 FTP Ftp command
20 FTP Ftp data transfer

To set up port filter on the WCG200, go: Access Restrictions > Filter Internet Traffic. The WCG200 provides you the ability to specify 10 port filtering ranges. Your own gateway/firewall may be different. On a spreadsheet, map out the ranges that you want to filter. Then enter them into the screen. The following image shows the results of such mapping for a typical home gateway/firewall.


The port filtering rules have been enabled for all devices (0.2-0.254) on the home network.  Note that one special port in the upper range was kept open.  You may need to do likewise.

Step 5: Enable VPN Passthrough

If you connect to a corporate or other private network over the Internet, you must enable virtual private network (VPN) passthrough.  In 2011, most machines use IPsec.  PPTP is still supported for backwards compatability.  Unless you know you need to use PPTP, disable it.


Summary

Congratulations!  You've completed this walkthrough.  Bet you didn't think you could configure such a technical device as your  small network firewall.  For further information on the topics discussed in this walkthrough, consult the references.

References
Notes

Saturday, February 26, 2011

Auditing SELECT Statements in SQL Server 2008 Standard using SQL Trace

Background

This procedure walks you through the process of scripting and implementing a very basic stored procedure for auditing SELECT queries against a SQL Server database.  It does not implement any practical structured error trapping which is reserved for a future article.  A copy of the entire script used in this article is available in the Resources section.  You will use SQL Profiler to draft the framework for the script and then you will use SQL Query Editor to finish it up and implement it.  Let's get started.


Procedure
  1. Start SQL Server Management Studio
  2. From the Tools menu select SQL Server Profiler. A Trace Properties dialog will appear.
  3. Enter a name for the trace
  4. Check Save to file.  A file Save As dialog appears.  Navigate to the directory in which you want to store the output from this trace; enter a file name and then click Save.
  5. Check Server processes trace data.  This completes configuration of the General tab.
  6. On the Trace Properties dialog select the Events Selection tab.
  7. On the Events Selection tab uncheck everything.
  8. Check Show all events  and Show all columns.
  9. Scroll down the list of event groups until you come to the TSQL one
  10. Expand this event group to see its members
  11. Enter a check into SQL: StmtStarting.  You may need to uncheck and then recheck it in order to have all of this event's properties also checked.
  12. Scroll across the list of columns until you see the TextData column.  This property will contain the text of a SQL query triggering this event.
  13. On the Events column, select the SQL: StmtStarting event so that it is highlighted (as in the figure above).
  14. Now click Column Filters.  The Edit Filter dialog appears.  The left pane lists all of the properties associated with the event you selected. 
  15. Scroll down this list until you come to the TextData property.
  16. Select the TextData property.  The right pane updates to show you the filters that you can apply.

  17. Open up the Like filter and then enter: %SELECT%
  18. Click OK.  The Edit Filter dialog closes
  19. Click Run.  The Trace Properties dialog closes and a new dialog appears listing events associated with the trace you created.
  20. In Microsoft SQL Server Management Studio select a table from any database, and then view the top 1000 rows (right-click on the table...).  Now go back to the trace list.  Scroll across until you see the TextData property.  All of the events listed here involve the use of SELECT queries.
  21. On the SQL Server Profiler menu choose File > Export > Script Trace Definition > For SQL Server 2005 - 2008 R2.  A Save As dialog appears.
  22. Navigate to where you want to save this script give it a name and then click Save.
  23. Stop the trace and then exit SQL Server Profiler.  You're all done with this tool.  Now go back to SQL Server Management Studio.
  24. From the File menu select Open > File with New Connection... An Open File dialog appears.
    Navigate to where you saved your script (the file ends with .sql) select it.
  25. Click Open.  A new Connect to Database Engine prompt appears.
  26. Enter the appropriate authentication details and then click Connect.  The script appears in a new query tab. Hang in there - you're almost done.  Now let's do a little editing and cleanup.
  27. Remove the filter on SQL Server Profiler statements.  You'll see it right after the one for the SELECT statement.  This filter isn't really needed and serves no useful purpose.  Just delete the whole line.  Now let's build a better filename generator.
  28. Add the following script just after the BEGIN statement.

  29. Update the create trace stored procedure line with the new filename. 

  30. These few lines of script you added create a new trace file every time the trace is started (such as after a shutdown). Now let's turn this into a new stored procedure.
  31. In Object Explorer open up the master database tree then open up Programmability, and then Stored Procedures.
  32. Right click on Stored Procedures and then select New Stored Procedure.  A new Query Editor tab appears.  In this Query Editor is a template for creating a new stored procedure.  This needs a little editing.
  33. Delete the first comment block (it's going to be removed anyway).  You can remove the first SET statement here as our trace procedure won't be performing any SELECT queries; and you can remove the second SET statement as we'll be using standard identifiers (single quote). Then add a few more lines like those shown below.  The reason being that we want this stored procedure to be applied to SQL: StmtStarting events generated by any database, and thus you need to associate it with the master schema.  The next thing to add is a quick check to make sure this procedure hasn't already been created: Fill out the second comment block as appropriate. 
  34. Now copy everything from your trace script and then paste it in between the BEGIN and END statements in the CREATE PROCEDURE template.  You should have something like that illustrated in the figure below.
  35. Remove the comment block just after the BEGIN statement.  This was entered by SQL Profiler and serves no useful purpose.

  36. Click the Parse button, located on the toolbar.  The Results window appears below the Query Editor window.
  37. Double-click the first line that you see in the Results window.  The Query Editor window scrolls down to the location of the error associated with that line.
  38. Remove the go statement just after the finish: statement.  This is what's causing the parse error. Once you remove this go statement, click Parse again.  The parse will complete successfully.
  39. Click the Save button in the toolbar.  The Save As dialog appears.  Enter a name for the trace and then click Save.
  40. Click the Execute button on the Management Studio toolbar.  This creates the stored procedure.
  41. In Object Explorer, right click on any folder and then select Refresh.
  42. In Object Explorer, open up the tree to master/Programmability/Stored Procedures.  The new stored procedure you just created will be listed below the System Stored Procedures.  Good Job!  I bet you didn't think you could get this far.  Now, the last task is to have SQL Server run the stored procedure and configure SQL Server to automatically start this procedure on startup.
  43. Open a new Query Editor window.
  44. Enter the SQL statements shown below.
  45. Click the Execute button.  A new Results window appears below the script presenting the Trace ID of the trace that was started.  In this case the trace has an ID of 2.
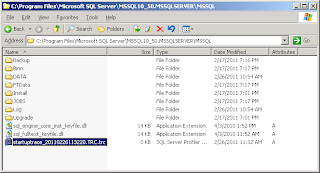
  46. Go to the directory in which this trace file was created and you should see it listed there.

  47. Now let's test our script.  If you shutdown and restart your SQL Server instance, a new trace file should be created.
  48. Shutdown and restart SQL Server, and then refresh the directory window where the trace file is being written to.  A second trace file appears.
  49. The next and final test is to see what events are captured by the trace.  To do this simply execute a read against any table. 
  50. Right-click on a table, and then choose Select Top 1000 Rows.  This executes a SELECT query against the selected table.
  51. Double-click on the trace file to start SQL Server Profiler.  In a results window you will see listed all of the events that were captured.  All of these events should involve a SELECT query, as shown in the figure below.
  52. Congratulations!  You have successfully created a script that captures all events involving any reads of any database in your Microsoft SQL Server instance.
  53. A copy of the entire script is available below.
Notes
  • The method discussed here can be applied to any TSQL query that you may want to audit. 
  • I've used SQL Profiler as a tool to build some of the script for me but you can of course script everything out manually in SQL Query Editor.  SQL Profiler is a good tool to use if you're just starting out with scripting traces, since it scripts most of the significant parts for you.  The only thing it doesn't do for you is implement some good structured error trapping, but you can do this yourself using the Try... Catch structure.
References
Resources

USE master
GO
IF OBJECT_ID('dbo.csp_MyAuditTrace') IS NOT NULL
DROP PROC dbo.csp_MyAuditTrace
GO

-- =============================================
-- Author: Al's Tech Tips
-- Create date: 02/26/2011
-- Description: Audits use of SELECT queries
-- against any database
-- =============================================
CREATE PROCEDURE dbo.csp_MyAuditTrace

AS

BEGIN

-- Set the filename for trace data capture
DECLARE @FileName nvarchar(256)
DECLARE @MyDateTime varchar(30), @instanceroot nvarchar(256)
SET @MyDateTime = CONVERT (nvarchar (30) , GETDATE(), 20)
SET @MyDateTime = REPLACE(@MyDateTime, '-','')
SET @MyDateTime = REPLACE(@MyDateTime, ' ','')
SET @MyDateTime = REPLACE(@MyDateTime,':','')

-- Get the instance specific LOG directory
-- Get the instance specific root directory.
SET @instanceroot = ''
EXEC master.dbo.xp_instance_regread N'HKEY_LOCAL_MACHINE',
N'SOFTWARE\Microsoft\MSSQLServer\Setup', N'SQLPath', @instanceroot OUTPUT

IF @instanceroot = '' OR @instanceroot = NULL
BEGIN
-- Exit the procedure
raiserror ('Could not obtain the instance root directory using xp_instance_regread.',
18,127)
return(1)
END

-- Prepare the Trace file.
IF SUBSTRING(@instanceroot, Len(@instanceroot)-1, 1) != '\'
SET @instanceroot = @instanceroot + '\'

SET @FileName = @instanceroot + 'startuptrace_' + @MyDateTime + '.TRC'

-- Create a Queue
declare @rc int
declare @TraceID int
declare @maxfilesize bigint
set @maxfilesize = 5
exec @rc = sp_trace_create @TraceID output, 2, @FileName, @maxfilesize, NULL
if (@rc != 0) goto error

-- Client side File and Table cannot be scripted

-- Set the events
declare @on bit
set @on = 1
exec sp_trace_setevent @TraceID, 40, 7, @on
exec sp_trace_setevent @TraceID, 40, 55, @on
exec sp_trace_setevent @TraceID, 40, 8, @on
exec sp_trace_setevent @TraceID, 40, 64, @on
exec sp_trace_setevent @TraceID, 40, 1, @on
exec sp_trace_setevent @TraceID, 40, 9, @on
exec sp_trace_setevent @TraceID, 40, 41, @on
exec sp_trace_setevent @TraceID, 40, 49, @on
exec sp_trace_setevent @TraceID, 40, 6, @on
exec sp_trace_setevent @TraceID, 40, 10, @on
exec sp_trace_setevent @TraceID, 40, 14, @on
exec sp_trace_setevent @TraceID, 40, 26, @on
exec sp_trace_setevent @TraceID, 40, 30, @on
exec sp_trace_setevent @TraceID, 40, 50, @on
exec sp_trace_setevent @TraceID, 40, 66, @on
exec sp_trace_setevent @TraceID, 40, 3, @on
exec sp_trace_setevent @TraceID, 40, 11, @on
exec sp_trace_setevent @TraceID, 40, 35, @on
exec sp_trace_setevent @TraceID, 40, 51, @on
exec sp_trace_setevent @TraceID, 40, 4, @on
exec sp_trace_setevent @TraceID, 40, 12, @on
exec sp_trace_setevent @TraceID, 40, 60, @on
exec sp_trace_setevent @TraceID, 40, 5, @on
exec sp_trace_setevent @TraceID, 40, 29, @on
exec sp_trace_setevent @TraceID, 40, 61, @on


-- Set the Filters
declare @intfilter int
declare @bigintfilter bigint

exec sp_trace_setfilter @TraceID, 1, 0, 6, N'%SELECT%'

-- Set the trace status to start
exec sp_trace_setstatus @TraceID, 1

-- display trace id for future references
select TraceID=@TraceID
goto finish

error:
select ErrorCode=@rc

finish:


END
GO