Introduction
This posting walks through the process for how to setup SharePoint 2010 Secure Store and Business Connectivity Services (BCS) to access line of business (LOB) data hosted in the same domain as the SharePoint farm. This posting builds upon the excellent postings previously written on this subject by Marco Cadario, Jardalu, iKarstein, and Kirk Evans, and of course the excellent Microsoft Developer Network articles that focus on SharePoint 2010 business connectivity. Working through this posting creates read access to a table in a database. The LOB data that the BCS in this posting will connect to is the Northwind database hosted on the farm's backend SQL Server instance.
This posting is performed on a small, two-tier development SharePoint 2010 farm hosted on Windows 2008 R2 SP1 and employing NTLM authentication. A Secure Store Service has not previously been manually configured on this machine, but one was setup automatically during the SharePoint Server 2010 initial installation and configuration. The tools that will be used in this posting are: Active Directory User and Computers snap-in, SQL Server 2008 management studio, and SharePoint Server 2010 Central Administration. Setting up Secure Store and BCS to access LOB data involves four main steps:
Step 1: Provision LOB accounts and security groups
This posting has presented a step-by-step walkthrough for how to setup Secure Store and BCS to access LOB data stored in a SQL Server instance within the same domain as the SharePoint Server 2010 instance. Particular attention has been given to the steps involved with configuration of a new External Content type. Additionally, common problems are identified and noted below in the Troubleshooting section.
References
| BI Services Series |
| How to implement SharePoint 2010 Access Services |
| How to setup Secure Store and BCS to access LOB data |
| How to enable document conversion from Word to HTML in SharePoint 2010 |
| How to set up Excel Services to use Secure Store Services and an unattended service account |
This posting is performed on a small, two-tier development SharePoint 2010 farm hosted on Windows 2008 R2 SP1 and employing NTLM authentication. A Secure Store Service has not previously been manually configured on this machine, but one was setup automatically during the SharePoint Server 2010 initial installation and configuration. The tools that will be used in this posting are: Active Directory User and Computers snap-in, SQL Server 2008 management studio, and SharePoint Server 2010 Central Administration. Setting up Secure Store and BCS to access LOB data involves four main steps:
- Provisioning accounts and security groups
- Creating a new Secure Store Service target application
- Creating a new external content type
- Setting BCS object permissions
- Testing
Step 1: Provision LOB accounts and security groups
- Create a new account, contoso\sp_bcs, in Active Directory that will be used to run the Secure Store application pool:

- Create a new security group, BCS1, the members of which will have access to the LOB data:

- Add members to this security group as desired.
- Register the account with SharePoint Server 2010 as a managed account:

- Grant the account access to the LOB database:

- This completes this step.


- In Central Administration, go to the Secure Store Service application:


- On the Edit ribbon, click the Generate New Key button. The Generate New Key dialog appears:See the Troubleshooting section below, if you experience a problem trying to generate a new key.

- Enter a pass phrase that meets the security requirements. For this posting, the pass phrase used was P@ssPhrase1.
- Click OK. The dialog closes, and the focus is returned to the Secure Store Service application page:

- On the Edit ribbon, click the New button. The Specify Settings page of the Create New Secure Store Target Application wizard is presented:

- On this page, configure the fields as desired. For this posting, the following configuration was implemented:
- Target Application ID: BCS1.
- Display Name: BCS1-spdev11-AW.
- Contact Email: Stephan.Bren@contoso.com.
- Target Application Type: Group.
- Target Application Page URL: None.

- Click Next. The Specify the Credentials page of the wizard is presented.
- Enter the field names as desired. For this posting, the following configuration was implemented:
- BCS1 Windows User Name - Windows User Name - Not Masked.
- BCS1 Windows Password - Windows Password - Masked.

- Click Next. The Specify the membership settings page is presented.
- Enter the accounts and groups as desired. For this posting, the following configuration was implemented:
- Target Application Administrators: contoso\Administrator; contoso\Stephan.Bren.
- Members: contoso\BCS1.

- Click OK. The Create New Secure Store Target Application wizard page closes, and the browser is navigated back to the Secure Store Service page, now listing the newly created target application:

- Select this target application, and, on the Edit ribbon, click the Set Credentials button. The Set Credentials for Secure Store Target Application (Group) dialog appears:.
- Enter the information as desired. For this posting, the following configuration was implemented:
- Credential Owners: contoso\Administration; contoso\Stephan.Bren; contoso\sp_bcs1.
- BCS1 Windows User Name: contoso\sp_bcs1.
- BCS1 Windows Password: P@ssw0rd.
- Confirm BCS1 Windows Password: P@ssw0rd.

- Click OK. The dialog closes, and the focus returns to the Secure Store Service page:

- This completes Step 2.


- Open SharePoint Designer 2010.
- Connect to the SharePoint Server 2010 farm.
- In the Navigation pane, select External Content Types:

- On the External Content Types ribbon, click the New External Content Type button. The Results pane updates to display the New External content type pane:

- In the External Content Type Information section, edit the fields as so:
- Name: Northwind.
- Display Name: Northwind.
- Version: [default].
- Identifiers: [default].
- Office Item Type: Generic List.
- Offline Sync for external list: Enabled.
- Click where it states: Click here to discover external data sources an... The Operations Designer pane is displayed:

- Click the Add Connection button. A small popup appears from which you can select the connection type.
- Select SQL Server,:

- Click OK. The popup closes and the SQL Server Connection dialog appears:.
- Enter the configuration information. For this posting, the configuration is the following:
- Database Server: spdev11.
- Database Name: Northwind.
- Name (optional): Northwind.
- Select Connect with Impersonated Windows Identity.
- Secure Store Application ID: BCS1. This is the name assigned to the Secure Store Service target application, back in Step 2:


- Click OK. The SQL Server Connection dialog closes and a progress bar appears momentarily: When the progress bar closes, the focus is returned to the Operation Designer pane, now displaying a closed tree item, Northwind, in the Data Source Explorer tab.

- Expand the tree. The various object groups associated with this database are revealed. Expand the Tables object group and then select the Customers table:Then expand the Customers table object:


- Right-click on the Customers table item in the tree. A popup menu is displayed:

- Select New Read List Operation. The Operations Properties page of the Read List wizard dialog is displayed:

- Click Next. The Filter Parameters Configuration page is displayed.
- Click Next. Leave the CustomerID data source element configuration settings as default, but for all the other fields, enable the Show in Picker setting:

- Click Finish. The dialog closes and the focus changes back to the Operation Designer page:

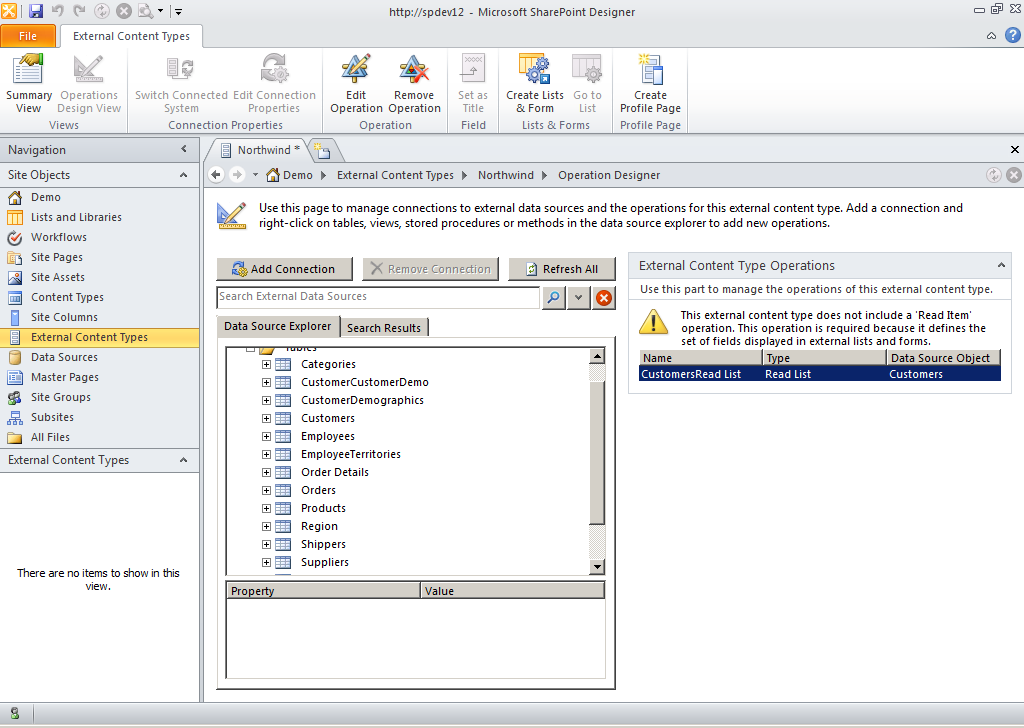
- Look in the External Content Type Operations section: the read list operation is listed. Note also the warning. To resolve this warning, repeat steps 3.12 through 3.17, but this time choosing New Read Item Operation from the popup menu. In other words:
- On the Data Source Explorer tab, scroll down to the Customers table.
- Right-click on the Customers table object.
- Select New Read Item Operation from the popup menu.
- Repeat the configuration steps for the Read Item wizard. Once the Read Item operation has been configured, you will see two operations listed in the External Content Type Operations section:

- Now, back up on the SharePoint Designer UI, select the External Content Types ribbon, and then click the Summary View button. The results pane is updated to display the Summary Results tab. Note that now, the Identifiers field has been populated with the CustomerID(String) field, and the available fields are listed in the Fields section:

- Click the Save button at the top right of the SharePoint Designer UI. This saves the BCS configuration back to the farm.
- Again on the External Content Types ribbon, click the Create Lists & Form button. The Create List and Form dialog appears.
- For this posting, the settings are configured as follows:
- List Name: Northwind_Customers.
- Read Item Operations: CustomersRead Item.
- System Instance: Northwind.
- List Description: [blank]

- Click OK. The dialog closes, and the focus returns to the Summary View. Note that now there is an entry in the External Lists section, at right:

- On the SharePoint Designer UI, in the Navigation pane at right, select Lists and Libraries.
- Next, in the Lists and Libraries panel, now appearing at right, note that there is a new group added, External Lists, and an item in this group, Northwind_Customers, and a new View is also listed:

- Close SharePoint Designer, and then proceed to the next step.


- Launch Central Administration.
- Navigate to the Manage Service Applications page, and then click on the Business Data Connectivity Service application. The Business Data Connectivity Service page is displayed:

- Select Northwind from the list, and then, on the Edit ribbon, click the Set Object Permissions button. The Set Object Permissions dialog appears.
- In this dialog, add the domain administrator account and the Contoso\BCS1 security group to the users and groups to be granted permissions.
- Then configure each on with all of the permissions listed below:

- Click Close. The dialog closes, and the focus returns to the Business Data Connectivity Service page.


- Open a new browser, and then connect (as domain administrator) to the site, spdev12:Note that the Northwind_Customers list appears in the Lists group of quick links.

- Click the Northwind_Customers link. The Northwind_Customers list is shown:

- This completes this procedure.


This posting has presented a step-by-step walkthrough for how to setup Secure Store and BCS to access LOB data stored in a SQL Server instance within the same domain as the SharePoint Server 2010 instance. Particular attention has been given to the steps involved with configuration of a new External Content type. Additionally, common problems are identified and noted below in the Troubleshooting section.
References
- TechNet SharePoint 2010
- Configure the Secure Store Service (SharePoint Server 2010)
- Secure Store service cmdlets (SharePoint Server 2010)
- Developer Network SharePoint 2010
- SharePoint Administrator and Developer Blogs
- How to create and configure Business Connectivity Services on SharePoint 2010
- Secure Store Service - Configuration ( SharePoint 2010 )
- How To: Create, Configure, Consume SharePoint 2010 Secure Store in Business Connectivity Services
- Walkthrough: Create a simple BCS connection with SharePoint Designer 2010
- Setting Up BCS and the Secure Store Service in SharePoint 2010
- Al's Tech Tips
- SharePoint 2010: An error occurred during the Generate Key process
- Cannot logon with credentials obtained from Secure Store Provider
- Developer Network SharePoint 2010
- Consuming External Data Using SharePoint Server 2010 Business Connectivity Services and an Excel 2010 Add-In
- Configuring the Secure Store Service
- MSDN Magazine
- An error occurred during the "Generate Key" process. Please try again or contact your Administration. To solve this problem, see these steps for resolving this problem.
- Cannot logon with credentials obtained from Secure Store Provider. To resolve this problem, see these steps.
- Access Denied by Business Data Connectivity. To resolve this problem, see these steps.
No comments:
Post a Comment